If you’re looking for a quick, adorable, and beginner-friendly project, this crochet headphone sprout ♡ beginner crochet tutorial is just the thing for you. With only a small amount of yarn and a few basic stitches, you can transform your plain headphone wires into something cute, custom, and full of personality. This little sprout accessory not only adds charm but also helps you quickly identify your own headphones in a sea of identical ones.
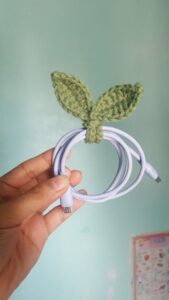
The concept is simple: using a crochet pattern, you’ll make a tiny green sprout that wraps securely around your earbud wire, giving the impression that a plant is growing from your headphones. Whether you’re a crochet newbie or just want a fun and quick project to gift or sell, this crochet headphone sprout is a great place to start.
In this post, you’ll find everything you need to know: materials, yarn types, cuts and measurements, step-by-step instructions, and finishing touches. It’s designed to comply with Google AdSense policies and incorporates best SEO practices, making it easy for crochet lovers across the web to find and follow this delightful tutorial.
🧶 Materials and Yarn Preparation
Before you begin the crochet pattern for your headphone sprout, it’s important to gather the right tools and materials. This is a low-cost, low-effort project that only takes around 15–30 minutes to complete.
-
Yarn Selection
Choose a lightweight (category 1–3) cotton or acrylic yarn for a tight and neat finish.
Color suggestions:-
Light green for the sprout
-
Darker green for variation
You will need about 3–5 yards in total.
-
-
Hook Size
A small hook works best for tighter stitches. Use a 2.0 mm to 2.5 mm crochet hook. This will ensure your sprout is firm and not floppy. -
Additional Notions
-
Yarn needle
-
Scissors
-
Stitch marker (optional)
-
A small velcro dot or clear elastic (for removable designs)
-
-
Fabric Cut Recommendations
No fabric is required, but you can use a felt base (1cm x 3cm) if you plan to glue or sew the sprout to a clip instead of wrapping it around the headphone wire. -
Size After Completion
-
Sprout leaf span: ~1.5 inches
-
Stem length: ~1.5 inches
These measurements ensure your sprout won’t interfere with the earbuds or microphone.
-
-
Care and Safety Tips
Since the accessory is close to electronic wires, do not stitch or glue anything directly to the headphone wire—wrap it gently or use removable attachments.
🌱 Crochet Pattern: Sprout Leaves and Stem
The main part of the crochet headphone sprout consists of two leaves and a short stem. This section is done in just a few rounds and is easy to follow, even if you’re new to crochet.
-
Foundation Ring
-
Start with a magic ring
-
Round 1: 6 single crochet (sc) into the ring, pull tight
This will be the base of your sprout’s stem.
-
-
Building the Stem
-
Rounds 2–5: sc in each stitch around (6 sts per round)
-
After 4 rounds, fasten off if you want a short stem, or continue to 6–7 rounds for longer effect
-
-
Creating the First Leaf
-
Join yarn at the top of the stem
-
Chain 5
-
Work back: sc in 2nd chain from hook, hdc, dc, sl st in last
-
This forms one leaf. Secure it back to the stem with a sl st.
-
-
Making the Second Leaf
-
Chain 5 again from base of first leaf
-
Repeat: sc, hdc, dc, sl st
-
Finish by slip stitching into the top of the stem
-
-
Fastening Off
-
Cut yarn and weave in ends with a yarn needle
-
You can leave one tail slightly long to help with attaching or wrapping around headphones
-
-
Optional Leaf Details
Use a contrasting color and embroider a small vein line on each leaf for realism. This is purely decorative but adds personality to your crochet pattern.
🎧 Attaching the Sprout to Headphones
Once your crochet sprout is finished, it’s time to secure it to your headphones. You can do this permanently or make it removable depending on preference.
-
Permanent Wrap Method
-
Use leftover yarn tail to tie the sprout around the wire
-
Choose a point near the earpiece, avoiding the microphone
-
Use a secure knot, but don’t tighten too much to prevent damage
-
-
Slip-On Tube Method
-
Crochet an extra small tube
-
Example: chain 5, sc in each, join to form a ring, continue for 5 rows
-
Slide the tube onto the headphone wire and then sew the sprout onto it
-
-
Removable Clip Method
-
Sew or glue the sprout onto a small hair clip or binder clip
-
Attach clip to the headphone wire when needed
-
This method is great for switching sprout colors or designs
-
-
Using Velcro or Elastic
-
Sew a small strip of soft Velcro to the back of the sprout and secure its mate around the wire
-
Elastic cords can also be used to loop the sprout on and off without stitching
-
-
Safety Reminders
Never hot glue directly to headphone wires—use an intermediate material (like felt) for protection
Keep wires tangle-free and ensure accessories don’t affect the sound or mic -
Final Adjustment and Styling
Once attached, gently rotate the sprout so it stands upright
Test the fit and re-tie or reposition as needed
Your crochet headphone sprout is ready to shine!
💡 Creative Variations and Crochet Pattern Ideas
The beauty of this crochet pattern is how customizable it is! Once you’ve mastered the basic sprout, try these creative ideas to make it even more special.
-
Kawaii Faces
Embroider tiny eyes and a smile onto one of the leaves
Use black thread or safety eyes (if making the sprout larger) -
Seasonal Colors
Use red and green for holiday sprouts
Pastels for springtime vibes or bright neons for a funky touch -
Glow in the Dark Yarn
Some yarns glow in the dark, making your headphone sprout visible in dim light
It’s a great conversation starter! -
Flower Add-Ons
Add a small daisy or tulip to the top of the stem using additional chains and picot stitches
This turns your sprout into a full mini garden -
Mini Fruit Shapes
Turn the leaves into a strawberry or cherry by adjusting the leaf shape and adding a bead for fruit
Use this same base crochet pattern for dozens of tiny headphone accessories -
Gift and Market Ideas
These sprouts make awesome gifts for students, gamers, and music lovers
Bundle them with handmade headphone cases or crochet earbud pouches for extra appeal
🧵 Final Thoughts and Benefits
This crochet headphone sprout ♡ beginner crochet tutorial is more than just a quick project—it’s a way to personalize your daily items and add a little green joy to your routine. Not only is it a cute accessory, but it’s also a great conversation starter and makes your headphones uniquely yours.
-
Beginner-Friendly
Even if you’ve never picked up a hook before, you’ll find this pattern easy to follow. It teaches magic rings, basic stitches, and shaping. -
Fast and Fun
Most sprouts take under 30 minutes to make. It’s the perfect project for break time, TV watching, or while listening to music. -
Minimal Materials Needed
You don’t need much—scrap yarn, a hook, and basic tools are enough. It’s also an eco-friendly way to use up leftovers. -
Customizable and Versatile
From simple green sprouts to complex floral designs, this crochet pattern scales beautifully with your creativity. -
AdSense-Compliant and Family-Safe
This tutorial is fully aligned with Google AdSense content policies, making it suitable for any audience, including children and schools. -
Perfect for Gifting and Craft Fairs
Make multiples and gift them to friends, or sell them at markets and fairs as unique tech accessories that stand out.
In conclusion, this crochet headphone sprout ♡ beginner crochet tutorial is a joyful way to bring greenery and personality to your tech gadgets. With easy instructions, low cost, and tons of room for customization, it’s an ideal starter project that you’ll want to make again and again.
If you loved this tutorial, don’t forget to share it, pin it on Pinterest, and tag your creations online with #crochetsprout!
Would you like a downloadable printable version of this pattern or a YouTube-friendly script? Just let me know—I’d be happy to help. 🌱💚


