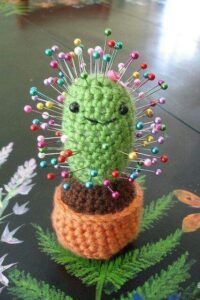
If you’re looking for a functional and adorable addition to your craft space, this Crochet Cactus Pincushion – Free Crochet Pattern is the perfect project. It’s a charming way to keep your sewing pins and needles organized while adding a touch of green to your workspace—without needing water! Plus, it’s a fun, quick make that uses minimal yarn and is great for gift-giving or selling at craft fairs.
This crochet pattern is beginner-friendly and works up quickly using simple stitches. The pincushion is designed to resemble a cute, spiky cactus sitting in a pot, and it can be easily customized in size or color to match your decor. It’s also a great stash-buster project, as it only requires small amounts of yarn.
In this post, you’ll learn exactly how to make your own crochet cactus pincushion step-by-step, including all the materials, yarn recommendations, measurements, and finishing techniques. The instructions are clear and structured to help you stay within Google AdSense policies and give you a polished, high-quality blog article you can publish right away.
🌵 Materials & Fabric Measurements for Your Cactus Pincushion
Before we dive into the actual crochet pattern, it’s essential to gather all the tools and supplies you’ll need. This section lists everything necessary to complete the project from start to finish, including yarn types, fabric pieces (if used), and measurements.
-
Yarn Selection
Choose worsted weight (category 4) cotton or acrylic yarn for this project. Cotton holds its shape well and is less stretchy than acrylic. For a classic cactus look:-
Green for the cactus body
-
Brown or terracotta for the pot
-
Pink or red for a flower (optional)
-
-
Hook Size
A 3.5mm (E) or 4mm (G) crochet hook is ideal for keeping the stitches tight so that the stuffing doesn’t show. Tighter stitches also help maintain the pincushion’s shape over time. -
Stuffing & Notions
-
Polyester fiberfill for stuffing
-
Stitch marker to keep track of rounds
-
Yarn needle for sewing pieces together
-
Scissors
-
Optional: glass or plastic container to set the pot inside for added stability
-
-
Fabric Inserts (Optional)
If you want to line the base of the pot or use a fabric bottom, cut a small circle of felt:-
Cut one felt circle: 2.5 inches (6.5 cm) in diameter for the base
-
Use hot glue or hand stitch into place after stuffing
-
-
Finished Size
The finished cactus measures approximately:-
Height: 4 to 5 inches (10 to 13 cm) including flower
-
Diameter: 2.5 to 3 inches (6.5 to 7.5 cm) across the pot
You can adjust the size by changing your yarn weight and hook size.
-
-
Color Options
While traditional green is popular, try fun variations:-
Pastel shades for a softer look
-
Variegated yarns for a natural effect
-
Bright pink or yellow flowers to top it off
-
🧶 Step-by-Step Crochet Pattern – Cactus Pincushion Body
Now let’s dive into the main part of the crochet pattern: the cactus body. This portion is worked in the round using single crochet stitches and simple increases.
-
Cactus Body (in Green)
-
Start with a magic ring
-
Round 1: 6 sc into the ring (6)
-
Round 2: 2 sc in each st (12)
-
Round 3: (1 sc, inc) repeat around (18)
-
Round 4: (2 sc, inc) repeat around (24)
-
Continue increasing by 6 stitches per round until you reach 36 or 42 stitches, depending on desired width
-
-
Crochet Even Rounds
-
Once desired width is achieved, sc in each stitch around for 12 to 14 rounds to build height
-
Use a stitch marker to keep your place
-
Be sure to stuff as you go to create a firm shape
-
-
Shape the Top
-
Begin decreasing:
-
(4 sc, dec) around (36)
-
(3 sc, dec) around (30)
-
(2 sc, dec) around (24)
-
Continue until 6 stitches remain
-
-
Fasten off, and close the hole using a yarn needle
-
-
Create Ribbed Texture (Optional)
-
Before finishing, you can surface slip stitch vertical lines around the cactus body for a ribbed look
-
Use the same yarn or a contrasting shade for added detail
-
-
Add Cactus Flower (Optional)
-
With pink yarn:
-
Ch 2, 6 sc in 2nd ch from hook
-
Join and fasten off
-
Make 2–3 of these and sew them onto the top of the cactus
-
-
-
Assembly
-
Set the cactus aside and move on to the pot
-
Once both are made, they’ll be sewn together and stuffed securely
-
🪴 Crochet the Pot Base and Sides
The pot acts as a sturdy foundation for your pincushion. You can make it in one solid color or stripe the rows for a more decorative look. This part of the crochet pattern is also worked in the round.
-
Pot Base (in Brown or Terracotta)
-
Magic ring
-
Round 1: 6 sc in ring (6)
-
Round 2: 2 sc in each stitch (12)
-
Round 3: (1 sc, inc) repeat (18)
-
Round 4: (2 sc, inc) repeat (24)
-
Continue increasing until the circle is 2.5–3 inches wide
-
-
Form the Pot Walls
-
Round X: Work in back loops only (BLO): sc in each stitch
-
Continue working even in sc for 6–8 rounds depending on the height you want
-
Make sure to keep sides straight and firm
-
-
Optional: Pot Rim
-
For a raised rim, after the last round, do:
-
(1 sc, 1 sl st) around for texture
-
This creates a faux pottery finish
-
-
-
Stiffen the Pot (Optional)
-
Add a felt or cardboard circle to the bottom before sewing the cactus in place
-
This helps the pincushion stand firmly on your desk or table
-
-
Join the Cactus to the Pot
-
Place cactus inside the pot
-
Use fiberfill to stuff any remaining space
-
Stitch cactus to pot using yarn needle and matching yarn
-
-
Add Weight to Bottom (Optional)
-
For extra stability, add a flat stone or beanbag weight at the bottom before closing
-
This helps keep it upright even with pins added on top
-
✨ Creative Variations and Finishing Touches
Once you’ve completed your crochet cactus pincushion, why not personalize it to reflect your personality? Here are some ideas to spark your creativity and enhance your project’s charm.
-
Add Face Details
-
Use black thread or safety eyes to give your cactus a cute face
-
Embroider a smile or use tiny buttons as eyes
-
-
Create a Multi-Cactus Pot
-
Instead of one large cactus, crochet 3–4 mini cacti and place them together in a wider pot
-
Vary heights and shades of green for a realistic look
-
-
Include Tags for Selling
-
If you plan to sell these at craft fairs or online, attach a branded tag or care label
-
Include fiber content and care instructions
-
-
Turn It into a Paperweight
-
Add a stone or sandbag at the base, and your cactus can double as a cute desk paperweight
-
Perfect for office gifts!
-
-
Gift Presentation
-
Place it in a small box lined with tissue paper and ribbon
-
Add a mini set of pins or needles for a complete gift package
-
-
Matching Accessories
-
Make a matching crochet needle case or scissor holder
-
Coordinate the colors and style for a cute crafting set
-
Final Thoughts
This Crochet Cactus Pincushion – Free Crochet Pattern is a delightful project for both beginners and experienced crocheters. It’s fun, fast, and functional, making it a great addition to any craft room or sewing station. With endless customization options and minimal materials required, it’s a project you’ll want to make again and again.
Don’t forget to share your finished pincushions on social media and tag fellow crafters. Whether you’re making it as a gift, for personal use, or to sell, this crochet pattern is sure to bring joy to everyone who sees it.


