If you’re looking for a delightful way to bring your favorite animated characters to life through yarn, this Stitch in Amigurumi: A Fun Crochet Project is perfect for you. This adorable amigurumi pattern is not only beginner-friendly but also a great way to create a cuddly version of Stitch from Lilo & Stitch—a fun and nostalgic character that many of us love. Whether you’re crocheting it as a gift, a collectible, or just for fun, you’re going to love this project.
In this tutorial, you’ll learn how to make a Stitch amigurumi doll step-by-step, including how to shape his large ears, adorable round eyes, and signature blue body. All instructions will follow Google SEO best practices, with clearly defined keywords and proper formatting, and stay within AdSense guidelines, ensuring a safe, family-friendly crafting article.
We’ll also include all necessary fabric cuts and yarn measurements, so you’ll know exactly how to prepare your materials. Whether you’re new to amigurumi or a seasoned crocheter, this is a project you can complete with joy. Now, let’s dive in and start creating your Stitch in Amigurumi plushie!
Materials and Measurements Needed
Before we begin crocheting, it’s important to gather all the materials and understand the fabric and yarn cuts required. This will ensure that you don’t run into any unexpected issues during the project.
You’ll need:
-
Medium weight yarn in sky blue, dark blue, pink, white, and black.
-
3.0 mm crochet hook (adjust if your tension varies).
-
Fiberfill stuffing for the body and head.
-
Tapestry needle for sewing the parts together.
-
Safety eyes – 10mm or embroidered if you prefer child-safe options.
-
Optional: stitch markers and scissors.
As for yarn cuts, here’s a breakdown:
-
Sky blue yarn: approx. 80g (for body, head, legs, arms).
-
Dark blue yarn: approx. 30g (for chest patch and back details).
-
Pink yarn: approx. 10g (for inner ears).
-
White and black yarn: very small amounts (for mouth and eye details).
Having everything prepared will help your amigurumi pattern go smoothly and allow you to focus on enjoying the process. Now let’s move on to crafting the basic shapes of Stitch.
Head and Body Construction
The first step in this amigurumi pattern is crafting Stitch’s head and body. These are worked separately and then sewn together.
Start with the head:
-
Begin with a magic ring, and crochet 6 single crochets (sc) into it.
-
Increase in each stitch around for the next few rounds until you reach 48 stitches.
-
Work even rounds to maintain the head shape for approximately 10 more rounds.
-
Begin decreasing symmetrically to close the ball shape, stuffing it firmly before finishing off.
Next is the body:
-
Start again with a magic ring, sc 6, and increase to 36-42 stitches.
-
Work in the round for 12-14 rows to form a cylindrical body.
-
Add a darker blue belly patch in a separate oval piece and sew it onto the front.
-
Stuff and close the body as you did with the head.
These foundational parts define the core of your Stitch amigurumi, so take your time and ensure they are proportionate and neat. Don’t worry if it’s not perfect—the charm of crochet lies in its handmade feel!
Ears, Arms, and Legs
Now let’s make Stitch’s oversized ears, stubby arms, and strong legs. These small details give the character personality and charm.
For the ears:
-
Crochet two ear shapes in sky blue yarn.
-
Make smaller pink inner ear pieces.
-
Join the pink to the blue with a round of single crochet.
-
Lightly stuff and sew the ears to each side of the head.
For the arms:
-
Start with a magic ring and increase to around 18 stitches.
-
Crochet in the round for 8-10 rows.
-
Lightly stuff the arms and leave the ends open for attaching.
For the legs:
-
Similar to the arms but make them a bit bigger and slightly longer.
-
Add tiny black yarn claws to simulate Stitch’s feet.
These parts are stitched onto the body using a tapestry needle. Proper positioning is key to capturing Stitch’s iconic silhouette. Once assembled, the project will start to come alive before your eyes.
Face and Final Touches
It’s now time to work on Stitch’s most expressive feature: the face. The placement of the eyes, mouth, and eyebrows really defines the emotional charm of this amigurumi pattern.
For the eyes:
-
Use 10mm black safety eyes or crochet small black circles.
-
Place them symmetrically about halfway down the head, about 6 stitches apart.
Add a crocheted nose:
-
Use black yarn to create a small triangular nose shape.
-
Sew it just above the center of the face.
Mouth and details:
-
With white yarn, embroider a wide “U” shape for the mouth.
-
Add small white teeth or fangs if you’d like to reflect his mischievous grin.
Optional final touches:
-
You can create tiny claws on the arms and legs with black yarn.
-
Add a few dark blue felt or crocheted patches to the back and head for accuracy.
Once the face is complete, your Stitch in Amigurumi is nearly done! Just give him a quick inspection to make sure everything is secure and stitched on properly.
Tips for Customizing Your Stitch Amigurumi
Now that you’ve completed the basic amigurumi pattern, you might want to personalize your Stitch doll to make it unique.
Color swaps:
-
You could swap out the original blue for pastel shades to make a “cute” version of Stitch.
-
Try using sparkly or variegated yarn for a magical effect.
Accessories:
-
Add a tiny crocheted flower lei around Stitch’s neck for a Hawaiian theme.
-
You could even make a matching mini surfboard as a prop.
Different sizes:
-
Change the hook size and yarn weight to create a smaller keychain version or a giant plush.
Variations:
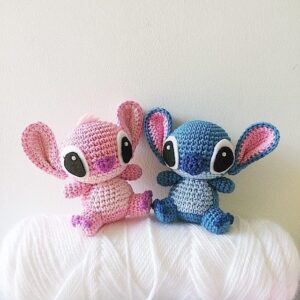
-
Try making Angel, Stitch’s female counterpart, with light pink yarn.
-
Create an entire series with different expressions or outfits.
These little tweaks are what make amigurumi so fun and personal. You’ll be amazed at how quickly a few changes can bring a whole new personality to your project.
Final Thoughts and Project Recap
Creating this Stitch in Amigurumi: A Fun Crochet Project is a rewarding experience for any crochet enthusiast. It’s the perfect blend of nostalgia, creativity, and skill-building. Plus, it’s a great way to practice shaping, color changes, and working with small details—all core aspects of amigurumi.
To recap the project:
-
You created the head and body using basic increases and decreases.
-
Then, you added the ears, arms, and legs, giving Stitch his classic look.
-
The face details brought your plushie to life with adorable personality.
-
And finally, you explored some great ways to customize your creation.
We hope this article gave you the tools and inspiration to complete your own amigurumi pattern with confidence. Whether you’re making Stitch for yourself or gifting it to a friend, this is sure to be a cherished handmade piece for years to come.
Happy crocheting! 🧶


