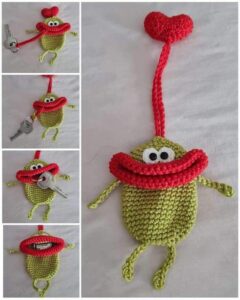
If you love blending creativity with functionality, the Crochet Monster Keycase is the perfect project for your next crafting session. Not only is it adorable, but it also helps keep your keys secure in a fun, imaginative way. Whether you’re a beginner or an experienced maker, this crochet pattern offers a playful way to create something useful while showing off your skills.
The idea of transforming your keys into a little monster might sound silly at first, but once you see how cute and quirky the final result is, you’ll want to make one for every family member and friend. Kids love them, adults laugh at them, and they make great handmade gifts. This is a crochet project that’s as entertaining to make as it is practical to use.
In this step-by-step guide, we’ll walk you through everything—from gathering your materials and shaping your monster to adding details like eyes, teeth, and the zippered mouth. With proper use of SEO techniques and keyword placements, this tutorial is crafted to help crafters around the world discover this clever little creation.
Materials Needed to Make Your Monster
To begin your Crochet Monster Keycase, you’ll need to gather some basic materials and tools. Most of these items are inexpensive and might already be in your stash if you’ve worked on small crochet projects before. The goal here is to keep things simple and accessible.
Start with worsted weight yarn in at least two or three colors. Bright, contrasting shades work best for that fun monster vibe—think lime green, royal blue, hot pink, or neon orange. You can mix and match colors for the body, arms, eyes, and details like teeth or spots.
You’ll need a 3.5 mm or 4 mm crochet hook, depending on your tension. This size will give you a firm stitch that helps the monster keep its shape. A tight fabric is ideal to hold your keys and maintain durability.
To form the monster’s mouth, use a small zipper, about 8–10 cm (3–4 inches) long. Nylon zippers are ideal, as they’re lightweight and flexible. Choose one in a complementary or contrasting color for added flair.
Other essentials include fiberfill stuffing, stitch markers, a yarn needle, fabric scissors, and a metal keyring or keychain loop. These final components transform the cute creature into a functional key holder.
Optional extras: googly eyes, felt pieces for facial expressions, or safety eyes if you want a neater finish. These details personalize your crochet pattern and make each monster unique.
You’ll also need a small piece of cotton or felt fabric, around 10 x 10 cm, to sew inside the mouth section, keeping keys from poking out. Don’t worry—we’ll walk you through the placement later in the pattern!
Step-by-Step: Crochet the Monster Body
Now that you have your materials, it’s time to dive into the actual crochet pattern. The base of your monster will be a pouch shape that holds the keys. We’ll then build out the fun parts like limbs and facial features.
Start with the monster body using your main yarn color.
Monster Body Pattern:
-
Chain 21
-
Round 1: SC in 2nd ch from hook, SC across, turn work and SC on the other side of the chain (40 SC)
-
Round 2–20: SC in each stitch around to build the pouch
-
At desired height (around 10 cm or 4 inches), fasten off and leave a long tail
-
Fold in half and sew sides together (or continue in the round if preferred)
-
Set aside to insert zipper later
Next, stitch the zipper across the top opening. Pin it in place and sew securely with matching thread or yarn. The monster’s “mouth” is now open for business—literally!
To prevent keys from slipping out, cut a felt or fabric lining just slightly larger than the zipper opening. Stitch it to the inside top of the pouch using whip stitch or hot glue.
Attach your metal keyring by looping it through the side of the body or into a crocheted tab you create. Make sure it’s firmly secured so it can withstand daily use.
Now your basic monster key pouch is formed. It’s time to have fun with the creative details that give it character and charm.
Make It Fun: Arms, Legs, Eyes, and Teeth
No crochet monster is complete without limbs and a wild expression. This section of the crochet pattern focuses on the add-ons that turn a key pouch into a funny little companion with personality.
Monster Arms & Legs
-
Chain 6
-
Row 1: SC in 2nd ch from hook and across (5 SC)
-
Rows 2–5: SC across
-
Fold and stitch sides together to create a tube shape
-
Make 2 arms and 2 legs in desired colors
-
Sew them to the monster body sides and bottom
Monster Eyes (Option 1 – Crochet)
-
Make a magic ring, ch 1, 6 SC in ring, sl st to join
-
Round 2: 2 SC in each stitch (12 SC)
-
Fasten off, sew black felt or yarn to center for pupil
-
Make 2 eyes and attach to top of body
-
Use safety eyes if preferred for a cleaner finish
-
Optional: add eyebrows or eyelids with yarn
Monster Teeth
-
With white yarn, chain 4
-
Turn and SC across
-
Fasten off, cut triangles along one side to mimic sharp teeth
-
Stitch under zipper as if peeking from the mouth
-
You can also cut small felt triangles and glue them on
-
Add a tongue from red felt or crochet for extra silliness
Each monster can be styled differently. One might have one large eye, while another has three! Add spots, stripes, or fuzzy yarn tufts for different textures.
Play around with accessories—hats, bows, glasses—to really make it a one-of-a-kind crochet keycase.
Finishing Touches and Practical Use
Now that your monster is assembled, it’s time to finalize your project. These last steps are essential for turning your craft into a durable, usable crochet keycase.
First, check all the seams and stitched areas. Reinforce the zipper, the arms and legs, and any hanging loops. Since this piece will get daily use, it’s worth making sure everything is secure.
Use a damp cloth to gently wipe the surface and remove any lint or fibers before photographing or packaging. If you’re selling your items or giving them as gifts, neatness matters!
Insert your keys and zip up. Test the zipper several times to ensure smooth motion. You can even add a little ribbon loop at the top for hanging or attaching to a bag.
Want to add a gift tag? Print one with a cute pun like “You’re MONSTER-ific!” or “Have a MONSTER of a day!” This makes it a perfect birthday or back-to-school present.
Store extras in a plastic bag or craft bin to keep them clean. These little key monsters also make great products for craft fairs or handmade shops. They’re quick to make, fun to personalize, and always get smiles!
And there you have it—a complete, eco-friendly, and fun way to showcase your crochet talents while organizing your life. Every key deserves a monster, don’t you think?
Conclusion
The Crochet Monster Keycase is more than just a playful idea—it’s a functional, creative, and joy-filled project that combines style with purpose. By following this step-by-step crochet pattern, you can bring these charming creatures to life while making something truly useful.
This craft is ideal for crafters looking to expand their handmade gift options, Etsy shop inventory, or just have fun. With only a small amount of yarn and simple accessories, you can make multiple keycases with minimal expense and maximum imagination.
So grab your hook, pick out your boldest yarn, and crochet yourself a monster that guards your keys with a grin!


