If you’re new to Amigurumi and searching for a fun and beginner-friendly project, look no further than this guide on how to crochet a strawberry amigurumi keychain for beginners. It’s cute, quick to make, and perfect for personalizing your bags, gifts, or craft table. This tiny fruit-themed accessory is a fantastic way to dive into the world of Amigurumi, and you’ll only need a few supplies to get started.
Amigurumi is a Japanese art form of crocheting small stuffed toys, often used in keychains, decorations, and children’s toys. The technique involves working in the round, using single crochet stitches to form soft, 3D shapes. The best part? You don’t need to be an expert to make something adorable. This Amigurumi pattern is simple and accessible, with clear instructions that anyone can follow.
In this article, you’ll learn how to make a strawberry-shaped Amigurumi keychain from scratch. We’ll go over materials, stitch guides, assembly, and decoration tips. Plus, we’ve optimized this content for Google search using SEO techniques so others can easily find this tutorial. Let’s start your creative journey and learn how to crochet a strawberry Amigurumi keychain for beginners step by step.
Materials and Preparation
To successfully complete your Amigurumi strawberry, it’s important to gather the right materials ahead of time. Fortunately, this project doesn’t require much, making it a budget-friendly and low-commitment crochet experience.
You’ll need worsted weight yarn in three colors: red for the strawberry body, green for the leafy top, and a small amount of white or yellow for the seeds. Cotton yarn works best for Amigurumi because it gives a firm, clean finish, but acrylic is also acceptable, especially for beginners.
Use a 2.5 mm or 3.0 mm crochet hook to keep the stitches tight so the stuffing won’t show. If you’re using thicker yarn, adjust the hook size accordingly. For tiny projects like this, tight stitches are crucial to maintain structure.
You’ll also need polyester stuffing, a yarn needle, stitch marker, and a small keychain ring. A pair of sharp scissors will help when cutting yarn ends neatly. All these tools are readily available in most craft stores or online crochet kits.
If you’re planning to make more than one, consider cutting fabric lining circles for the inside (optional). A circle of 6 cm in diameter works well to add firmness and prevent stuffing from shifting—though it’s entirely optional for a small item like this.
Lastly, set aside about 30–45 minutes for your first try. This Amigurumi pattern is designed to be quick, easy, and stress-free—perfect for beginners or experienced crafters looking for a relaxing mini project.
Crochet the Strawberry Body
Now it’s time to dive into the main part of your project: crocheting the strawberry body. We’ll work in the round using single crochet (sc) stitches. The finished fruit shape will measure about 5 cm tall when made with worsted yarn.
Amigurumi Pattern – Strawberry Body (Red Yarn):
-
Round 1: Make a magic ring, 6 sc into the ring (6)
-
Round 2: Inc in each stitch around (12)
-
Round 3: (1 sc, inc) around (18)
-
Round 4: (2 sc, inc) around (24)
-
Rounds 5–9: Sc in each stitch (24)
-
Round 10: (2 sc, dec) around (18)
-
Round 11: (1 sc, dec) around (12)
-
Round 12: Start stuffing, then dec around (6)
-
Fasten off and weave in the end securely
As you shape the body, stuff it gently but firmly using small bits of fiberfill. Too much stuffing can stretch the stitches, while too little may cause it to collapse. Add stuffing before closing the last round.
The magic ring technique creates a neat, hole-free starting point. If you’re unfamiliar with it, you can substitute by chaining 2 and working into the first chain, though the magic ring offers a more polished look.
Use a stitch marker to keep track of your rounds. This prevents stitch loss or accidental increases, ensuring a balanced, professional-looking shape.
After closing the piece, inspect it for symmetry. It should look like a rounded cone—plump on the bottom and slightly tapered at the top. Congratulations, your strawberry’s body is done!
Crochet and Attach the Leaves
The Amigurumi pattern continues with the leafy green crown. This part sits on top of the strawberry and adds a natural and decorative finish. It’s crocheted separately and sewn on top.
Amigurumi Pattern – Leaf Top (Green Yarn):
-
Chain 2
-
Round 1: Work 6 sc into 2nd chain from hook (6)
-
Round 2: (sc, ch 3, sl st in same st) around (leaf point created)
-
Repeat until 6 leaf points are made
-
Fasten off, leaving a long tail for sewing
Once your leaf crown is complete, center it on top of the red strawberry. Use a yarn needle and the long tail to sew it into place. Stitch carefully between leaf points for a clean finish.
You can slightly curl the leaves upward for a 3D effect. If your stitches are tight, the leaves may naturally pop out a bit, which adds to the whimsical charm of the Amigurumi keychain.
Secure the final stitch and hide the yarn tail inside the body. Gently tug the crown if needed to align the leaves evenly.
The green topper provides contrast and instantly transforms your basic shape into a recognizable strawberry. This is a great chance to personalize with your favorite shades of green—lime, olive, or classic bright green.
Optional: Use small white yarn stitches or embroidery floss to create tiny seed dots all over the red body. Space them evenly for a clean, professional look.
Assembly and Keychain Attachment
Now that your strawberry is fully crocheted, it’s time to assemble the Amigurumi keychain and make it functional. This step is quick and fun—perfect for finishing your project strong.
Use a jump ring or keychain ring with an open loop. Attach it securely to the top of the leaf crown by looping through a stitch or crocheting a small loop with chain stitches (e.g., chain 6 and slip stitch to form a ring).
Insert the keyring hardware and pull the loop through. Make sure it’s tight and centered so the keychain doesn’t tilt when hanging.
You can also sew a small plastic ring or D-ring onto the top using green yarn to match the leaf crown. Make sure to secure it tightly so it won’t loosen with use.
Once your hardware is attached, double-check the shape. If needed, squeeze the strawberry slightly to reshape or fluff it. Add final details such as facial features, beads, or a smile if you want a kawaii-style keychain.
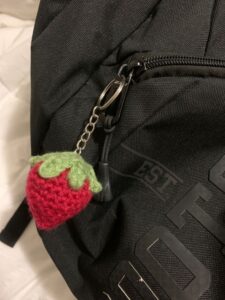
The finished size should be about 5 cm tall and 4 cm wide, making it a perfect fit for purses, keys, or backpack zippers. It’s lightweight yet sturdy thanks to the tight crochet stitches and durable yarn.
This project makes a perfect handmade gift, party favor, or small business product. The fact that it uses minimal yarn and is quick to make means you can easily produce multiples for events or online shops.
Tips for Customization and Selling
Once you’ve mastered this basic Amigurumi pattern, the creative possibilities are endless. Let’s explore some fun ways to modify your keychain and tips for monetizing your new crochet skill.
Try using pastel colors to make fantasy strawberries—lavender, mint green, or baby blue. These make cute and trendy variations that are especially appealing for gift baskets or themed sets.
Add tiny accessories like bows, tiny flowers, or mini charms. These extras can be glued or sewn on and instantly increase perceived value, especially for resale or craft fairs.
If you’re selling your Amigurumi keychains, package them with a branded tag or attach them to a small backing card. Include a note that they’re handmade with care—this adds a personal, artisan touch.
Consider adjusting the pattern to make other fruits—blueberries, cherries, or even lemons—using the same technique. Just swap the yarn colors and slightly tweak the shape.
Market your keychains online using popular tags like #amigurumi, #crochetkeychain, and #handmadegifts. Share progress videos or time-lapse reels to attract attention on social platforms like Instagram or TikTok.
Finally, always follow Google AdSense policies if you’re sharing or monetizing your pattern on a blog. Keep your content family-friendly, original, and valuable—just like this tutorial!
Final Thoughts
Learning how to crochet a strawberry Amigurumi keychain for beginners is a fantastic way to explore the art of Amigurumi. It’s quick, simple, and results in an adorable, functional item you’ll be proud to use or gift.
With just a bit of yarn, time, and love, you can turn simple stitches into a charming keepsake. This project is perfect for practice, selling, or teaching others, and it fits perfectly into any crocheter’s portfolio.
Use this Amigurumi pattern as a springboard to explore more complex shapes, fruit designs, or seasonal items. Crochet is about creativity, joy, and sharing handmade happiness—so keep going and keep creating.
Your strawberry keychain is just the beginning. Happy crocheting!


