If you’ve ever wanted to combine functionality with charm in your kitchen, this Crochet Owl Dishcloth Holder step by step guide is exactly what you need. This creative and practical piece brings both organization and cuteness to your space, helping you keep your dishcloths in place while adding a handmade touch to your décor.
Using a simple Crochet pattern, you’ll learn how to create an adorable owl design that not only looks great but also holds your kitchen towel or dishcloth securely. With basic supplies, a bit of yarn, and some creativity, even beginner crocheters can complete this project confidently.
In this tutorial, we’ll break down each part of the process—from the base body to the wings and eyes—in a clear, structured format. Whether you’re crocheting for your own kitchen or crafting a thoughtful gift, this Crochet Owl Dishcloth Holder will be both delightful and functional.
Materials, Fabric Cuts, and Preparations
Before diving into this Crochet pattern, it’s important to prepare everything you’ll need. Having your materials ready ensures that your crafting session is smooth and enjoyable.
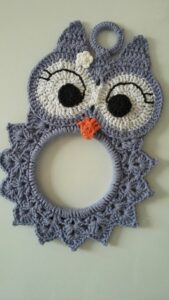
You’ll need worsted weight cotton yarn in at least three colors: one for the body (e.g., brown or gray), one for the belly (e.g., cream or white), and a third for accents (e.g., orange or yellow for the beak and feet). Cotton is best for durability and absorbency, making it ideal for kitchen items like dishcloth holders.
Use a 4.0 mm (G/6) crochet hook, which offers a firm yet flexible structure. You’ll also need stitch markers, a yarn needle, scissors, hot glue or fabric glue (optional), and plastic rings or wooden rings (approximately 5 cm in diameter) to hold the dishcloth.
For the felt pieces (optional), you can cut two white circles of 2.5 cm for the owl’s eyes, and one small triangle (1.5 cm) in orange or yellow for the beak. These can be sewn or glued into place for added texture and detail.
Make sure to have a clean, flat surface where you can lay out your project and work comfortably. Good lighting is key, especially when working with darker yarns or intricate details.
Now that your materials are ready, let’s begin creating this adorable and useful Crochet Owl Dishcloth Holder by starting with the owl’s base body.
Step-by-Step: Creating the Owl Body
The main part of this Crochet pattern is the body, which forms the foundation for the eyes, wings, and towel ring. We’ll use single crochet (sc), half-double crochet (hdc), and increases to shape the round owl base.
Crochet Pattern – Owl Body
-
Round 1: Magic ring, 6 sc into the ring (6)
-
Round 2: Inc in each stitch around (12)
-
Round 3: (1 sc, inc) x 6 (18)
-
Round 4: (2 sc, inc) x 6 (24)
-
Round 5: (3 sc, inc) x 6 (30)
-
Continue increasing by 6 sts per round until you reach 60 sts
Once your circle reaches about 16 cm in diameter, stop increasing and work 5 more rounds evenly to form the body’s height. This will give the owl a slightly oval shape, making it ideal for hanging and holding a towel.
Now, fold the top edge inward and crochet across to flatten the top of the head. This creates the owl’s forehead. You can single crochet 15 stitches across the top to close it and leave a small opening to attach the ring.
Begin stuffing the bottom with a little fiberfill if you want a padded holder, though this is optional. Most designs are left flat for practical hanging use. Be sure to crochet tightly so the fabric is firm.
Weave in all loose ends carefully and prepare to crochet the facial features. These bring personality and detail to your owl, turning it from a circle into a characterful kitchen helper.
Making the Owl’s Eyes, Beak, and Wings
The eyes and beak are the most charming parts of your owl. Let’s crochet them using basic stitches to give your owl a lively, expressive face.
Crochet Pattern – Owl Eyes (Make 2)
-
Magic ring, 6 sc in the ring (6)
-
Round 2: Inc in each stitch around (12)
-
Round 3: (1 sc, inc) x 6 (18)
Fasten off and leave a long tail for sewing. Use a contrasting yarn or black buttons for the pupils.
Beak (in orange yarn)
-
Chain 5
-
Row 1: sc in 2nd chain from hook and across (4 sc)
-
Row 2: dec over first 2 sts, dec over last 2 sts (2)
-
Row 3: dec (1) – fasten off
Use a yarn needle to attach the eyes symmetrically about 4–5 stitches apart. Place the beak just below and centered between the eyes. You can also glue on felt shapes if you prefer a different texture.
Crochet Pattern – Wings (Make 2)
-
Chain 6
-
Row 1: hdc in 2nd ch and across (5)
-
Row 2: hdc dec, 3 hdc (4)
-
Row 3: hdc dec, 2 hdc (3)
-
Row 4: hdc dec, 1 hdc (2)
-
Row 5: hdc dec (1) – finish and fasten off
Sew or glue the wings slightly angled downward, on the side of the body. This gives a cute, friendly look and balances the overall design.
With the facial features in place, your Crochet Owl Dishcloth Holder is starting to come to life. Now, let’s complete the bottom part that holds the dishcloth securely in place.
Adding the Ring and Finishing Touches
The final step in this Crochet pattern is attaching the dishcloth holder ring. This can be a plastic or wooden ring, or a crocheted loop if you prefer an all-yarn design.
Option 1 – Plastic or Wooden Ring Attachment:
Use strong yarn to stitch the ring to the bottom center of the owl. Insert the yarn through both the ring and body several times for a secure hold. Tie off with tight knots and weave in the ends.
Option 2 – Crochet Ring:
-
Chain 40 and join with a sl st to form a circle
-
Round 1: Sc around (40)
-
Round 2: Hdc around (40), sl st to finish
Sew this ring to the owl’s base using the yarn tail
This ring should sit firmly and support a lightweight dish towel. Make sure the positioning is centered so the towel hangs straight and doesn’t tilt the owl.
You can also add a hanger loop to the top. Chain 10 and stitch to the top center of the owl’s head to create a hanging loop. Use the same yarn or a contrasting color for extra flair.
Embellish your owl with extras if you like: a bow, mini buttons, or a heart patch. Just be sure any attachments are safe and firmly secured if the holder will be near heat or moisture.
Congratulations! Your Crochet Owl Dishcloth Holder is ready to use, hang, or gift. Let’s wrap up with some ideas and tips for making your holder truly one-of-a-kind.
Creative Ideas and Final Thoughts
The best part of this project is how customizable it is. With a basic Crochet pattern, you can switch up colors, sizes, and details to match any kitchen theme or personal taste.
Try making a rainbow owl using leftover yarn scraps. Mix and match pastels, bold colors, or neutrals depending on your style. You could even make themed owls for different holidays like Halloween, Christmas, or Valentine’s Day.
If you’re confident with embroidery, stitch feathers onto the belly using backstitch or chain stitch techniques. Add little eyelashes to the eyes for extra cuteness or make sleepy eyes with just a few dashes of yarn.
These make wonderful handmade gifts. Pair them with a matching dish towel or kitchen utensil for a thoughtful housewarming or holiday present. Add a label and wrap in eco-friendly paper for an even more personal touch.
If you’re selling your work, these owls do well at craft fairs and online. Use professional photos, detailed descriptions, and hashtags like #crochet, #crochetpattern, and #handmadekitchen to attract attention.
Keep practicing this Crochet pattern, and don’t be afraid to modify it to make your own signature design. Every owl has its own personality—and so does every crafter!


