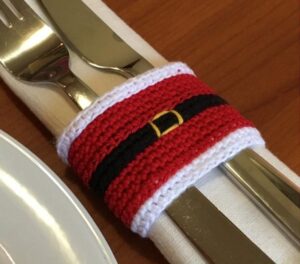
When the holiday season comes around, the little details can make a big difference in creating a cozy and joyful atmosphere. One of the simplest ways to elevate your Christmas table setting is with a handmade crochet cutlery and napkin holder. This practical yet decorative accessory adds charm and warmth to any holiday dinner and makes your guests feel extra special.
If you’re looking for a beginner-friendly Crochet pattern to personalize your Christmas decor, this tutorial is just what you need. These holders are small, quick to make, and perfect for using up yarn scraps. With just a few materials and stitches, you can create beautiful and reusable holiday table accessories.
In this crochet cutlery and napkin holder tutorial #Christmas, we’ll walk you through all the steps to make a festive set of holders, perfect for a dinner party, family gathering, or handmade holiday gift. Get ready to bring out your hooks and yarn and add a handcrafted touch to your Christmas table this year!
Materials, Sizing, and Holiday Color Choices
Before diving into the actual Crochet pattern, it’s essential to gather your supplies and understand the structure of the cutlery holder. This preparation helps ensure consistent sizing and quality throughout your set.
For this crochet project, you’ll need worsted weight cotton yarn in your favorite Christmas shades. Traditional colors like red, green, white, and gold work beautifully, but feel free to customize it to match your home decor or party theme.
Use a 4.0 mm (G/6) crochet hook to keep the stitches tight and the holder firm enough to stand upright on a plate. Cotton yarn is highly recommended because it’s sturdy, washable, and heat-resistant, making it perfect for dinner table use.
Each finished holder should measure approximately 10 cm wide and 18 cm tall (about 4 x 7 inches), with a pouch or flap large enough to fit standard-sized forks, knives, spoons, and a rolled napkin.
In addition to yarn and hook, you’ll need a yarn needle for weaving in ends, scissors, and optionally, decorative buttons or appliqués like tiny crocheted snowflakes, stars, or Santa hats for embellishment.
Prepare your workspace by organizing your yarn colors and tools. If you’re making multiple holders, consider creating an assembly line: crochet all the backs first, then the pouches, then attach the decorative elements.
Crochet the Main Body of the Holder
The foundation of this crochet cutlery and napkin holder is a simple rectangular base. This is where your cutlery and napkin will rest. We’ll use basic stitches to create a firm and evenly shaped rectangle.
Step 1 – Foundation Chain: Start by chaining 21 stitches using your base color (e.g., red or green). This will create the width of your holder.
Step 2 – Row 1: Single crochet (sc) in the second chain from the hook and across. You should have 20 sc at the end of the row. Chain 1 and turn.
Continue working single crochet rows until your piece measures 18 cm (approx. 7 inches) in height. This should take around 35–38 rows, depending on your tension. Always chain 1 and turn at the end of each row.
Once you’ve reached your desired height, fasten off and weave in the ends using a yarn needle. This creates the sturdy back panel of the holder.
If you’d like to add a contrasting border, join another color at any corner and work single crochet evenly around all four edges. This adds a polished, decorative touch.
To make your holder extra festive, you can also stitch around using a picot edge or scallop edging. These give the piece a playful and seasonal appearance, perfect for Christmas.
Creating the Pocket and Joining the Pieces
Now that the back panel is ready, we’ll crochet the pouch portion of the holder. This front pocket will hold the cutlery and napkin, so it needs to be slightly shorter and securely attached to the base.
Step 1 – Pocket Chain: Chain 21 stitches, just like you did for the back panel.
Step 2 – Row 1: Sc in the second chain from the hook and across. (20 sc) Chain 1 and turn.
Work 20 rows of single crochet for a pouch that measures around 10 cm (4 inches) high. This will provide ample room for utensils while keeping them snugly in place.
When your pouch is complete, fasten off and leave a long tail for sewing. Position the pocket over the lower half of the base panel and pin or clip it in place if needed.
Using a yarn needle, sew the pouch on three sides (left, bottom, and right) of the base. Be sure to leave the top open to create the pocket. Work with tight stitches to ensure durability.
You can also attach the pouch with slip stitches or single crochet joins, depending on your preferred finish. Just be consistent across your set of holders for a cohesive look.
Add Embellishments for That Holiday Spark
Now comes the fun part: decorating your crochet cutlery and napkin holder with Christmas-themed designs. You can keep it minimal or go all out with festive embellishments.
One easy idea is to add a crocheted snowflake or star to the front of the pocket. You can use metallic yarn for a sparkling effect or go with traditional white for a frosty winter look.
Another cute option is to crochet mini Santa hats, Christmas trees, or gingerbread men and sew them onto the pouch. These add personality and make each holder unique.
If you’re short on time, consider sewing on holiday buttons, bells, or ribbon bows. Just make sure they are securely attached and washable if you plan to reuse the holders.
For a personal touch, you can embroider initials or names on each holder using surface crochet or simple backstitch with a yarn needle and contrasting yarn.
You could also add a loop or small button tab to close the top or hang the holder as decor. This makes it versatile beyond the dinner table—it could even double as a gift pouch.
Remember, handmade doesn’t mean perfect. Lean into your creativity and let each holder reflect your festive spirit!
Final Touches, Presentation, and Storage
Your Christmas crochet cutlery and napkin holder is now ready to shine! With a little finishing, you’ll have a gorgeous table accessory that adds warmth and craftsmanship to your holiday gathering.
Before using or gifting, give each holder a gentle blocking. Wet-blocking is ideal for cotton yarn—lightly dampen the item, shape it flat, and let it dry. This ensures a neat appearance on your table.
Set your table with plates, glasses, and your newly finished holders front and center. Insert a napkin (folded or rolled), plus a fork, spoon, and knife. Instant charm and polish!
If gifting, consider pairing the holder with matching coasters, placemats, or even a set of homemade cookies. Wrap in tissue and tie with a ribbon for a personal touch.
To store for next season, make sure each piece is clean and dry. Stack them and store in an airtight bag or container to protect from moisture and dust.
These reusable pieces can be washed by hand with mild soap and laid flat to dry. Because they’re made from cotton, they’ll hold up well year after year.
This project is not only fun but also eco-conscious. Say goodbye to disposable paper napkin rings and plastic tableware holders—your Crochet pattern adds sustainability and beauty in one creative package.
Conclusion: Crochet a Joyful Holiday with Handmade Details
A crochet cutlery and napkin holder is more than just a functional table item—it’s a piece of holiday magic crafted with care. With this Crochet pattern, you can create something beautiful, sustainable, and unique for your festive gatherings.
This project is ideal for beginners and seasoned crocheters alike, offering endless ways to personalize each piece. From color choices to embellishments, you can let your creativity flourish while making something truly meaningful.
The step-by-step process is easy to follow, and the materials are accessible, making this the perfect weekend project. Whether you’re preparing for a Christmas dinner, creating gifts, or stocking your craft table for a market, these holders are a charming addition.
Best of all, they combine the joy of crafting with the warmth of giving. Nothing beats setting a holiday table where every detail—down to the cutlery holder—was made with love.
So grab your hook, pick your yarn, and let the holiday magic begin! With this crochet cutlery and napkin holder tutorial #Christmas, you’ll bring handmade cheer to every meal.


