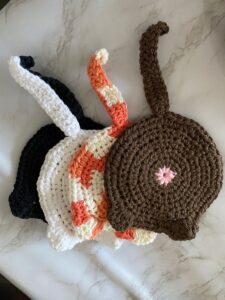
If you’re a left-handed crafter looking for something humorous, practical, and fun to make, you’ll love this Left Handed Crochet Cat Butt Coasters tutorial. These cheeky cat-themed coasters are the perfect conversation starter for your home or a hilarious handmade gift for a fellow cat lover. Best of all, this project is quick to complete, beginner-friendly, and uses only basic crochet techniques.
Unlike many patterns that favor right-handed instructions, this tutorial is specially written for left-handed crocheters, making the learning curve smoother and the crafting process more enjoyable. You’ll follow a step-by-step guide to make these adorable coasters from start to finish, complete with materials, stitch counts, and shaping tips that are easy to visualize from a left-handed perspective.
Whether you’re crafting for fun, selling at markets, or preparing for the holiday gifting season, these crochet cat butt coasters bring humor and functionality into one quirky little item. Let’s explore everything you need to get started and make your own set of these fuzzy feline behinds!

Materials, Tools, and Measurements for Left-Handed Crocheters
Before you pick up your hook, it’s important to have the right materials and tools at your side. This will make your experience smooth and enjoyable as a left-handed crocheter. Since this project is relatively small, it’s also great for using up yarn scraps in your stash.
Start by choosing a worsted weight cotton yarn in gray, orange, black, or any color you’d like your cat to be. Cotton is best for coasters because it absorbs moisture and lies flat. You’ll also need a contrasting color for the center (aka the “butthole”)—white, pink, or cream works great for that humorous detail.
For tools, a 4.0 mm (G/6) or 4.5 mm crochet hook is ideal. These hook sizes allow for firm but flexible stitches, which help the coaster keep its shape without being too rigid. Be sure to use a hook that feels comfortable in your left hand—there are ergonomic options available if you tend to crochet for long periods.
Additional supplies include scissors, a yarn needle, and stitch markers if needed. You may also want to keep a steam iron nearby to block the coasters after finishing. This helps flatten the coaster for better use.
The finished coaster will measure approximately 4.5 to 5 inches (11.5 to 13 cm) in diameter, not including the tail. With the tail, the total length will be about 7 inches (18 cm), which is perfect for mugs, glasses, or even plant pots.
Having all your materials ready before you begin helps streamline the process. Don’t worry if this is your first crochet pattern—we’ll take it step by step in a left-hand-friendly format.
Step-by-Step Crochet Pattern: Making the Cat Butt Base
Now it’s time to begin your crochet cat butt coaster. As a left-handed crafter, you’ll work in the opposite direction than most tutorials—clockwise, rather than counterclockwise. We’ll start with the round base that represents the cat’s body and then add the humorous detail and tail.
Step 1: Magic Ring & First Round
Start with a magic ring (also called a magic circle) and make 6 single crochet (sc) into the ring. Pull tight and join with a slip stitch (sl st) to the first sc. (6 stitches total)
Step 2: Increase Round
Chain 1. Make 2 sc in each stitch around. Join with a sl st. (12 stitches)
Step 3: Continue Increasing
Chain 1. (1 sc, 2 sc in next) repeat around. Join with a sl st. (18 stitches)
Step 4: More Increases
Chain 1. (1 sc in next 2 stitches, 2 sc in next) repeat around. Join. (24 stitches)
Step 5: Finish the Base Circle
Continue increasing in this fashion until you reach 36–40 stitches, which gives you the right diameter for the coaster. Work evenly in rounds to create a smooth circle.
Step 6: Center Detail (Optional)
Switch to your contrast yarn. Insert it in the center of the magic ring and embroider or surface slip stitch a tiny circle to represent the cat’s rear. This is the playful focal point of the piece!
You’ve now completed the base of your crochet cat butt coaster, and we’re ready to add the finishing touches that really make it pop: the legs and tail.
Adding Legs, Tail, and Cat Details
The extra limbs and tail give your coaster a cat-like shape and reinforce the humorous design. These additions are simple but require attention to placement so they appear symmetrical—especially from a left-handed angle.
Step 1: Front Legs (Make 2)
Chain 6, turn. Slip stitch in the second chain from hook and across. Fasten off, leaving a tail. Attach these to the front side of the body circle (closest to the center detail), spacing them about 1 inch apart.
Step 2: Back Legs (Make 2)
Chain 8, turn. Slip stitch across. These should be slightly longer than the front legs. Sew them on opposite the front legs and angled slightly to mimic a sitting cat.
Step 3: Tail
Chain 16. Single crochet back down the chain. Fasten off. Sew the tail to the upper-left side of the coaster (remember, left-handed = mirrored placement), letting it curve naturally. You can lightly steam it to help it curl or lie flat.
Step 4: Optional Ears
To make your coaster even cuter, you can add tiny triangles for ears. Chain 3, sc in 2nd chain, hdc in next. Fasten off and attach them to the top of the circle.
Step 5: Secure All Parts
Be sure all limbs and tails are stitched on tightly. Weaving in ends securely is important so the coaster can withstand use and washing.
Step 6: Block the Coaster
Steam block your coaster gently with a damp cloth and iron (or pin to a surface and spray lightly with water). This gives the coaster a professional, flat finish and ensures it stays level under a mug.
These final touches bring your coaster to life! Your crochet creation is now not only functional but full of character and laughs.
Customization Ideas and Final Presentation Tips
Now that you’ve mastered the basic crochet pattern, you can have even more fun by customizing your cat butt coasters to match different personalities, breeds, or holidays. Each coaster can be a unique conversation piece!
Try using multicolor or variegated yarn to represent calico or tabby cats. You can embroider fur stripes, color patches, or even add tiny buttons for “collars.” Use glitter yarn for festive versions, or red and green for Christmas-themed coasters.
You can also create a set of coasters with different cat poses or tail shapes. Some tails can curl, while others point straight. Adjusting the chain length of the tail lets you personalize each one.
For gifting, package your coasters in kraft paper envelopes or pair them with a cat-themed mug for a complete gift. These also make perfect stocking stuffers, gag gifts, or even craft fair best-sellers.
To care for your coaster, gently hand wash it in cool water with mild soap. Lay flat to dry to preserve the shape. Because it’s made of cotton, it should be durable and absorbent, making it perfect for daily use.
These crochet cat butt coasters are a wonderful way to bring a little humor into the home while practicing your crochet skills. You’ll love watching people’s reactions when they realize what they’re looking at!
Conclusion: Celebrate Your Craft with a Laugh
In the world of crochet, few things are as delightful as a project that brings both skill and smiles. These Left Handed Crochet Cat Butt Coasters are not just funny—they’re creative, practical, and enjoyable to make from start to finish.
You’ve now learned how to gather your materials, follow a crochet pattern tailored for left-handed crafters, and stitch together a complete coaster from base to tail. Even if you’re just beginning your crochet journey, this pattern gives you a simple and lighthearted way to improve your technique.
Whether you’re making a single coaster or a full set, these little cats are guaranteed to stand out. So grab your yarn, hook, and sense of humor—and start stitching your way to the cutest coaster collection around.


