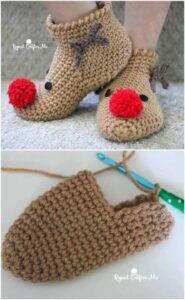
A very cute and practical crocheted moose sock is the perfect handmade accessory for keeping your feet warm while adding a touch of woodland charm to your wardrobe. These socks are both functional and fun, making them a fantastic project for crochet enthusiasts of all skill levels. They can be personalized with colors and details to create a truly unique pair that everyone will love.
This crochet pattern is beginner-friendly, yet versatile enough for advanced crocheters to get creative with. With a cozy sock base and adorable moose features—like antlers, eyes, and a cute nose—this project is guaranteed to bring smiles. Perfect for holiday gifts, winter wear, or just lounging at home, crocheted moose socks combine practicality with whimsical design.
In this article, we’ll cover the materials, measurements, and step-by-step guide to help you create your own crochet moose socks. You’ll also find tips for customization and ideas to make your socks even more unique. Let’s get started on this warm and delightful project!
🧶 Materials and Tools Needed
Before you begin making your very cute and practical crocheted moose sock, gather all the supplies you’ll need. Choosing the right yarn and tools ensures your socks are comfortable, durable, and safe for daily wear.
-
Yarn Selection
Use a soft, washable yarn—preferably acrylic or wool blend—for warmth and flexibility. You’ll need approximately 150–200 yards of brown yarn for the sock base and small amounts of beige, black, and cream yarn for the moose details. -
Hook Size
A 4.0 mm (G-6) or 4.5 mm (7) crochet hook works well for socks. Choose a hook size that gives you a snug but stretchy fabric. -
Additional Supplies
-
Yarn needle for sewing pieces together
-
Stitch markers to track rounds
-
Scissors
-
Optional safety eyes (or embroider eyes for children’s safety)
-
-
Measurements and Cuts
For adult-size socks, aim for a foot length of about 9–10 inches. Adjust stitch count for smaller or larger sizes. If lining with fleece for extra warmth, cut 2 fabric shapes slightly smaller than the sock base for each foot. -
Gauge
Gauge is about 16 stitches and 18 rows = 4 inches in single crochet. Matching gauge ensures proper sock sizing. -
Safety Tip
Avoid any detachable parts if the socks are for babies or toddlers. Embroider features instead of using buttons.
🧦 Step-by-Step Guide: How to Crochet the Moose Sock
Now let’s go through the process of making a very cute and practical crocheted moose sock. This guide is simple, beginner-friendly, and easy to follow.
-
Sock Base (Toe-Up Method)
-
Start with a magic ring and work 6 single crochet (sc) into the ring.
-
Round 1: 2 sc in each stitch (12 sts).
-
Round 2: 1 sc in next st, 2 sc in next st around (18 sts).
-
Continue increasing evenly until you reach 48 sts (or desired foot circumference).
-
-
Foot Section
-
Work even in single crochet for 18–22 rounds, depending on foot size.
-
Try the sock on occasionally to check length.
-
-
Heel Section
-
Mark the center back and work short rows to form a heel cup.
-
Use half double crochet (hdc) for added stretch.
-
-
Leg Section
-
Work evenly in hdc or dc stitches until the sock reaches desired height (usually 6–8 inches above the ankle).
-
-
Ribbed Cuff
-
For a snug fit, finish with 6–8 rows of front and back post double crochet (fpdc/bpdc) ribbing.
-
-
Moose Details
-
Antlers: Make two antlers for each sock using beige yarn. Chain 8, sc along, adding small branches by chaining and slip stitching.
-
Eyes & Nose: Crochet two small circles for eyes (white yarn) and a larger circle for the nose (brown or black yarn).
-
🦌 Attaching the Moose Features
Once you’ve finished crocheting the base sock and moose details, it’s time to assemble everything.
-
Positioning the Features
Lay the sock flat and use stitch markers to mark where the antlers, eyes, and nose will go. Ensure both socks are symmetrical. -
Sewing Antlers
Using a yarn needle, securely stitch the antlers to the top of the sock cuff. Make sure they are tightly fastened to withstand washing and wear. -
Adding Eyes
Sew or embroider the eyes slightly below the antlers. If using safety eyes, attach them before sewing the details onto the sock. -
Nose Placement
Sew the nose between and slightly below the eyes. You can stuff the nose lightly for a 3D effect. -
Optional Embroidery
Use black yarn to embroider eyebrows or a smile for added personality. -
Final Touches
Weave in all yarn ends neatly and trim excess threads.
🎨 Customization Ideas for Your Moose Sock
A very cute and practical crocheted moose sock can be made in endless variations. Here are some ideas to make your pair unique.
-
Color Variations
Experiment with light gray or cream for the sock base and darker tones for the moose features. Festive colors like red or green can make them perfect for Christmas gifts. -
Add Pom-Poms or Bells
Attach tiny bells to the antlers for a playful holiday vibe. Pom-poms can also be added for extra fun. -
Use Fuzzy Yarn
Try a fluffy yarn for the antlers to give them a more realistic, cozy look. -
Create Matching Accessories
Crochet matching mittens, a scarf, or a beanie with the same moose design. This makes an adorable winter set. -
Make Family Sets
Adjust the size for kids and adults so the whole family can have matching moose socks. -
Gift Packaging
Fold the socks and wrap them with a ribbon. Add a handmade tag with washing instructions for the perfect gift.
❤️ Why You’ll Love This Crochet Pattern
There are so many reasons why making a very cute and practical crocheted moose sock is a rewarding project.
-
Beginner-Friendly Design
The pattern uses basic stitches like single crochet and half double crochet, making it accessible for beginners. -
Practical and Fun
These socks are not just decorative; they’re warm, durable, and perfect for everyday use during colder months. -
Great for Gifts
Handmade gifts are always special. A pair of moose socks will surely delight friends and family. -
Fully Customizable
You can play with colors, features, and sizes to make each pair unique. -
Quick to Make
Each sock can be completed in a few hours, making it a great weekend project. -
Keepsake Item
Handmade socks with cute details like moose faces become cherished items, especially when given as heartfelt gifts.
Final Thoughts
A very cute and practical crocheted moose sock is a fun and cozy project that combines warmth with a touch of whimsy. Whether you make them for yourself, your kids, or as a thoughtful gift, this crochet pattern is a delightful way to add handmade charm to your wardrobe.
With just a few basic materials, some yarn, and your creativity, you can create a unique pair of socks that will be loved for years to come. So grab your hook, pick your favorite colors, and start crocheting today—because nothing says love like something made by hand!


