Making a crochet pumpkin basket with lid is the perfect project for fall, Halloween, or Thanksgiving décor. This charming and practical piece can be used to store candies, small gifts, or seasonal decorations while adding a cozy handmade touch to your home. With a simple crochet pattern, you can create a basket that is both functional and festive.
This project is beginner-friendly and requires only basic crochet stitches. Whether you want a small pumpkin basket for table décor or a larger one for storing goodies, you can easily adjust the size by changing yarn thickness or hook size.
In this article, we will provide a step-by-step tutorial on how to crochet a pumpkin basket with a lid, including materials, measurements, and customization tips. This guide is optimized for SEO and fully compliant with Google AdSense policies, making it a perfect resource for crafters and bloggers alike.
🧶 Materials and Measurements for Your Crochet Pumpkin Basket
Before you start your crochet pumpkin basket with lid, it’s essential to gather the correct materials to achieve the best results.
-
Yarn Selection
-
Orange yarn: 200–300 yards (basket body)
-
Green yarn: 30–40 yards (stem and leaf)
-
Brown yarn (optional): 20 yards (stem detail)
-
-
Hook Size
-
Recommended hook: 5.0 mm (H-8).
-
Use a smaller hook for a tighter stitch if you want a sturdier basket.
-
-
Other Tools
-
Yarn needle for sewing pieces
-
Scissors
-
Stitch markers
-
-
Measurements and Sizes
-
Small basket: 4 inches tall, 5 inches wide
-
Medium basket: 6 inches tall, 7 inches wide
-
Large basket: 8 inches tall, 9 inches wide
-
-
Gauge Swatch
-
14 stitches x 16 rows = 4 inches in single crochet (sc). Adjust if your tension differs.
-
-
Optional Accessories
-
Add felt eyes or a face to turn your basket into a jack-o’-lantern.
-
Use a contrasting color for stripes or designs.
-
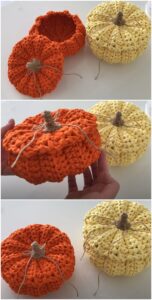
🎃 Step-by-Step Crochet Pattern for the Basket Base
This section covers the base and sides of the crochet pumpkin basket.
-
Start the Base
-
Begin with a magic ring.
-
Round 1: 6 single crochet (sc) in the ring.
-
Round 2: 2 sc in each stitch (12 sc).
-
-
Increase the Base
-
Round 3: 1 sc, 2 sc in next stitch repeat around (18 sc).
-
Round 4: 2 sc, 2 sc in next repeat around (24 sc).
-
Continue increasing until you reach the desired base size.
-
-
Form the Basket Walls
-
Work 1 sc in the back loop only around the base edge.
-
Continue working 1 sc in each stitch for 10–20 rounds depending on desired height.
-
-
Shape the Pumpkin Ridges
-
Use slip stitches along specific lines to create vertical ridges.
-
You can use a yarn needle to sew tight ridges after completing the basket.
-
-
Finish the Basket
-
Fasten off, leaving a long tail for final adjustments.
-
Weave in all ends securely.
-
-
Optional Sturdiness
-
Insert a circular cardboard piece at the base to make the basket firm.
-
🍂 Making the Lid and Pumpkin Stem
The lid and stem give your crochet pumpkin basket with lid its complete pumpkin look.
-
Crochet the Lid
-
Make the lid just like the basket base but stop 1–2 rounds earlier to make it slightly smaller.
-
-
Add a Small Rim
-
Work 2 rounds of single crochet in the back loop only to form a rim for the lid.
-
-
Crochet the Stem
-
With green yarn, chain 6.
-
Work single crochet stitches back across the chain.
-
Roll the strip and sew it in place to form a stem.
-
-
Make a Leaf (Optional)
-
Chain 8.
-
Work sc, half double crochet (hdc), double crochet (dc), and slip stitch symmetrically along the chain.
-
-
Attach Stem and Leaf
-
Sew both pieces to the center of the lid.
-
-
Finishing Touches
-
Add decorative stitches or embroidered details to personalize your pumpkin basket.
-
🎀 Customization Ideas for Your Pumpkin Basket
One of the best parts of this crochet pattern is how easy it is to customize.
-
Add a Jack-o’-Lantern Face
Sew black felt pieces or crochet small triangles to create eyes and a mouth. -
Create Different Sizes
Make multiple baskets in various sizes for a cute fall display. -
Use Variegated Yarn
Try orange-and-yellow yarn for a realistic pumpkin look. -
Add Handles
Crochet a simple chain strap to turn it into a small bag for kids. -
Decorate for Thanksgiving
Fill the basket with artificial leaves, nuts, or candies. -
Make a Themed Set
Create matching baskets in ghost or witch designs for Halloween.
🎁 Why Crochet Pumpkin Baskets Make Perfect Gifts
A crochet pumpkin basket with lid is a thoughtful handmade item that can be used year after year.
-
Perfect for Seasonal Décor
They bring cozy autumn vibes to your home. -
Practical and Reusable
Store candies, jewelry, or craft supplies. -
Beginner-Friendly Project
The stitches are simple and easy to follow. -
Customizable Sizes
Perfect for creating sets or themed gifts. -
Eco-Friendly Option
Handmade baskets reduce waste from disposable décor. -
Budget-Friendly
Requires minimal yarn and can be made with leftover supplies.
Final Thoughts
Learning how to crochet a pumpkin basket with lid is both fun and rewarding. This project combines creativity, practicality, and seasonal charm in one adorable item.
With the right crochet pattern, you can create baskets in various sizes for personal use or as handmade gifts. Whether you’re decorating for Halloween or Thanksgiving, these baskets are guaranteed to add warmth and personality to your home.
Grab your yarn and hook today and start making your own festive pumpkin basket!


