If you’ve been looking for a small, creative project to improve your crochet skills, then this easy crochet mug cover for beginners is the perfect place to start. It’s practical, charming, and requires only basic materials—ideal for those just starting out with crochet. Plus, it makes a thoughtful handmade gift for coffee or tea lovers.
This project is a fantastic way to explore the world of crochet patterns without feeling overwhelmed. You’ll work with basic stitches and simple shapes, learning how to build texture and fit around a mug. By the end of this tutorial, you’ll not only have a cute mug cozy but also feel more confident in your crocheting abilities.
In the step-by-step instructions below, you’ll find everything from measurements to stitch counts. Whether you’re making this mug cover for yourself or as a heartfelt gift, it’s designed to be beginner-friendly, quick to make, and a great introduction to crochet. Let’s dive into this cozy, creative journey.
Tools, Yarn, and Measurements
To get started on your easy crochet mug cover, you’ll need a few basic supplies. All of these materials are budget-friendly and can be found at your local craft store or online. Don’t worry if this is your first time crocheting—this guide walks you through each step.
1. Choosing the Right Yarn
For a functional and washable mug cover, it’s best to use 100% cotton yarn. Cotton is durable, holds its shape well, and doesn’t stretch too much with heat. Choose any color that fits your personality—solid colors or even variegated ones work beautifully.
2. Crochet Hook Size
Use a 5.0 mm (H-8) crochet hook, which pairs perfectly with worsted weight yarn. This size is comfortable for beginners and allows you to keep consistent tension without straining your hands.
3. Mug Measurements
Most standard mugs measure around 10 inches (25.4 cm) in circumference and 3.75 inches (9.5 cm) in height. You’ll be crocheting a rectangle to wrap around the mug, so measure your mug before starting and adjust the number of rows if needed.
4. Additional Tools
Have on hand a yarn needle for weaving in the ends, a pair of sharp scissors, and one or two buttons (¾ inch or 2 cm in diameter). A tape measure will also help with keeping your stitches to scale.
5. Optional Fabric Lining
If you want to add a professional touch, cut a small piece of cotton fabric about 11 inches x 4 inches (28 x 10 cm). This lining can be hand-sewn or glued inside the cover for extra heat protection and a clean finish.
6. Stitch Gauge (Optional)
If you want your mug cover to fit perfectly, crochet a small swatch of 10 rows by 10 stitches and measure. This isn’t essential but helps prevent resizing issues later.
Crochet Mug Cover Pattern – Step-by-Step
Now for the fun part! This crochet pattern uses single crochet (sc) stitches and is worked in rows to form a rectangle that wraps snugly around a mug. It’s easy to adapt if your mug is larger or smaller than average.
1. Foundation Chain
Start with a slip knot, and chain 16. This gives you a cover about 3.75 inches (9.5 cm) tall, which fits most mugs. If your mug is shorter or taller, add or subtract chains in multiples of 1.
2. Row 1
In the second chain from your hook, make one single crochet. Then sc across the entire row until you reach the last chain. You should now have 15 sc stitches. Chain 1 and turn.
3. Repeat for Length
Continue working rows of 15 single crochet stitches, chaining 1 and turning at the end of each row. Crochet until the length of the piece reaches 9 to 10 inches (22–25 cm), which wraps around most standard mugs.
4. Buttonhole Row (Optional)
On your final row, create a buttonhole by crocheting 6 sc, ch 2, skip 2 stitches, and sc in the remaining stitches. This creates a small gap for a button closure.
5. Finishing Off
When you’ve reached your desired length, cut the yarn, leaving a 6-inch (15 cm) tail. Use your yarn needle to weave in all loose ends neatly.
6. Button Attachment
Wrap the finished cozy around your mug to determine the best placement for your button. Sew it securely at the opposite end of the buttonhole. Make sure it fits snugly without being too tight.
Style Ideas and Customization Tips
What’s great about this crochet mug cover pattern is that it’s a blank canvas. You can personalize it in countless ways—whether you’re adding color, texture, or seasonal flair. Here are some creative ideas to inspire your next project.
1. Add Stripes or Color Blocks
Change yarn colors every 4 or 5 rows to create stripes or a color-blocked effect. Use leftover yarn from other projects for a budget-friendly option. It’s a great way to play with color without needing to buy more supplies.
2. Embroider with Yarn
After finishing your crochet mug cover, use a yarn needle and contrasting color yarn to embroider initials, hearts, stars, or simple flowers. This adds a personal touch and elevates the overall design.
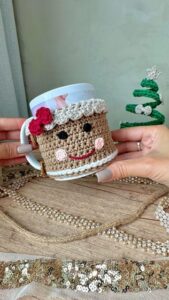
3. Themed Mug Covers
Make themed versions for holidays: red and green for Christmas, orange and black for Halloween, or pastel colors for Easter. You can even use tiny crochet appliqués like snowflakes or pumpkins for added charm.
4. Button Choices
Pick buttons that stand out! Wooden buttons, vintage designs, or novelty shapes like hearts or animals give your mug cover extra personality. Velcro or snaps are good alternatives if buttons aren’t your style.
5. Use Different Stitches
Once you’re comfortable, experiment with half double crochet (hdc) or double crochet (dc). These stitches add texture and allow you to finish more quickly. You could also try ribbing with front post double crochet for a snug stretch.
6. Gift Sets
Make matching sets with a mug cover and a crochet coaster. Add a packet of tea, coffee, or hot chocolate and wrap it in cellophane for the perfect handmade gift. Great for birthdays, teacher appreciation, or Christmas.
FAQs and Troubleshooting for Beginners
Working on an easy crochet mug cover can bring up a few common questions—especially for new crocheters. Here are answers and solutions to make your experience stress-free and fun.
1. My stitches look uneven. What should I do?
Uneven stitches are totally normal when you’re starting out. With practice, your tension will become more consistent. Try to keep your hands relaxed and your yarn feed steady.
2. The mug cover is too loose or too tight.
If it’s too loose, reduce your row count or try a smaller hook. If it’s too tight, add a few more rows or use a larger hook. Test the fit before sewing on the button.
3. Can I machine wash it?
If you’re using 100% cotton yarn, yes! Machine wash on a gentle cycle with cold water and lay flat to dry. Avoid high heat, as it could shrink the yarn.
4. What if I don’t have a button?
You can use Velcro strips, snaps, or even a simple tie closure with a yarn chain. All work well and keep your mug cozy snug.
5. Can I follow this pattern left-handed?
Absolutely! Crochet is flexible. Just mirror the pattern by turning your work in the opposite direction. The stitches and instructions remain the same.
6. How do I adjust the pattern for a travel mug?
Measure the circumference and height of your travel mug. Add or subtract stitches in the foundation chain for height, and rows for length. Be sure to allow for any curve or handle shape.
Final Thoughts: Craft Your Own Cozy Companion
This easy crochet mug cover for beginners is more than just a weekend craft—it’s a stepping stone to greater crochet confidence. With simple stitches and a bit of creativity, you can transform a plain mug into something warm, soft, and personalized.
Use this crochet pattern to explore different yarns, textures, and embellishments. Make one for every season, or craft a batch to give away during holidays and special occasions. It’s a small project with a big heart, and the results are always rewarding.
So grab your yarn, pour yourself a cup of tea, and start crocheting your very own mug cozy today. Your future self—and your favorite mug—will thank you.


