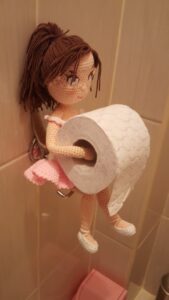
If you’re looking to add personality to your bathroom decor, this Amigurumi Crochet Toilet Paper Holder Doll is the perfect project for you. Both decorative and practical, this handmade doll will charm your guests while conveniently storing an extra toilet paper roll. It’s a whimsical take on home organization that blends creativity with functionality.
Perfect for intermediate crocheters and ambitious beginners, this Amigurumi project allows you to practice shaping, assembling, and stuffing while creating something that brings joy and laughter. Using just a few tools, yarn, and patience, you’ll end up with a quirky doll that hides a spare roll in plain sight.
In this step-by-step guide, we’ll walk you through everything you need to know—from materials and measurements to the actual Amigurumi crochet pattern. Whether you’re creating one for your home or as a unique handmade gift, this tutorial makes it easy to turn yarn into a delightful bathroom accessory.
Materials, Measurements & Preparation
Before starting your Amigurumi crochet toilet paper holder doll, it’s important to gather all your tools and know your measurements. The doll will need to be sturdy enough to stand upright while also flexible enough to hold the toilet paper roll securely.
1. Yarn Selection
Use worsted weight acrylic yarn for this project. It’s durable, holds shape well, and is budget-friendly. You’ll need several colors: skin tone for the face and arms, white or any preferred color for the dress, and accent colors for shoes, hair, or accessories. Choose a neutral color for the roll base.
2. Hook Size
A 3.5 mm (E) crochet hook is ideal for Amigurumi projects, as it ensures tight stitches to keep stuffing inside. A smaller hook prevents gaps and gives your doll a polished look. If you’re a loose crocheter, go down to a 3.0 mm hook.
3. Stuffing and Notions
Use polyester fiberfill stuffing to give the doll structure. You’ll also need a yarn needle, stitch markers, safety eyes (or embroidery thread), blush for cheeks (optional), and scissors. Two or three buttons may be needed for decorative purposes.
4. Toilet Paper Roll Dimensions
A standard toilet paper roll has a diameter of about 4.5 inches (11.4 cm) and height of 4.5 inches (11.4 cm). Your doll’s dress must cover this area loosely. The doll should be about 10–12 inches (25–30 cm) tall for proper balance and visibility.
5. Fabric or Plastic Stabilizer (Optional) If you want to add weight or structure to the base, you can cut a circle of plastic canvas or stiff felt (about 5 inches/12.7 cm diameter) and insert it in the dress base. This helps the doll stand better, especially if displayed on a shelf or tank top.
6. Safety Tips
Because this project involves stuffing and possibly small safety eyes or buttons, it’s important to keep it out of reach of unsupervised young children. Always double-knot or securely sew in all embellishments.
Crochet Pattern – Head, Body, Arms & Hair
Now, let’s dive into the Amigurumi crochet pattern to make the head, body, and arms. The trick to Amigurumi is working in continuous spirals and keeping your tension consistent. A stitch marker is essential to keep track of rounds.
1. Head (Skin Tone Yarn)
Begin with a magic ring.
Rnd 1: 6 sc into ring.
Rnd 2: inc in each stitch (12)
Rnd 3: (sc, inc) repeat around (18)
Continue increasing until 36 sts. Work even for 8–10 rounds. Begin decreasing the same way: (sc, dec) around until closed. Lightly stuff before sealing.
2. Hair Cap (Contrast Color)
Make a flat circle to match the top of the head using sc increases. Work even for 2 rounds to give height. Sew it to the top of the head. For bangs or braids, chain strands and attach individually.
3. Eyes & Features
Place safety eyes between rounds 8 and 10, about 6 stitches apart. Embroider a smile with black yarn. Blush cheeks with fabric paint or powder blush. This brings life to your doll.
4. Arms (Make 2)
Ch 2, 6 sc into the second chain. Work in spiral for 8 rounds. Switch to shirt color, work 4 more rounds. Stuff lightly and sew to the upper sides of the body.
5. Body Core
Start with the same method as the head. Increase to 36 stitches and work even for about 12 rounds. Begin decreasing slightly to taper toward the waist. Leave the bottom open—this is where the toilet roll will rest.
6. Neck Join
Crochet a few rounds with a slight decrease between the head and body. This helps form the neck. Once complete, sew head to body securely using a yarn needle.
Skirt, Dress Base & Toilet Roll Slot
The real star of this Amigurumi crochet toilet paper holder doll is the flared dress that hides the toilet roll! This part should be roomy and decorative, but also strong enough to stand up on its own.
1. Dress Skirt Base
Attach yarn at the waist and chain 1. Begin crocheting in the round, increasing every few stitches to flare out the skirt. Do this for 12–15 rounds or until it comfortably covers a toilet paper roll.
2. Hemline Details
You can add a shell stitch (sc, skip 1, 5 dc in next st, skip 1, sc) for a decorative hem. Use a contrast color to make it pop. This adds a nice finishing touch and helps the skirt hold its shape.
3. Skirt Lining (Optional)
For extra structure, cut a fabric circle (approx. 11″ diameter) and sew or glue it to the inside of the skirt. This gives stability and helps prevent the dress from sagging with humidity.
4. Toilet Paper Roll Slot
Leave the center of the dress base open, wide enough to slip the roll in and out. This should measure at least 4.5 inches (11.5 cm) in diameter. The doll will simply sit atop the roll with the dress covering it.
5. Attach to Body
Crochet or sew the top edge of the skirt to the doll’s body. Make sure it’s centered so the skirt hangs evenly around the roll. You can also add suspenders or a belt at the waist for extra decoration.
6. Add a Stand (Optional)
To ensure the doll doesn’t topple over, you can add a round piece of cardboard or stiff plastic into the base of the skirt. Cover it with felt or fabric and glue in place using hot glue.
Final Touches, Decoration & Personalization
Now that your Amigurumi crochet toilet paper holder doll is assembled, it’s time to make her shine with accessories, colors, and creative flourishes. This is the part where your personality and taste can come through.
1. Add Aprons, Belts, or Collars
Use basic chain stitches and single crochet rows to create small accessories. An apron with a little pocket, a decorative belt, or a Peter Pan collar adds delightful vintage flair.
2. Make Matching Sets
Create bathroom sets by making matching Amigurumi tissue box covers, small soap bottle covers, or towel toppers using the same colors and yarn. This will give your bathroom a cohesive handmade theme.
3. Seasonal Themes
Turn your doll into a holiday decoration! Use red and green for a Christmas elf, orange and black for a Halloween witch, or pastel for an Easter bunny. Just switch yarn colors and change small accessories like hats or bows.
4. Embroider Names or Messages
Make your project even more special by embroidering names or little messages on the dress or apron. “Wash Your Hands,” “Welcome,” or even a child’s name adds warmth and personalization.
5. Gifting Tips
Wrap your finished Amigurumi doll in clear plastic and tie it with a ribbon. Add a tag that says, “Lift my skirt for a surprise!” It makes a humorous and heartwarming handmade gift.
6. Care Instructions
Remind the recipient to gently hand wash the doll in cold water and air dry. Avoid machine washing or drying, as it could damage the shape or detailing of the doll.
Final Thoughts – Handmade Humor & Heart
Creating an Amigurumi crochet toilet paper holder doll combines creativity, functionality, and humor into one unforgettable project. It’s an unexpected way to decorate your bathroom and showcase your crochet skills in a delightful, lighthearted manner.
With simple stitches, fun shapes, and endless room for customization, this Amigurumi doll is not only practical but also a conversation piece. Whether you make just one or start a collection for different seasons, this project is sure to make people smile.
Remember, the beauty of crochet patterns like this is that they’re infinitely adaptable. Change the colors, tweak the design, or add your own spin. You’re not just crafting a doll—you’re creating joy, one stitch at a time.


