If you’re looking for a fun and cozy crochet project that doubles as functional home décor, the stuffed cookie coaster is the perfect choice. With its adorable dessert-inspired design, this project is ideal for gifting, selling at craft fairs, or adding a whimsical touch to your coffee table. And the best part? It’s beginner-friendly and quick to make using a simple crochet pattern.
The stuffed cookie coaster isn’t just cute—it’s practical too. The extra stuffing adds a plush feel, protecting your surfaces while giving your décor a handmade twist. Whether you love chocolate chip cookies or want to create a novelty set for your guests, these coasters are a creative way to showcase your crochet skills.
In this article, you’ll find a detailed step-by-step crochet pattern, including all the fabric cuts, yarn measurements, and instructions for assembling your own cookie coasters. We’ll also share tips to customize the pattern and explore different color combinations to keep your project fresh and fun.
Materials and Yarn Cuts You’ll Need
To create your own stuffed cookie coaster, you’ll need basic crochet supplies and a few additional materials for stuffing and shaping. Choosing the right yarn and hook size will ensure that your coaster holds its shape and remains soft and absorbent.
Start with medium-weight cotton yarn in two main colors: one for the cookie base and another for the chocolate chips. Cotton is ideal because it’s absorbent and sturdy—perfect for a coaster. You’ll also need a small amount of stuffing, like polyester fiberfill, to give your cookie its signature puffy look.
Here’s a quick checklist of materials:
-
Worsted weight cotton yarn: Light brown for the cookie, dark brown or black for the chips.
-
Crochet hook: Size 4.0 mm (G) or 4.5 mm (7), depending on your tension.
-
Polyester fiberfill stuffing: A small handful per coaster.
-
Yarn needle: For sewing and weaving in ends.
-
Scissors and stitch markers: Optional but helpful for beginners.
For each coaster, you’ll need approximately 15–20 grams of your base color yarn and 5 grams of contrasting yarn for the chips. You can also use black yarn to embroider smiley faces or decorative sprinkles if you’d like to add personality to your coasters.
Cut your yarn before you begin:
-
Main base: 2 pieces, 4” (10 cm) in diameter each.
-
Chocolate chips: 4–6 pieces per coaster, each about 0.5” (1.2 cm).
-
Optional smiley detail: 6” (15 cm) strand of black yarn.
Step-by-Step Stuffed Cookie Coaster Crochet Pattern
The following crochet pattern provides a clear step-by-step guide to help you create your stuffed cookie coaster. This is a great project for all skill levels, including beginners looking to practice their circular crochet skills.
Step 1: Start the Base Circle
Using your light brown yarn, create a magic ring. Chain 2 (does not count as a stitch), and work 10 double crochets (dc) into the ring. Pull the ring closed and slip stitch into the first dc to close the round. You now have the foundation for your coaster.
Step 2: Build the Cookie Round
For the next round, chain 2 and work 2 dc into each stitch around. You should have 20 stitches. Continue increasing in the next rounds by adding one extra dc between increases (e.g., 1 dc, 2 dc; then 2 dc, 2 dc, etc.) until your circle reaches about 4 inches in diameter.
Step 3: Make the Second Circle
Repeat steps 1 and 2 to create a second identical circle. This will be the bottom of your stuffed coaster.
Step 4: Add the Chocolate Chips
Cut small pieces of dark brown yarn and either sew or surface-crochet them onto the top circle. You can also use small yarn balls or French knots to simulate chocolate chips. Aim for 5–6 chips per coaster.
Step 5: Assemble and Stuff
Place the two cookie circles together, wrong sides facing in. Using a slip stitch or single crochet seam, join the edges of both circles, leaving a 1-inch gap for stuffing. Add fiberfill stuffing to your desired puffiness and finish closing the gap.
Step 6: Finish and Weave In Ends
Once your crochet coaster is fully assembled and stuffed, weave in any remaining yarn tails. If you’d like to add a smiley face or decorative stitch detail, do so now using embroidery thread or contrasting yarn.
Customizing Your Crochet Coaster
One of the best parts of working with any crochet pattern is the ability to make it your own. With the stuffed cookie coaster, there are many ways to personalize your project and make it stand out.
You can experiment with different cookie types by changing the yarn colors. Try oatmeal brown yarn with white flecks for a classic oatmeal raisin look, or use pale beige and red for a sugar cookie with cherries. Let your favorite sweet treats inspire your designs.
Want to go kawaii? Add felt cheeks and tiny eyes to create a smiling cookie coaster. Use a bit of blush-colored yarn or embroidery floss to give your coaster personality. This is especially cute for kids’ rooms or novelty gift sets.
You can also vary the size of your coaster by adjusting your yarn weight and hook size. Thicker yarns and larger hooks will create bigger, fluffier coasters. Conversely, smaller hooks will give you a flatter, denser result.
Use your leftover yarn scraps to make mini cookie keychains using the same pattern—just work fewer rounds and use a smaller hook. These mini versions make great stocking stuffers or party favors.
If you’re making a set, consider a matching cookie tin or fabric pouch to package them together. It makes a lovely gift for teachers, coworkers, or anyone who loves handmade crafts.
Lastly, don’t be afraid to blend textures. Use variegated yarns for a marbled cookie effect or metallic thread for sprinkles. Crochet is all about expressing yourself through yarn.
Selling and Gifting Your Stuffed Cookie Coasters
Stuffed cookie coasters make fantastic handmade items to sell at craft fairs, online shops, or as thoughtful homemade gifts. They’re unique, functional, and cost-effective to produce—perfect for crafters looking to monetize their crochet skills.
If you’re selling, bundle coasters in sets of 2, 4, or 6 and wrap them in eco-friendly packaging. Include a small tag or label that describes the yarn used and care instructions (e.g., hand wash only, air dry). You can also offer customization options like name embroidery or color themes.
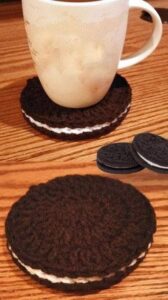
Use high-quality images when listing them on platforms like Etsy or Shopify. Show the coaster with a coffee mug or tea cup to give buyers a clear idea of size and purpose. Include photos of both sides to highlight the plush, stuffed finish.
When gifting, consider pairing the coaster with a matching mug or a packet of cookies for a complete themed gift. It’s ideal for birthdays, holidays, and teacher appreciation.
As always, make sure to credit the crochet pattern designer if you’re selling work made from someone else’s design. If you’ve written your own pattern (like this one), you can include printed instructions for buyers to try it themselves.
Also, consider expanding your product line. Use the same basic pattern to create other themed coasters—think pizza slices, donuts, or pancakes. It’s a great way to build a cohesive and creative crochet collection.
Sharing your finished projects on social media with hashtags like #crochetcoaster or #handmadegifts can also help increase visibility and connect you with the crochet community.
Final Thoughts on the Stuffed Cookie Coaster
The stuffed cookie coaster is a charming and practical crochet pattern that anyone can enjoy making. Whether you’re new to crochet or a seasoned fiber artist, this project offers a satisfying and playful way to create something useful and adorable.
From choosing the perfect yarn to adding stuffing and personal touches, every step of the process is fun and relaxing. The end result is a cozy coaster that brings smiles and warmth to your space—or to someone else’s.
By using high-quality cotton yarn and practicing good finishing techniques, you’ll ensure your coaster is both durable and washable. Don’t be afraid to play with colors, textures, and even scents by storing your finished coaster with cinnamon sticks or lavender sachets.
The versatility of this pattern means you can keep coming back to it for new occasions and ideas. As your skills grow, consider combining coasters into full sets, placemats, or table runners.
So go ahead—grab your hook, a cup of tea, and start stitching your next batch of cozy crochet goodness. These stuffed cookie coasters are sure to become a favorite in your collection.


