If you’re looking for a sweet and cheerful addition to your next quilt, the Baby Bee Quilt Block is the perfect choice. This block brings warmth, whimsy, and a pop of personality to any quilt pattern, whether you’re making a baby blanket, a seasonal wall hanging, or a bee-themed quilt for a loved one.
The Baby Bee Quilt Block is a beginner-friendly project, yet it’s detailed enough to appeal to experienced quilters who want to try something playful. With a mix of geometric precision and adorable design, it’s a delightful way to build your sewing skills and add unique visual interest to your next quilting creation.
In this post, you’ll find a detailed guide on how to create your own Baby Bee Quilt Block, complete with fabric cut sizes, sewing instructions, and creative customization tips. Whether you’re making one block or a whole swarm, this guide will help you every step of the way.
Materials and Fabric Cuts for Your Baby Bee Quilt Block
Before starting your quilt pattern, it’s essential to gather all materials and make precise cuts. This helps ensure that your final block comes together neatly and accurately.
Fabric Selection
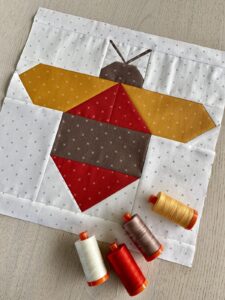
To bring your Baby Bee Quilt Block to life, choose cotton fabrics in classic bee colors: yellow, black, and white, plus a background color such as light blue or soft green. You can also opt for fun floral prints or polka dots for the wings and background to give it a modern twist.
Tools You’ll Need
-
Rotary cutter and self-healing mat
-
Acrylic ruler
-
Sewing machine or needle for hand stitching
-
Iron and ironing board
-
Fabric marking pen or pencil
-
Matching thread
-
Pins or clips
Fabric Cuts (for one 12″ x 12″ finished block)
-
Yellow (bee body):
-
(2) 2” x 3.5” rectangles
-
(2) 1.5” x 3.5” rectangles
-
-
Black (bee stripes):
-
(3) 1” x 3.5” rectangles
-
-
White (wings):
-
(4) 2.5” x 2.5” squares
-
-
Background (sky):
-
(4) 4.5” x 4.5” squares
-
(2) 2.5” x 2.5” squares (optional filler)
-
Optional Additions
-
Embroidery floss for antennae
-
Fusible interfacing for extra structure
-
Batting if turning into a mini quilt block
Pre-cutting your fabric and labeling each piece makes assembly much smoother. Now that everything is ready, let’s start stitching!
Step-by-Step Instructions for Sewing the Baby Bee Quilt Block
Now that you have your pieces cut and ready, it’s time to piece together your charming Baby Bee Quilt Block. This section guides you through sewing the bee’s body, wings, and background.
Step 1: Assemble the Bee Body
Start by sewing alternating strips of yellow and black fabric. Sew one yellow rectangle (2” x 3.5”) to a black strip (1” x 3.5”), followed by a yellow (1.5” x 3.5”), another black, another yellow, and a final black strip. Press seams flat toward the darker fabric.
Step 2: Trim and Shape the Body
Once all the strips are sewn, trim the block to a neat 6.5” x 3.5” rectangle. This ensures it fits perfectly within the overall layout of the quilt pattern. Check that your seams are straight and that the stripes line up evenly.
Step 3: Create the Wings
Use the four 2.5” white squares to make two half-square triangles (HSTs) for each wing. Pair each white square with a background square of the same size. Draw a diagonal line, sew ¼” on either side, and cut along the line. Press open and trim to 2” squares.
Step 4: Attach the Wings
Sew the wing HST units to each side of the bee body. The white triangle should point outward to mimic the angle of a bee’s wings. Press carefully to avoid puckering.
Step 5: Add the Background
Sew a 4.5” square of background fabric above and below the bee body strip. These form the “sky” around your bee. You can also use extra 2.5” squares to fill gaps or balance the design. Press and square up the block to 12.5” x 12.5”.
Step 6: Optional Embellishments
Use embroidery floss to stitch antennae above the bee’s head. You can also hand-stitch flight trails or add hand-quilting details to make your quilt block stand out.
With these steps complete, your bee block is ready to join others in a quilt top, mini quilt, or decorative wall hanging.
Creative Ideas to Use the Baby Bee Quilt Block
Once you’ve mastered this adorable quilt block, you’ll find endless ways to incorporate it into fun and meaningful projects. From baby quilts to home decor, your creativity can truly take flight!
Baby Quilts
A natural fit for baby showers or nursery gifts, the Baby Bee Quilt Block looks lovely repeated in a soft pastel palette. Alternate bee blocks with solid or simple nine-patch squares for a balanced look.
Table Runners and Placemats
Use a row of bee blocks to create a whimsical spring-themed table runner. You can also make single blocks into individual placemats or potholders.
Wall Hangings
Highlight a single bee block in a small hoop or fabric frame. Add patchwork borders and hand-stitch details for a personalized wall display.
Tote Bags and Accessories
Turn your quilt block into a front panel for a handmade tote bag or zipper pouch. Add fusible interfacing and batting to give it structure and durability.
Quilt Along or Group Projects
Invite friends to create their own bee blocks and stitch them together in a community quilt. It’s a great way to mix styles and foster creativity among quilting groups.
Seasonal Quilts
Incorporate your bee block into a larger seasonal or garden-themed quilt pattern. Combine with flower blocks, hexagons (like honeycomb), or sun motifs for a full spring vibe.
Your Baby Bee Quilt Block can truly shine in a variety of ways. Don’t be afraid to mix prints, textures, and colors to keep things fresh and interesting.
Tips for Quilting Success and Finishing Touches
To ensure that your quilt pattern comes out clean and polished, there are a few best practices you should always keep in mind—especially when sewing smaller pieces or assembling multiple blocks.
Precision Matters
Take your time cutting and measuring fabric. Even slight misalignments can cause problems when assembling blocks. Use a sharp rotary blade and always square up your pieces.
Chain Piecing
If you’re making multiple bee blocks, chain piecing will save you time and thread. It also helps maintain consistency across each block.
Pressing Seams
Always press seams after sewing—preferably toward the darker fabric. Use a bit of steam for a crisp finish, but avoid stretching your fabric.
Basting and Quilting
Once your quilt top is assembled, layer it with batting and backing. Baste with pins or spray and quilt using straight lines, free-motion stitching, or hand quilting.
Label Your Quilt
Add a tag or label to the back of your finished quilt with your name, date, and the occasion. This turns your creation into a treasured keepsake.
Washing and Care
If gifting or selling, pre-wash your quilt to soften it and set the stitches. Use a gentle detergent and air-dry or tumble on low.
By following these final touches, your quilt will not only look amazing but will last for years to come.
Final Thoughts: Buzz into Quilting Joy
The Baby Bee Quilt Block is more than just a sewing project—it’s a symbol of joy, warmth, and creativity. Whether you’re making it for a baby gift, personal keepsake, or just to enjoy the process of quilting, this block adds charm and a touch of whimsy to your work.
With a manageable size and simple construction, this quilt pattern is ideal for quilters of all skill levels. It offers the opportunity to experiment with color, play with embroidery, and personalize each block with your own signature flair.
So why wait? Pull out your favorite yellow, black, and white fabrics, follow the steps, and get buzzing on your next quilt project. Whether you make one or a whole hive, the Baby Bee Quilt Block is sure to bring a smile to anyone’s face.


