If you’re searching for a cheerful and meaningful design to include in your next quilt, look no further than the Four Leaf Clover Quilt Block. Known for symbolizing luck and positivity, the four leaf clover motif is perfect for springtime projects, St. Patrick’s Day quilts, or simply as a charming addition to any quilting collection.
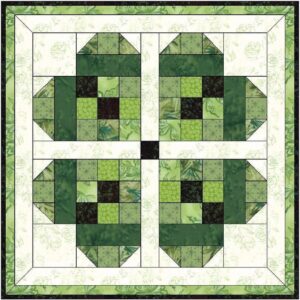
This quilt pattern is beginner-friendly, yet visually striking. It can be made using traditional piecing techniques and scrap-friendly fabrics, allowing you to create something unique with what you already have in your stash. The block itself forms the shape of a four leaf clover using simple squares and half-square triangles, which are then arranged into a cohesive and elegant block.
In this tutorial, you’ll learn how to make a standard Four Leaf Clover Quilt Block, complete with cutting measurements, layout instructions, and sewing steps. Whether you’re assembling a full quilt top or creating a decorative mini quilt, this block is sure to bring beauty and good fortune to your work.
Materials and Fabric Cutting Instructions
Creating the Four Leaf Clover Quilt Block starts with gathering your materials and making accurate cuts. Proper preparation will set the stage for a clean and visually appealing final block.
Fabric Suggestions
Use a range of green fabrics to represent the clover leaves. Choose either solid greens for a classic look or mix prints for a modern feel. For the background, white or cream fabrics work well to make the leaves stand out. You can also use black, beige, or even gold for a more elegant or festive look.
Tools You’ll Need
-
Rotary cutter
-
Quilting ruler
-
Self-healing cutting mat
-
Sewing machine (or hand sewing tools)
-
Iron and pressing surface
-
Pins or clips
-
Matching thread
Cutting Instructions for One 12″ Finished Block (12.5″ Unfinished)
-
Green fabric (clover leaves):
-
(4) 3.5” x 3.5” squares
-
(8) 2” x 2” squares (for corners)
-
-
White (background):
-
(4) 3.5” x 3.5” squares
-
(8) 2” x 2” squares
-
(4) 1.5” x 1.5” squares (optional for stem unit corners)
-
-
Green (stem):
-
(1) 1.5” x 4.5” rectangle
-
Optional additions:
If you want to applique the stem or leaves instead of piecing them, prepare lightweight fusible web and fabric scraps for that method.
With all your pieces cut and sorted, let’s move on to piecing the block.
Step-by-Step Piecing of the Clover Leaves
The clover shape is constructed using traditional piecing techniques, primarily by forming corner units using half-square triangles (HSTs) and placing them around the center square.
Step 1: Make the Leaf Petals
Start by pairing each green 2” square with a white 2” square. You’ll create a total of 8 half-square triangle units. Draw a diagonal line across the back of each white square, sew ¼” on both sides of the line, then cut along the line. Press seams open or toward the green fabric.
Step 2: Square Up HST Units
Trim each HST to exactly 1.5” square. Having consistent sizes will help the block come together evenly and keep the corners sharp.
Step 3: Assemble Petal Squares
Arrange each 3.5” green square with four HST units around its corners to form a rounded petal shape. Position the HSTs so that the green triangles point inward toward the square, forming a rounded clover shape.
Step 4: Sew the Petal Units
Sew the HSTs into pairs, then sew each pair to opposite sides of the 3.5” square. Press seams outward to reduce bulk. Repeat this for all four petal sections.
Step 5: Add Background Squares
Use the 3.5” white squares to fill the outer corners of the block layout. These help frame the clover shape and give breathing space between each petal.
Step 6: Layout the Block
Arrange the four leaf units in a square with a space in the center. The clover petals should all point inward, and the background pieces should frame the block. You’ve now got a clear clover shape ready to sew into rows.
Adding the Stem and Assembling the Block
The clover’s stem adds charm and structure to your quilt pattern. Here you can piece a simple stem or use applique for a more flexible design.
Step 1: Choose Your Stem Method
The simplest option is to piece a stem using a 1.5” x 4.5” green strip and sew it between two 1.5” x 1.5” white squares on each side. Alternatively, cut a curved stem shape and fuse it using an iron-on method.
Step 2: Attach the Stem
If piecing, position the stem unit beneath one of the bottom petals before final block assembly. If appliquéing, wait until the whole block is assembled and then stitch the stem on top of the finished surface.
Step 3: Final Block Layout
Assemble the block in a 3×3 grid:
-
Top row: petal unit, background, petal unit
-
Middle row: background, optional center (can be a small square or heart), background
-
Bottom row: petal unit, stem unit, petal unit
Step 4: Sew Rows Together
Join the three rows together, aligning seams carefully. Use pins at intersections to ensure a sharp and square layout. Press each row and then press the full block when finished.
Step 5: Check Block Size
After piecing, your unfinished block should measure 12.5” x 12.5”. If necessary, square it up carefully using a quilting ruler.
Step 6: Optional Embellishments
Add embroidery, such as a running stitch around each petal, or small quilting motifs like tiny hearts or vines around the background to enhance your design.
Creative Quilt Pattern Ideas Using the Four Leaf Clover Block
Once you’ve mastered the Four Leaf Clover Quilt Block, you can use it in several creative ways in your quilting projects. Its versatility makes it a lovely motif for many seasonal and decorative applications.
Make a Lucky Table Runner
Use 3 or 4 clover blocks in a row with narrow borders to make a festive table runner for spring or St. Patrick’s Day. You can alternate clovers with Irish chain blocks for a traditional Irish theme.
Create a Mini Quilt
Sew a single quilt block and add a wide border to make a charming mini quilt for your wall. Frame it with contrasting fabrics like gold, green plaid, or rainbow prints.
Use in a Baby Quilt
A series of clover blocks in pastel greens and yellows can make a sweet baby quilt. Add sashing and cornerstones to break up the blocks and give the quilt a clean finish.
Incorporate into a Sampler Quilt
Use the Four Leaf Clover Quilt Block as one of many designs in a sampler quilt. Pair it with other nature-themed blocks like tulips, bees, or butterflies for a spring-inspired project.
Clover-Themed Quilt Top
Make a full quilt top of only four leaf clover blocks. Rotate them to create a flowing pattern of luck across the entire top, and use bold sashing for a dynamic effect.
Gift or Keepsake
Stitch the block into a decorative pillow or pouch and give it to someone as a good luck charm. Add a label on the back with a personalized message for an extra-special touch.
Final Tips and Finishing the Clover Quilt Block
To make your project as polished and long-lasting as possible, here are some extra tips for finishing and caring for your quilt.
Use High-Quality Cotton
Cotton quilting fabric is best for durability and ease of use. Pre-wash if your fabrics are prone to shrinking or bleeding.
Press, Don’t Iron
Gently press your seams rather than ironing back and forth. This keeps your fabric from stretching and helps seams lie flatter.
Chain Piece for Speed
If making multiple blocks, save time by chain piecing HSTs and squares. It’s efficient and keeps your project flowing smoothly.
Square Up Often
Take the time to square up units after each sewing step. It helps maintain consistency across your blocks and results in a smoother assembly.
Layer, Baste, and Quilt
Once your quilt top is complete, layer it with batting and backing. Baste well, quilt by hand or machine, and bind using your preferred method.
Label and Display
Finish your quilt with a personal label, and proudly display or gift it. The Four Leaf Clover Quilt Block will surely spread luck and happiness wherever it goes.
Conclusion
This Four Leaf Clover Quilt Block Tutorial offers a simple yet stunning addition to any quilt pattern. With its symbolic meaning and easy-to-follow construction, it’s ideal for quilters at all levels. Whether you’re crafting a full quilt, making a mini wall hanging, or looking for a seasonal accent, this block will bring your project to life with charm and intention.
By following this guide, you’ll not only build your quilting skills but also create something truly heartwarming. So pick out your greenest fabrics, start stitching, and let the luck of the four leaf clover guide your needle!


