If you’re looking for a fun and adorable project to brighten your day, the Crochet Bee Amigurumi Keychain is the perfect pick. This delightful little bee is ideal for beginners and seasoned crocheters alike. Plus, it’s a functional piece of art that can decorate your keys, backpack, or even gift packages during spring or summer seasons.
Crafting a bee-themed amigurumi item allows you to explore basic shapes and colorwork without overwhelming complexity. This pattern is compact, portable, and highly customizable. Best of all, it makes a wonderful handmade gift for friends or a unique product for your handmade shop.
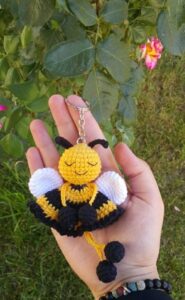
In this post, we’ll explore everything you need to know to create your own crochet bee amigurumi keychain, including tools, fabric measurements, and a step-by-step amigurumi pattern tutorial. The result is a lovable, striped keychain that’s small in size but big on charm.
Tools and Materials for Your Crochet Bee Amigurumi Keychain
To begin your amigurumi pattern, you’ll need a few simple supplies. Most of these items are easy to find in your local craft store or online. Choosing soft yet durable yarn will ensure your bee keychain lasts through daily use.
Start with selecting worsted weight yarn in three colors: yellow, black, and white. These classic bee shades bring out the bold, vibrant look that makes this amigurumi project pop. You’ll also need fiberfill for stuffing, and keychain hardware to attach your finished creation.
Here’s a full list of materials:
-
1 skein yellow yarn (100% cotton, worsted weight)
-
1 skein black yarn (same weight and fiber)
-
Small amount of white yarn (for wings)
-
2.5 mm or 3.0 mm crochet hook
-
Tapestry needle
-
Stitch markers
-
Scissors
-
Polyester fiberfill
-
1 metal key ring or lobster clasp
For cutting your materials, no fabric is needed, as amigurumi typically uses yarn. However, if you’d like to attach a small felt heart or label to your keychain, cut a 1.5” x 1.5” piece of felt using sharp scissors and attach it with fabric glue or embroidery thread.
How to Crochet the Bee’s Body
Creating the body of your crochet bee amigurumi keychain is straightforward. You’ll be working in continuous rounds (also known as spiral rounds) using basic stitches like single crochet, increases, and decreases.
-
Start with a Magic Ring: Use yellow yarn and create a magic ring. Crochet 6 single crochets (sc) into the ring. Pull it tight and place a stitch marker on the first stitch of each round for guidance.
-
Increase Rounds:
-
Round 2: 2 sc in each stitch around (12 sts)
-
Round 3: (1 sc, inc) repeat 6 times (18 sts)
-
Round 4: (2 sc, inc) repeat 6 times (24 sts)
This forms the rounded base of the bee’s body.
-
-
Create the Stripes:
Switch to black yarn and work 4 rounds even (24 sts each). Then switch back to yellow and crochet 2 rounds. Alternate again to black for 2 rounds and finish with yellow for the last few rows. -
Begin Shaping the Head:
-
Round 10: (2 sc, dec) repeat 6 times (18 sts)
-
Round 11: (1 sc, dec) repeat 6 times (12 sts)
-
Round 12: dec around (6 sts)
-
-
Stuff and Close:
Fill the body with fiberfill before the final round. Then close the opening with a yarn needle by weaving through the front loops and pulling tight. -
Optional Detail: Embroider a tiny smile or attach safety eyes between rounds 5–6 for extra cuteness.
Adding the Wings and Keychain Hardware
The wings give your bee its iconic look and playful personality. You can make them with simple oval or heart shapes. Use white yarn to contrast the black and yellow stripes for high visibility.
-
Wing Pattern (Make 2):
-
Magic ring, 6 sc
-
Round 2: 2 sc in each stitch (12)
-
Round 3: (1 sc, inc) repeat 6 times (18)
Fasten off, leaving a tail for sewing.
-
-
Shape the Wings:
Press each wing gently and fold slightly at the center to create a “flutter” shape. Stitch securely to each side of the bee’s back, about 1–2 stitches apart. -
Sewing Tips:
Use the tail left from fastening off and a tapestry needle. Be sure not to pull too tightly or the wings may lose their shape. -
Attaching the Keychain:
Take a jump ring or metal loop and attach it through the top of the bee’s head. Use a lobster clasp or standard key ring to make it easy to clip onto items. -
Optional Felt Accent:
Cut a 1.5” circle or heart from felt and glue or stitch it underneath the wings or at the base for a handmade signature touch. -
Securing Everything:
Double-check all pieces are secure and no stuffing is exposed. This ensures durability if the amigurumi keychain will be handled frequently or gifted.
Tips for Customization and Selling Your Amigurumi Pattern
Whether you’re making this for yourself or to sell, personalizing your amigurumi pattern can make it stand out. You can experiment with different yarn textures, sizes, and accessories to make each bee unique.
-
Use Variegated Yarn:
Try self-striping yarn to add a rainbow twist or pastel blend to your bee. This adds a whimsical touch to the traditional design. -
Add a Bow or Crown:
Crochet a tiny bow or flower to attach on the bee’s head for an extra bit of personality. This is great if you want to turn your bee into a Valentine’s or birthday gift. -
Label It Handmade:
Attach a small “Handmade” tag or embroidery thread to sign your work. These tags are often appreciated by gift buyers or Etsy shoppers. -
Create a Set:
Make a set of three bees in different sizes (mini, small, and medium) and sell them as a “honeybee trio.” It’s a great value bundle and makes a charming gift set. -
Package with Care:
If selling, place each crochet bee amigurumi keychain in a small clear bag or paper box. Include a care card and optional thank-you note for professional presentation. -
Share on Social Media:
Take bright, well-lit photos of your bees and post them on platforms like Instagram, Pinterest, or Facebook. Use hashtags like #amigurumi, #crochetbee, and #crochetpattern to boost visibility.
Final Thoughts on Making Your Own Crochet Bee Amigurumi Keychain
The crochet bee amigurumi keychain is more than just a quick craft—it’s a thoughtful and charming gift made with love. The project allows you to improve your crochet skills while producing something functional and heartwarming.
You don’t need to be an expert to create this amigurumi pattern. With a few basic stitches and some practice, you can make an adorable bee that’s sure to bring smiles. Each finished keychain is a reflection of your creativity and attention to detail.
Because this project uses small amounts of yarn, it’s also a great stash buster. You can easily make several in different color themes depending on the occasion—think red for Valentine’s Day, green for spring, or blue for baby showers.
Remember to follow the tutorial step-by-step and personalize your bee however you’d like. This pattern is meant to be flexible, so don’t be afraid to play with your design.
If you enjoyed this amigurumi pattern, consider trying other small creatures like crochet butterflies, frogs, or chibi characters. Each one will build your confidence and crochet collection!
So grab your hook and yarn and start creating your very own crochet bee amigurumi keychain today—your keys (and your friends) will thank you.


