If you’re looking to add a touch of countryside charm to your next quilting project, this Chicken Quilt Tutorial is exactly what you need. Whether you’re crafting for a farmhouse kitchen, a baby’s room, or your own cozy quilt collection, these quirky chickens stitched into patchwork blocks are sure to make everyone smile. This design is beginner-friendly but offers enough creativity for experienced quilters to personalize and enjoy.
The quilt itself is built around a simple, repeatable quilt pattern that forms the body and features of a chicken using basic shapes and color blocks. It can be made as a single block for a pillow, or repeated to create an entire quilt. You’ll learn how to piece each component, sew with precision, and achieve a vibrant and cohesive finished design.
This article will walk you through a full step-by-step process — from choosing fabric and measuring cuts, to assembling your chicken block and quilting it together. By the end, you’ll have your own chicken quilt that’s cheerful, handmade, and bursting with farmhouse flair.
Choosing Fabrics and Preparing Your Cuts
Picking the right fabrics is a fun and essential step in your chicken quilt pattern. Since this design uses bold color contrasts and playful shapes, choose prints and solids that evoke the character of barnyard chickens. Think reds, yellows, whites, and bold blacks — and don’t be afraid to throw in a gingham or polka dot for personality.
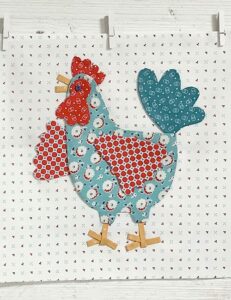
For each chicken quilt block, you’ll need fabric in five color categories: background, body, beak/comb, legs, and wings. Choose your background fabric to contrast with your chicken so that it stands out clearly. White or light grey chickens pop against darker or colorful backdrops.
Here are the measurements for one block (finished size 12″ x 12″):
-
Background fabric: (2) 2.5” x 2.5”, (1) 4.5” x 2.5”, (2) 6.5” x 2.5”
-
Body fabric: (1) 6.5” x 6.5” square
-
Wing fabric: (1) 3” x 3”
-
Comb/beak fabric: (1) 2” x 2” (cut triangle), (1) 1.5” x 1.5”
-
Leg fabric: (2) 0.5” x 3.5”
Cut all your fabric with a rotary cutter and ruler to ensure clean, precise edges. Accuracy in cutting will help your quilt pattern come together smoothly during piecing.
Before sewing, iron your fabric to eliminate wrinkles. Pressing between steps is essential throughout the process, so keep your iron handy. It helps all your pieces align perfectly and avoids bunching.
If you’re planning a full quilt, repeat the fabric cuts per the number of chicken blocks you want. For example, a baby quilt with a 3×3 layout will need nine sets of these cuts. Keep your stacks organized by color and block section.
Assembling the Chicken Quilt Block
Once all your pieces are cut, it’s time to begin constructing your chicken quilt block. We’ll start by assembling the chicken body, wings, and beak — then add detail and borders. These steps are easy to follow and offer opportunities for your creativity to shine.
Begin with the body. Sew the 6.5” square body fabric to the bottom 6.5” x 2.5” background strip using a quarter-inch seam. Press the seam downward. This forms the main portion of the chicken’s torso against its background.
Next, add the wing. Take the 3” x 3” square and fold it diagonally, press, and open. Sew along the diagonal fold line on the top right of the body square to make a half-square triangle wing. Trim the excess and press the triangle open. This creates the illusion of a folded wing.
Now, attach the beak and comb. The beak triangle (cut from the 2” x 2” square) is sewn into the top left of the head area. Use a snowball technique: position the triangle on a 2.5” square background piece, sew diagonally, and trim. For the comb, sew the 1.5” red square directly above the beak using a quarter-inch seam.
Add the chicken’s legs using the two narrow yellow strips (0.5” x 3.5”). These can be sewn directly onto the bottom background strip to peek out from the chicken’s underside. Keep spacing even for symmetry.
Once your pieces are sewn into place, assemble all rows — comb and beak row, body and wing row, and leg row — with background pieces as necessary to complete a square. Align all seams carefully and press each one open to reduce bulk.
Sewing Your Quilt Top Together
With your chicken quilt block complete, now it’s time to decide how many blocks you want to create and how to join them. You can make a table runner with just three or four, or create a full throw quilt by making multiple rows of chickens.
Decide your layout: traditional grid, alternating chickens in different directions, or even mirror-image chickens facing each other. Layouts with color variation in chickens add more charm and visual interest to your quilt.
Sew your blocks together in rows first. Use a consistent 1/4” seam allowance and press each row’s seams in alternating directions. This allows nesting of seams and helps keep your blocks aligned neatly.
Once your rows are complete, join them together carefully. Double-check seam intersections and corners — this makes a big difference in your quilt pattern looking crisp and polished.
After joining all blocks into a top, add borders if desired. A 2” sashing around the full quilt top helps frame the chickens and make the design stand out. You can use contrasting fabric or a coordinating solid.
Now it’s time to sandwich your quilt. Layer backing fabric (2 inches larger than the quilt top on all sides), batting, and the quilt top. Baste them together using pins or spray adhesive to prepare for quilting.
Quilting and Finishing Your Chicken Quilt
Once your quilt top is assembled and basted, it’s time for the fun part — quilting the layers together. For this design, straight-line quilting or free-motion quilting both work well. Choose a quilting method that highlights your chicken blocks without overwhelming them.
For a simple finish, sew straight lines 1/4” on either side of all seams. This method is known as “stitch in the ditch” and provides a clean, minimal look that holds all your layers in place.
Want to get creative? Try outlining each chicken or stitching around the wings and combs to create a more 3D effect. This can bring even more personality to your quilt pattern.
Once the quilting is done, trim your sandwich so that all edges are even and square. Use your rotary cutter and ruler to maintain a clean border.
Now it’s time to add the binding. Cut 2.5” strips of fabric, join them into one long strip, and fold lengthwise. Sew the binding to the front of the quilt, fold it over, and hand-stitch or machine-stitch it to the back.
Lastly, attach a quilt label to the back with your name, the date, and the quilt’s name — “Chicken Coop Charm” perhaps? Every handmade quilt deserves a signature.
Wrapping Up Your Chicken Quilt Tutorial
Making your own chicken quilt is not just a delightful experience; it’s also a beautiful way to bring farmhouse charm into your home. Whether you’re crafting for a gift, decor, or your next craft fair, these whimsical chicken blocks create a cozy, handmade masterpiece.
This project combines playful design with simple techniques, making it accessible to beginners while still satisfying for seasoned quilters. It’s also easily customizable — from bold rooster colors to pastel chicks, your fabric choices will breathe life into your quilt pattern.
If you’re teaching a class or sewing with a group, the chicken quilt block is a great collaborative activity. Each quilter can make a unique chicken, and together they create a joyful barnyard of variety.
You can also scale the block up or down depending on your project. Make smaller versions for potholders or larger ones for a toddler blanket. The modular design makes it extremely versatile.
Don’t forget to share your finished chicken quilt on social media or in your quilting community! Add hashtags like #chickenquilt or #farmhousequilt so others can admire your handiwork and find your tutorial.
We hope this chicken quilt tutorial has inspired you to create something charming, heartfelt, and handmade. Happy quilting — and cluck on!


