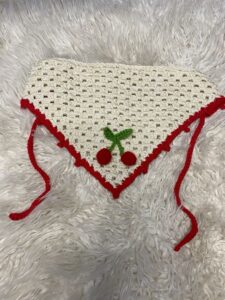
The Cherry crochet bandana is a charming accessory that combines playful design with the timeless beauty of handmade crafts. Perfect for all ages, this bandana can be worn as a headscarf, neck accessory, or even tied to a bag for a touch of style. Making your own bandana is not only cost-effective but also allows you to customize colors and sizes to match your personality.
For beginners, this project is an excellent way to practice basic crochet patterns while creating something practical and adorable. The cherry appliqué adds a fun and fresh detail, making the accessory perfect for spring and summer outfits. With a few simple stitches and some creativity, you can craft a piece that looks boutique-worthy.
This guide will walk you step by step on how to make a Cherry crochet bandana, including the materials you will need, basic measurements, and clear instructions. Whether you are new to crochet or an experienced crafter, this project is quick, easy, and satisfying to complete.
Materials and Preparation for the Cherry Crochet Bandana
Before starting the Cherry crochet bandana, gather all the materials you will need. Preparing everything in advance makes the process smooth and enjoyable.
First, you will need cotton yarn in three colors: one for the bandana base (white, beige, or any preferred shade), red for the cherries, and green for the leaves. Cotton yarn is ideal because it is soft, breathable, and holds its shape well.
Next, choose a crochet hook that matches your yarn weight. For most cotton yarns, a 3.5mm to 4mm hook works perfectly. Make sure you also have scissors, a yarn needle, and stitch markers to help keep track of your rows.
Cut your yarn for the cherries into pieces approximately 30 cm each. For the leaves, cut strands of green yarn about 20 cm long. For the bandana base, you will need longer yarn, depending on the size you want.
Measure your head circumference or the desired length for the bandana. A standard triangular bandana is about 40 cm wide at the base and 25 cm tall at the center point. You can adjust these dimensions according to your preference.
Having all these materials ready will help you follow the crochet pattern without interruptions, making the process more enjoyable and efficient.
Step-by-Step Guide to Crochet the Bandana Base
The first step in making your Cherry crochet bandana is creating the triangular base. This part uses simple stitches that are perfect for beginners.
Start by making a slip knot and chaining 4 stitches. In the fourth chain from the hook, make 3 double crochets. This will form the starting point of the triangle. Turn your work and chain 3.
For each row, you will increase one stitch at the beginning and end to shape the triangle. Continue working double crochets across, making sure to place 3 double crochets in the center stitch of each row to maintain the triangular shape.
Repeat this process until the base of the triangle reaches your desired width. For an adult-sized bandana, about 20 to 25 rows are usually enough. Make sure to check the size by measuring it as you go.
Once you reach the desired size, fasten off the yarn and weave in any loose ends using the yarn needle. At this point, you can also crochet a chain strap on each end of the triangle to help tie the bandana.
This simple crochet pattern creates a sturdy yet flexible base, perfect for adding decorative cherries later. The triangle shape is flattering and versatile, making it a great accessory for everyday wear.
Crocheting the Cherry and Leaf Appliqué
Now it’s time to create the cherries that give the Cherry crochet bandana its unique charm. These appliqués are small and quick to make, making them perfect for leftover yarn.
To crochet a cherry, start with a magic ring and make 6 single crochets into the ring. Pull tight to close and slip stitch to join. Make another round of 6 single crochets to create a slightly larger circle. Finish off and weave in the end.
Repeat this step to make at least two cherries. You can make more if you want a fuller design. For the leaves, chain 6, then work 1 single crochet, 1 half double crochet, 2 double crochets, 1 half double crochet, and 1 single crochet along the chain. Slip stitch to finish.
Make at least two leaves for each set of cherries. Once the cherries and leaves are ready, use the yarn needle to sew them together in small clusters.
Attach these clusters to the bandana by sewing or crocheting them onto one corner of the triangle. Position them slightly to the side for a cute, asymmetrical look.
These crochet patterns for cherries and leaves are simple, quick, and easy to customize with different colors or sizes.
Final Touches and Styling Your Cherry Crochet Bandana
With the base and cherries complete, it’s time to add final touches to your Cherry crochet bandana. You can add edging around the triangle for a more finished look. A simple single crochet border works well.
Another option is to create a scalloped border by making “skip 1 stitch, 5 double crochets in next stitch, skip 1 stitch, single crochet in next stitch” around the edge. This adds a delicate and decorative finish.
Once your bandana is complete, block it by lightly wetting and shaping it to your desired size. Let it dry flat so that it keeps its shape.
This accessory can be styled in many ways. Wear it as a headscarf for a boho look, around your neck as a chic accent, or tie it onto your bag for a fun detail.
The best part about this project is how versatile and quick it is. You can make several bandanas in different colors to match various outfits.
By following this crochet pattern, you will have a handmade accessory that is both practical and stylish. It also makes a thoughtful gift for friends and family.


