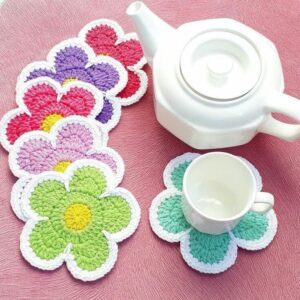
The crochet flower coasters – step by step tutorial is the perfect project for anyone who loves combining creativity with functionality. These coasters are not only beautiful but also practical, protecting your table from scratches, spills, and heat. The floral design adds a cheerful and elegant touch to any space, making them ideal for daily use or as handmade gifts for friends and family.
One of the best things about crochet flower coasters is that they are quick to make and do not require a lot of yarn. This makes them great for using leftover yarn scraps while allowing you to experiment with different colors and textures. Whether you are a beginner or an experienced crocheter, this project is simple yet rewarding, helping you improve your crochet skills.
In this guide, we will go through a step by step tutorial on how to create these lovely coasters. You will learn about the necessary materials, how to make the base, how to shape the petals, and tips for finishing and customizing your coasters. A helpful FAQ is included at the end, along with a conclusion summarizing everything covered in this article.
Materials and Preparation
To begin the crochet flower coasters – step by step tutorial, you will need cotton yarn in your preferred colors. Cotton is the best choice for coasters because it is durable, washable, and heat-resistant. Choose at least two colors: one for the flower center and one or more for the petals.
A 3.5mm or 4mm crochet hook works well with worsted-weight or DK yarn. You will also need a yarn needle for weaving in ends and scissors to cut your yarn. Optional items include stitch markers if you want to keep track of your rounds more easily.
Before starting, make sure you are comfortable with basic stitches such as chain (ch), slip stitch (sl st), single crochet (sc), half double crochet (hdc), and double crochet (dc). These stitches will be used throughout the project.
Prepare a clean, well-lit workspace with all your tools within reach. Having an organized area helps the process feel smooth and enjoyable.
Decide on the size of your coaster. Typically, a coaster measures around 4 to 5 inches in diameter, but you can make it larger or smaller by adjusting the number of rounds.
Once you have your yarn and tools ready, you can start working on the coaster base, which will serve as the foundation for the petals.
Creating the Coaster Base
The base is the first part of the crochet flower coasters – step by step tutorial and acts as the center of the flower. Begin by making a magic ring and working several single crochet stitches into the ring. Pull the ring tight to close the center.
Continue working in rounds, increasing evenly with each round to form a flat circle. You can use double crochet stitches to create a more open and textured look.
Make sure to count your stitches to avoid mistakes that could cause the coaster to curl or ruffle. Keeping the stitch count correct will ensure the base lays flat.
Work until the base reaches about 3 inches in diameter. This will leave enough room for the petals to extend outward and create the desired coaster size.
Fasten off the yarn for the base color or continue directly with the petal color, depending on your design choice.
The circular base should now be flat and even, ready for the petal section to be added.
Shaping the Flower Petals
This is the most creative step in the crochet flower coasters – step by step tutorial. The petals give the coaster its floral look and can be customized in shape and color.
To create petals, switch to your chosen color and work around the last round of the base. Each petal can be formed by chaining a few stitches, then working back into the base with a combination of single, half-double, and double crochet stitches.
For a basic petal, you can chain 3, work 2 double crochets into the same stitch, and slip stitch into the next stitch. Repeat this pattern around the base to create multiple petals.
You can experiment with petal size by increasing or decreasing the number of chains or stitches. For a fuller flower, add more petals closer together.
Make sure to keep tension consistent so that the petals are uniform in shape. Blocking the coaster at the end can also help shape the petals evenly.
Once all petals are completed, fasten off and weave in the yarn ends using a yarn needle.
Finishing and Customizing the Coasters
The last part of the crochet flower coasters – step by step tutorial is finishing and adding personal touches to your project. Start by weaving in any remaining ends securely on the back side of the coaster.
Blocking your coaster can help it lay flat and enhance the shape of the petals. You can do this by pinning it to a blocking mat and lightly steaming or spraying with water.
To create a set, make multiple coasters in different color combinations. You can mix and match colors for the petals and centers to create a cheerful variety.
If you want larger coasters for bigger cups or teapots, simply add more rounds to the base before starting the petals.
Consider adding small embellishments such as beads or embroidery details to make your coasters more unique and decorative.
These coasters make great gifts. You can bundle a few together with a ribbon or place them in a small box to give as a handmade present.
FAQ – Crochet Flower Coasters
1. What yarn is best for coasters?
Cotton yarn is ideal because it absorbs moisture and is heat-resistant, making it practical for everyday use.
2. Are crochet flower coasters beginner-friendly?
Yes, they are perfect for beginners since they use basic stitches and are small, quick projects.
3. How long does it take to make one coaster?
Depending on your skill level, each coaster takes about 30–60 minutes to complete.
4. Can I make different sizes of these coasters?
Yes, simply add or remove rounds in the base to make the coaster larger or smaller.
5. How do I clean crochet flower coasters?
Hand wash in cool water with mild detergent and lay flat to dry. Cotton yarn is durable and easy to maintain.
6. Can I sell coasters made from this tutorial?
Yes, handmade crochet coasters are popular items at craft fairs or as online shop products.
Conclusion
The crochet flower coasters – step by step tutorial is a simple yet rewarding project that adds beauty and functionality to your home. You learned how to prepare materials, create a sturdy base, shape the petals, and finish your coasters with customization options.
These coasters are perfect for everyday use, as gifts, or even for selling at craft fairs. They are beginner-friendly and a great way to use leftover yarn while improving your crochet skills.
We hope you enjoyed this tutorial and feel inspired to create your own set of beautiful flower coasters. Please leave your honest opinion and suggestions in the comments—we would love to hear your thoughts and see your creations!


