Creating a Strawberry patchwork placemat – Step by Step Tutorial is a delightful way to add color, charm, and a touch of handmade beauty to your dining table. With its vibrant red strawberries, playful green leaves, and soft pinks or whites in the background, this project brings a fresh and cheerful atmosphere to every meal. Whether you’re planning a spring brunch or looking for a thoughtful handmade gift, this placemat is a perfect addition to your sewing or quilting journey.
This tutorial is designed for both beginners and experienced crafters. You’ll learn how to cut your fabric, arrange the patches, sew them together, and finish your piece with clean edges and professional touches. With easy-to-follow steps and a focus on detail, you’ll enjoy each phase of creating your own Strawberry patchwork placemat.
Not only is this a fun sewing project, but it also helps you use up fabric scraps creatively. You can customize each placemat to match your kitchen décor, seasonal themes, or special occasions. This Strawberry patchwork placemat – Step by Step Tutorial gives you the foundation to create something truly special while honing your quilting and patchwork skills.
Choosing Fabrics and Materials
Before starting your Strawberry patchwork placemat – Step by Step Tutorial, it’s essential to gather all the right materials. Choosing high-quality cotton fabric with complementary colors will ensure a polished and durable finish.
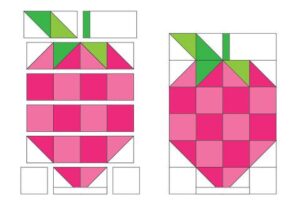
Look for red fabric with small strawberry prints or solid red fabric to represent the fruit. Green fabric will be used for the leaves, and a light neutral color like white, beige, or soft pink will make up the background patches. Each patch should measure 4.5 x 4.5 inches before sewing.
You will need at least 18 patches for one placemat. This includes 4 strawberry-themed patches, 4 green leaf patches, and 10 neutral background patches. You can mix and match patterns to give your placemat a more dynamic, patchy look.
A rotary cutter and self-healing cutting mat will make it easier to cut clean, accurate squares. A clear quilting ruler is also helpful for measuring and ensuring your pieces are straight and uniform.
Use 100% cotton thread for sewing, along with sewing pins or clips to hold patches in place. An iron and pressing cloth are essential for achieving crisp seams and a neat overall appearance.
Lastly, prepare quilt batting and a backing fabric piece the same size as the final placemat (usually about 14 x 18 inches). These materials will give your Strawberry patchwork placemat structure and comfort.
Assembling the Patchwork Design
Now that you have your materials, it’s time to begin the exciting process of assembling your Strawberry patchwork placemat – Step by Step Tutorial. This part involves planning the layout and sewing the fabric patches together.
Start by laying out all your 4.5 x 4.5-inch fabric squares on a flat surface. Arrange them in a 3-row by 6-column layout. Position your strawberry-themed squares evenly across the placemat so they create a balanced design.
Place the green leaf squares around the strawberry squares to create a natural look, as if strawberries are growing from the leaves. Fill in the remaining spaces with your background color fabric to complete the visual flow.
Once you are satisfied with the layout, stack each row in order and pin the squares right sides together, two at a time. Sew using a ¼-inch seam allowance and press the seams open after each line of stitching.
After all the rows are sewn, join them by sewing row to row using the same ¼-inch seam allowance. Take your time to match seams so that the corners of each patch align neatly. This detail will enhance the professional appearance of your placemat.
Press the entire patchwork top flat and smooth, making sure all seams are crisp. This step is important for preparing the top layer of your Strawberry patchwork placemat for quilting.
At this point, your patchwork top is complete and ready to be layered with batting and backing fabric. The visual design should resemble a playful garden of strawberries surrounded by soft, coordinating colors.
Quilting and Binding the Placemat
In this stage of the Strawberry patchwork placemat – Step by Step Tutorial, you’ll bring all the layers together and quilt them to form a sturdy and functional placemat. This part is crucial for durability and texture.
Create a quilt sandwich by placing your backing fabric right side down, the batting in the middle, and your patchwork top on top, right side up. Make sure all layers are smooth and aligned, and use safety pins to hold them in place.
You can quilt using straight lines, diagonal stitches, or even free-motion quilting if you’re experienced. Simple straight-line quilting along the patch seams is often easiest and looks clean and modern.
Use your sewing machine’s walking foot if you have one, as it helps feed all three layers evenly. Begin quilting from the center and work outward to avoid puckering or shifting.
Once the quilting is done, trim the edges of the placemat so all three layers are even and the corners are squared off. This ensures your binding will sit properly and look professional.
To bind your placemat, cut 2.5-inch wide strips of fabric, enough to go around the entire edge. Fold each strip in half lengthwise, press, and attach to the edge using a ¼-inch seam. Fold the binding over the edge and stitch it down by hand or machine.
The binding adds a polished edge and reinforces the placemat. Now your Strawberry patchwork placemat is complete and ready to brighten up your dining table!
Tips for Customization and Gifting
The best part of this Strawberry patchwork placemat – Step by Step Tutorial is how easily you can personalize the project. With a few creative touches, each placemat becomes a unique, heartfelt creation.
Try using different shades of red or pink for the strawberries to give the placemat a varied and realistic look. You can also incorporate gingham or polka-dot patterns for a vintage or farmhouse aesthetic.
If you enjoy embroidery, add little stitched seeds or outlines on the strawberries. A few hand-sewn details make your work stand out and add charm to the design.
You can create a set of four or six placemats with slightly different layouts, giving your table a coordinated but playful appearance. This makes it perfect for everyday use or seasonal settings.
For gifting, tie a ribbon around a stack of placemats and include a handmade tag. These make thoughtful presents for birthdays, holidays, housewarmings, or bridal showers.
If you’re selling handmade crafts, this project is great for small-batch sales. Many people appreciate handcrafted kitchen items, and the strawberry theme appeals to a wide audience.
The versatility of the design allows it to be adapted for other fruits, such as apples or cherries, simply by changing the colors and fabric prints. This opens up even more possibilities for creativity.
FAQ – Strawberry patchwork placemat
Q1: What size should each fabric square be?
A: Each square should be cut to 4.5 x 4.5 inches, which gives you a finished 4-inch square after sewing with a ¼-inch seam allowance.
Q2: What is the standard placemat size?
A: A typical placemat measures around 14 x 18 inches, but you can adjust the size to fit your table or design preference.
Q3: Can I make this project without a sewing machine?
A: Yes, you can hand-sew the entire placemat, but it will take longer. Be sure to use small, tight stitches and reinforce corners and edges.
Q4: What kind of batting should I use?
A: Use low-loft cotton or cotton/polyester blend batting. It gives a soft feel without making the placemat too bulky.
Q5: How do I clean the finished placemat?
A: Hand-washing or machine washing on a gentle cycle with cold water is best. Lay flat to dry and press with an iron to reshape if needed.
Q6: Can I add interfacing instead of batting?
A: Interfacing can be used for a thinner, more rigid placemat, but it won’t have the same quilted softness. Choose based on how you want the placemat to feel.
Conclusion
This detailed Strawberry patchwork placemat – Step by Step Tutorial has guided you through the entire creative process—from selecting fabrics and planning your layout to quilting and adding those final, polished details. With this project, you’ve not only practiced key sewing techniques but also created a piece that’s both functional and decorative.
The beauty of the strawberry theme lies in its universal appeal and the joy it brings to everyday settings. Whether you’re crafting for yourself or others, the satisfaction of completing a handmade project like this is truly rewarding.
We hope you found this tutorial inspiring and easy to follow. Please share your honest feedback and suggestions for future tutorials—your input helps us create content that meets your needs and fuels your creativity. Happy sewing!


