projects are perfect for those who love crafting functional items that bring everyday convenience. Whether you’re packing lunch, snacks for a road trip, or a cool drink for the beach, a thermal bag can help maintain the right temperature. Making one at home not only allows for customization but also saves money and promotes sustainability.
Crafting your own easy to make thermal bag is not as complicated as it may sound. With a few basic materials and a sewing machine, you can create a stylish and durable bag that keeps food warm or cold. This guide is specifically tailored for beginners and intermediate crafters, with detailed steps that ensure a smooth crafting process from start to finish.
In this easy to make thermal bag – Step by Step Tutorial, you’ll learn how to choose your materials, cut and sew the insulation layers, assemble the bag structure, and add useful finishing touches like handles or zippers. The instructions are written in plain language and are beginner-friendly. By the end, you’ll be able to create a fully functional thermal bag tailored to your needs.
Materials Needed for the Thermal Bag
Before you begin this easy to make thermal bag – Step by Step Tutorial, gather all necessary materials. Having everything ready will make the process more efficient and enjoyable. Start with fabric for the outer layer — cotton, canvas, or oilcloth are all good choices for durability and style.
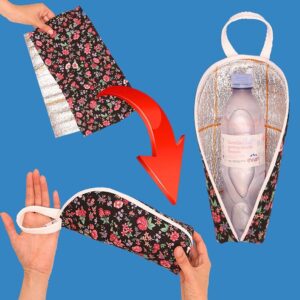
For the insulating layer, you’ll need thermal batting or insulated lining. This is the most important part for maintaining temperature, and it typically features a reflective side to block heat transfer. Some people also use aluminum-insulated car shades or insulated interfacing, which are both budget-friendly alternatives.
The lining fabric should be lightweight and easy to clean. Waterproof options like ripstop nylon or PUL (polyurethane laminate) work great, especially for carrying cold drinks or meals that may leak or sweat. These linings help prevent moisture from seeping through the bag.
You’ll also need basic sewing tools: scissors, pins, a measuring tape or ruler, thread that matches your fabric, and a sewing machine. A walking foot is helpful but not required — it helps to sew through thick or slippery layers like insulation and plastic lining.
For closures, choose between a zipper, Velcro, or snaps, depending on your preference. Adding a zipper makes the bag more secure and helps trap temperature better. If you prefer a quicker finish, Velcro is easier to sew and adjust.
Don’t forget the straps or handles. You can use cotton webbing, recycled belts, or make your own fabric handles. These give your bag portability and a polished, finished look.
Cutting and Preparing the Fabric Layers
Now that you’ve gathered your materials, this part of the easy to make thermal bag – Step by Step Tutorial focuses on preparing the layers. Begin by deciding the size of your bag. A standard lunch bag size might be around 10 x 7 x 5 inches, but you can adjust based on your needs.
Cut three rectangles of each type of fabric: outer fabric, insulated batting, and lining. For a 10 x 7 x 5 bag, cut two pieces at 12 x 8 inches (front and back) and one piece at 12 x 16 inches (the body wrapping the sides and bottom). You’ll need the same cuts for all three materials.
Once all pieces are cut, layer them in this order: outer fabric on the bottom (right side down), insulated batting in the middle (reflective side facing out), and lining on top (right side up). Pin or clip each sandwich together neatly.
Quilt the three layers lightly if you’d like extra durability and to keep them from shifting during use. Use straight lines spaced evenly across the fabric to stitch through all three layers. This also gives your easy to make thermal bag a professional look.
Next, prepare your side seams. Fold the large body piece in half widthwise and sew the short sides together to form a tube. Then pin or clip your front and back panels to the sides of this tube, aligning all edges.
Sew carefully around all edges using a 1/4 inch seam allowance. If your machine struggles with the thickness, go slowly and lift the presser foot often to adjust the fabric layers.
Once all sides are sewn, turn the bag right side out. Smooth all edges and prepare for the final assembly in the next step.
Assembling the Thermal Bag Structure
This section of the easy to make thermal bag – Step by Step Tutorial guides you through building the actual shape and functionality of the bag. After turning your sewn layers right-side out, check the seams for durability and trim any excess threads.
To give the bag its final structure, you’ll create a flat base. Push out the corners and fold the bag sides to create square bottom corners. Sew across the base corners about 2 inches in from the tip, then trim off the excess to keep things neat.
Now is a good time to insert any inside pockets. You can use extra lining or outer fabric to make small rectangular pockets for utensils or napkins. Attach them to the lining side before sewing the top edge closed.
Next, attach the handles. If you’re using webbing, cut two pieces about 14 to 16 inches long. Position them evenly on each side of the bag, aligning the ends with the top edge. Pin and sew securely using a box stitch for strength.
Now it’s time to attach the closure. If you’re using a zipper, sew one side of the zipper to the top inside edge of the bag and the other side to the opposite edge. If using Velcro, sew strips along the top edge where the flap or lid will close.
Before closing the bag, double-check that everything is aligned and the handles are facing the correct way. Then fold the top edge inward about 1/2 inch and sew all the way around to finish the seam and secure the zipper or closure.
At this stage, your easy to make thermal bag is nearly complete! All the layers should be neatly sewn, the bag stands up on its own, and the interior is insulated and ready for use.
Finishing Touches and Personalization Ideas
The final section of this easy to make thermal bag – Step by Step Tutorial is about adding charm and uniqueness to your creation. Once the basic structure is complete, you can start embellishing and personalizing your thermal bag.
Consider adding fabric appliqué designs, such as fruit shapes, flowers, or monograms. This adds personality and is especially fun if you’re gifting the bag to someone. You can iron or sew on patches too.
Decorative topstitching around the seams not only enhances appearance but adds extra strength. Use a contrasting thread color for bold lines or a matching color for subtle elegance.
Want a label? You can create a tag with your name or brand if you’re selling your thermal bags. Sew it onto the inside or side seam before closing the bag’s top edge.
For easy carrying, you can also sew in loops or attach D-rings at the sides to clip onto backpacks or strollers. This is great for kids’ lunch bags or travel-size coolers.
If you want a foldable design, consider adding a button and loop to secure it when rolled. This is useful for collapsible thermal bags that save space when not in use.
Congratulations — you’ve completed your own easy to make thermal bag, designed to your style and built with love! Now it’s time to use it for lunches, picnics, or even grocery runs.
FAQ – easy to make thermal bag
What is the best insulation for a thermal bag?
Thermal batting with a reflective lining, like Insul-Bright or similar materials, works best to keep temperatures stable.
Can I sew a thermal bag without a sewing machine?
It’s possible to sew by hand, but using a sewing machine ensures stronger seams and saves time, especially through thick layers.
How do I clean my homemade thermal bag?
Spot cleaning with a damp cloth is best. If using waterproof lining, you can wipe it clean. Avoid soaking or machine washing.
Can I make this thermal bag in different sizes?
Yes! Simply adjust the fabric measurements to make smaller snack bags or larger tote-style cooler bags.
How long does it take to make this thermal bag?
For beginners, it may take about 2–3 hours. Experienced crafters might finish in under 2 hours, depending on the details added.
Is this thermal bag safe for hot food?
Yes, with proper thermal insulation, it will help keep hot food warm for a reasonable amount of time. Use food-safe liners when necessary.
Conclusion
In this easy to make thermal bag – Step by Step Tutorial, you learned how to choose materials, cut and prepare layers, sew the structure, and personalize your bag with handles and closures. The process is simple and customizable, perfect for crafters of all levels.
We hope this guide has inspired you to start your own thermal bag project and discover the joy of making something both beautiful and practical. If you tried this tutorial, please leave your honest opinion in the comments. Share what worked, what you would change, and any suggestions for future tutorials. Your feedback means the world to us


