
The Christmas Wreath Quilt Block – Tutorial is a festive and creative sewing project that combines the joy of quilting with the warmth of holiday traditions. A wreath symbolizes welcome, celebration, and family togetherness, making it a perfect design for holiday quilts. By learning how to make this block, you can create stunning pieces that can be used in quilts, table runners, wall hangings, or even gifted to loved ones.
One of the best things about working on a Christmas Wreath Quilt Block – Tutorial is that it allows quilters of all levels to embrace their creativity. Beginners can follow a simple step-by-step process, while advanced quilters can add intricate details, colors, or embellishments. No matter your skill level, the end result will be a beautiful holiday-inspired block that radiates warmth and charm.
This Christmas Wreath Quilt Block – Tutorial is also a wonderful way to get into the holiday spirit. Handmade decorations always carry a personal touch, and when you stitch a quilt block with care, it becomes more than just fabric and thread—it transforms into a keepsake. Whether you add it to a larger quilt or display it on its own, the design is sure to spread holiday cheer in your home.
Materials Needed for Christmas Wreath Quilt Block – Tutorial
To begin the Christmas Wreath Quilt Block – Tutorial, it’s essential to gather the right materials. Cotton quilting fabric is the most popular choice because it is easy to sew and holds its shape well. Choose festive colors like deep greens for the wreath, bright reds for accents, and whites or creams for the background. These traditional tones highlight the Christmas spirit beautifully.
In addition to fabric, you will need a rotary cutter, a self-healing cutting mat, and a quilting ruler. These tools help ensure precise cuts, which are crucial for creating clean, symmetrical quilt blocks. Accuracy in cutting makes the sewing process much easier and produces professional-looking results.
Thread selection is another important consideration. Use high-quality cotton thread in a color that blends well with your fabric. Neutral tones work well for piecing, while decorative stitches can benefit from contrasting thread to add an extra festive flair.
Don’t forget basic sewing supplies such as pins, fabric clips, and scissors. Pins and clips will help hold your fabric pieces together, preventing slipping while you stitch. A good pair of fabric scissors is always essential for trimming small areas or loose threads.
You will also need a sewing machine. While it’s possible to hand-stitch the quilt block, a machine will make the process much faster and provide stronger seams. Ensure your machine is in good working order and threaded properly before starting.
Finally, consider extras such as small appliqué shapes, ribbon, or even fabric paint. These additional touches can give your Christmas Wreath Quilt Block – Tutorial project a personalized and festive appearance.
Step-by-Step Instructions for Christmas Wreath Quilt Block – Tutorial
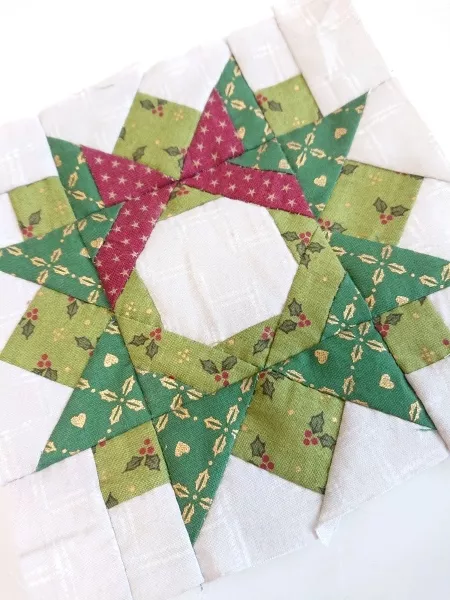
The first step in the Christmas Wreath Quilt Block – Tutorial is to cut your fabric pieces. Start with a square background, usually in white or cream, which will allow the wreath design to stand out. Then, cut green fabric strips or squares to form the circular wreath shape.
Next, arrange the green pieces in a circular layout on the background square. This arrangement will form the base of your wreath. Take time to align the pieces neatly, as this step determines the overall look of your block. Use pins or fabric glue to temporarily secure them in place.
Once arranged, sew the green pieces onto the background using a quarter-inch seam allowance. Work slowly and carefully to maintain even spacing and a smooth circular shape. Precision in this step is key to achieving a polished wreath design.
After attaching the wreath base, add red fabric pieces to represent berries or holiday accents. Small red squares or circles work perfectly and can be sewn or appliquéd onto the wreath. This step adds color and festive detail to your block.
Next, finish the edges by pressing seams with an iron. This creates a crisp and professional look, making the wreath design stand out even more. Ironing also helps the block lay flat, which is important if it will be sewn into a larger quilt.
Finally, trim your quilt block to the desired size. Standard quilt blocks often measure 12 inches, but you can adjust according to your project. Your Christmas Wreath Quilt Block – Tutorial is now complete and ready to be used in any holiday creation.
Creative Variations for Christmas Wreath Quilt Block – Tutorial
The Christmas Wreath Quilt Block – Tutorial offers endless opportunities for creative variations. One fun idea is to add a bow to your wreath using fabric or ribbon. A bright red bow stitched at the bottom of the wreath gives it a classic holiday appearance.
Another variation is to experiment with different shades of green. Instead of using just one fabric, mix various tones to create depth and texture. This technique makes the wreath look more dynamic and lifelike.
Adding sparkle is another way to enhance your design. Metallic fabrics, glittery thread, or even sequins can be incorporated to give your quilt block a festive shimmer. These details are especially striking when the block is displayed under holiday lights.
For a modern twist, try using non-traditional colors. Blues, silvers, and golds can create a winter wonderland theme, while pastel shades work well for a softer, whimsical style. Experimenting with color palettes makes each Christmas Wreath Quilt Block – Tutorial unique.
You could also make the wreath three-dimensional by using fabric yo-yos or appliqué techniques. These textured elements add a tactile quality to your quilt block, making it more engaging and visually interesting.
Lastly, consider personalizing your block with embroidery. Stitch initials, dates, or holiday messages inside or around the wreath. This personal touch transforms your block into a meaningful keepsake or gift.
Tips and Tricks for Christmas Wreath Quilt Block – Tutorial
When working on the Christmas Wreath Quilt Block – Tutorial, pre-wash your fabrics to prevent shrinking later. Pre-washing also removes any chemicals or finishes applied during fabric production.
Accuracy is key in quilting, so always measure and cut carefully. Using a rotary cutter with a ruler ensures straight lines and sharp edges. Taking the time to cut correctly saves frustration during assembly.
Press seams as you go. Ironing after each step not only keeps your project neat but also helps pieces align properly. Pressing can make the difference between a block that looks homemade and one that looks professional.
If you are new to quilting, consider practicing on scrap fabric before cutting into your chosen material. This practice run helps you get comfortable with the steps and ensures your final block will turn out beautifully.
Don’t be afraid to adapt the pattern. The Christmas Wreath Quilt Block – Tutorial is a guide, but you can always make adjustments based on your style and preferences. Creativity is part of the fun of quilting.
Finally, enjoy the process. Quilting is not just about the finished product but also about the joy of creating something with your hands. Take your time and let the holiday spirit guide your design.
FAQ About Christmas Wreath Quilt Block – Tutorial
Q1: Is the Christmas Wreath Quilt Block – Tutorial suitable for beginners?
Yes, it’s a great project for beginners since it uses simple shapes and straightforward sewing techniques.
Q2: How long does it take to complete the block?
On average, it takes about 2–4 hours, depending on your skill level and the amount of detail you include.
Q3: What size should the quilt block be?
A common size is 12 inches square, but you can adjust the size to fit your specific project needs.
Q4: Can I sew the block by hand instead of using a machine?
Yes, hand-sewing is possible, but using a sewing machine speeds up the process and provides stronger seams.
Q5: What fabrics are best for this project?
Cotton quilting fabric is recommended, but festive fabrics like metallic blends can add extra sparkle.
Q6: Can I use the block in projects other than quilts?
Absolutely. The block can be turned into a pillow cover, table runner, or wall hanging for holiday décor.
Conclusion
The Christmas Wreath Quilt Block – Tutorial is a delightful way to bring holiday cheer into your quilting projects. From choosing festive fabrics to sewing the wreath shape and adding creative details, each step offers an opportunity to create something special. Whether you use it in a quilt, a table runner, or as a stand-alone piece, this block captures the warmth and joy of the season.
We hope this tutorial has inspired you to try making your own holiday quilt block. Please share your honest opinions and suggestions—we’d love to hear how you plan to use your Christmas Wreath Quilt Block – Tutorial in your festive creations.

