
The How to make a Prairie Point Christmas Tree quilt – TUTORIAL is a festive and inspiring project that combines the art of quilting with the joyful spirit of the holiday season. Prairie points are small folded fabric triangles that create a textured, three-dimensional effect, and when arranged carefully, they resemble the layers of a Christmas tree. This tutorial provides an opportunity to transform fabric scraps into a stunning piece that can decorate your home or be gifted to someone special.
One of the most appealing aspects of the How to make a Prairie Point Christmas Tree quilt – TUTORIAL is that it is suitable for all skill levels. Beginners can follow the steps to master the technique of prairie points, while more advanced quilters can experiment with color variations, embellishments, and creative layouts. The finished quilt block can be used in a larger quilt, turned into a wall hanging, or even made as a stand-alone holiday decoration.
Creating a Prairie Point Christmas Tree quilt not only brings joy but also connects you to quilting traditions. Prairie points have been used in quilting for generations, adding both beauty and functionality to projects. This tutorial helps preserve that tradition while giving it a modern, festive twist. With patience, creativity, and a love for the season, you can stitch something that will be admired year after year.
Materials Needed for How to make a Prairie Point Christmas Tree quilt – TUTORIAL
To begin the How to make a Prairie Point Christmas Tree quilt – TUTORIAL, it’s essential to gather the right materials. Cotton fabric is the most recommended choice because it is easy to fold, press, and stitch. You will want shades of green for the tree, a contrasting background fabric such as white, cream, or deep red, and a few festive scraps for accents like ornaments or stars.
A rotary cutter, cutting mat, and quilting ruler will make precise fabric cutting much easier. Since prairie points rely on symmetry and even folding, accuracy during this step is critical. Make sure your tools are sharp and in good condition to achieve clean lines.
Thread should complement your fabric choices. Neutral tones like white or beige work well for piecing, but you might also consider using metallic or colored thread for visible stitching details. High-quality cotton thread ensures durable seams that hold up over time.
Basic sewing supplies such as pins, clips, and scissors are also necessary. Pins and clips will help keep your folded prairie points in place before sewing. A pair of sharp fabric scissors is perfect for trimming and detail work.
You will also need an iron and ironing board. Pressing is an essential part of creating neat prairie points, as it helps them stay flat and maintain their shape. Skipping this step may result in uneven folds.
Finally, consider embellishments to enhance your design. Buttons, beads, or embroidered details can add festive charm to your Prairie Point Christmas Tree quilt and make it stand out as a holiday centerpiece.
Step-by-Step Guide for How to make a Prairie Point Christmas Tree quilt – TUTORIAL
The first step in the How to make a Prairie Point Christmas Tree quilt – TUTORIAL is to cut squares for your prairie points. Common sizes are between 3 to 5 inches, depending on how large you want your tree to appear. The larger the squares, the bigger and more pronounced the prairie points will be.
Next, fold each square in half diagonally to form a triangle, and press with an iron to create a crisp fold. Fold again into a smaller triangle and press once more. These double-folded triangles are your prairie points. Take time during this step to ensure all folds are neat and symmetrical.
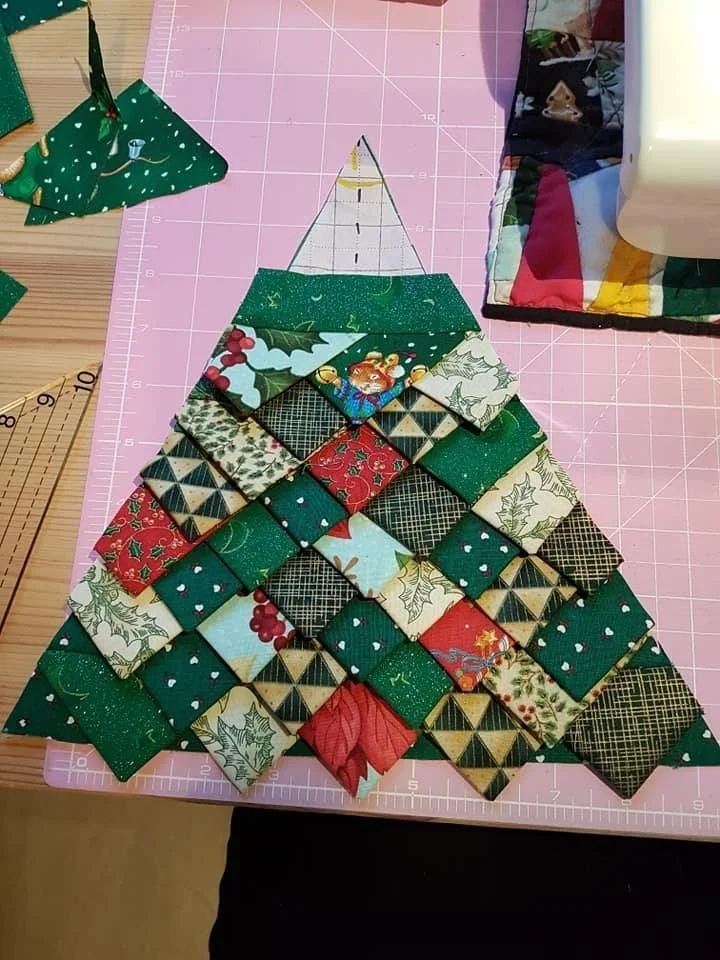
Arrange the prairie points in rows to form a triangular tree shape. Begin with a wider row at the bottom and gradually reduce the number of points in each row as you move upward. The result will mimic the layered branches of a Christmas tree.
Pin the prairie points in place onto your chosen background fabric. Overlap them slightly to create depth and ensure there are no gaps. When you’re satisfied with the arrangement, sew along the top edges of each row to secure them to the fabric.
Add decorative touches to your quilt block. You might place a yellow or gold star at the top of the tree, red or multicolored fabric circles as ornaments, or metallic thread stitching to represent garlands. These small additions will make your tree feel festive and complete.
Finally, press the entire block to ensure it lays flat. Trim the block to your desired size, commonly 12 inches square, making it easy to incorporate into larger quilt projects or display as a stand-alone piece.
Creative Variations for How to make a Prairie Point Christmas Tree quilt – TUTORIAL
One exciting aspect of the How to make a Prairie Point Christmas Tree quilt – TUTORIAL is the opportunity to customize it with different variations. Instead of sticking to traditional greens, you could experiment with patterned fabrics, such as plaids or florals, to give your tree a whimsical look.
Another variation is to create a forest effect by making multiple prairie point trees in different sizes. These can be arranged together on a larger quilt to form a festive landscape scene.
Adding texture is also an option. Instead of leaving the tree flat, consider lightly stuffing some of the prairie points to create a more three-dimensional effect. This makes the quilt block even more eye-catching and unique.
You can personalize the design by adding embroidered initials, names, or dates. This turns your quilt block into a keepsake that commemorates a special Christmas or family tradition.
For a modern take, use non-traditional holiday colors. Shades of blue, silver, or gold can give your project a contemporary style while still maintaining the festive theme.
Lastly, consider finishing the project as a wall hanging or table runner instead of a quilt block. This flexibility makes the Prairie Point Christmas Tree quilt an excellent choice for home décor or handmade gifts.
Tips and Tricks for How to make a Prairie Point Christmas Tree quilt – TUTORIAL
When making the Prairie Point Christmas Tree quilt, accuracy is key. Take your time when folding and pressing the prairie points to ensure they are consistent in size and shape. This attention to detail will improve the overall look of your tree.
Chain piecing can save time. If you’re making multiple quilt blocks or several trees, fold and sew prairie points in batches. This efficient method helps maintain consistency and speeds up the process.
Experiment with embellishments carefully. While decorations like buttons and beads add charm, avoid using too many if the quilt will be washed frequently. For decorative wall hangings, you can be more creative with delicate details.
Always pre-wash your fabrics to prevent shrinkage and color bleeding. This step ensures that your quilt remains vibrant and well-fitted after washing.
Don’t forget to press between each step. A well-pressed block not only looks professional but also makes assembly much easier.
Finally, remember to enjoy the process. The How to make a Prairie Point Christmas Tree quilt – TUTORIAL is not just about creating a final product—it’s also about experiencing the joy of making something festive with your own hands.
FAQ About How to make a Prairie Point Christmas Tree quilt – TUTORIAL
Q1: Is this project suitable for beginners?
Yes, this tutorial is beginner-friendly. The folding technique may take a little practice, but it is straightforward and easy to master.
Q2: What size should I make my quilt block?
A standard 12-inch square block is recommended, but you can adjust the size to fit your project.
Q3: Can I sew prairie points by hand instead of using a machine?
Yes, hand stitching is possible, though it will take longer. A sewing machine provides quicker and more secure results.
Q4: What fabrics work best for prairie points?
Cotton quilting fabric is the best choice because it folds neatly and holds its shape. Avoid fabrics that are too thick or slippery.
Q5: How can I make my quilt block look more festive?
Add embellishments like stars, ornaments, or metallic thread stitching. Mixing fabric patterns also adds visual interest.
Q6: Can I use this block for projects other than quilts?
Absolutely. It can be turned into a pillow cover, wall hanging, or table runner for holiday décor.
Conclusion
The How to make a Prairie Point Christmas Tree quilt – TUTORIAL is a delightful way to celebrate the holiday season while practicing a timeless quilting technique. From folding prairie points to arranging them into a festive tree, every step allows you to combine creativity and tradition. The finished block can be as simple or as decorative as you like, making it a versatile and meaningful project.
We hope this tutorial has inspired you to create your own quilted Christmas tree. Please share your honest opinions and suggestions—we’d love to hear how you plan to use the How to make a Prairie Point Christmas Tree quilt – TUTORIAL in your holiday projects.

