
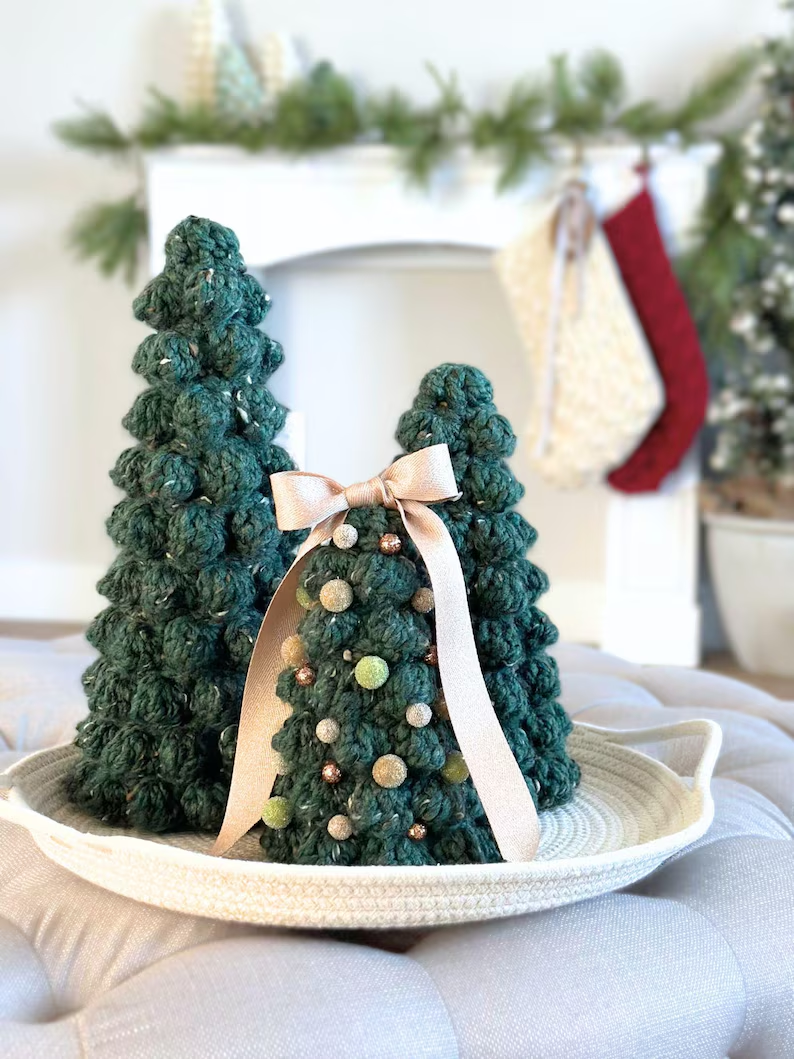
Crochet Pompom Christmas Tree Pattern is one of the most charming and creative holiday projects for crochet lovers. This delightful pattern combines the warmth of handmade crafts with the festive spirit of Christmas, making it a must-try for anyone who enjoys crocheting. Whether you’re a beginner or an experienced crafter, creating your own crochet Christmas tree decorated with colorful pompoms can bring a unique touch of coziness and joy to your home.
Making a Crochet Pompom Christmas Tree Pattern allows you to experiment with textures, colors, and designs. You can create a small tabletop version or a larger decorative piece to brighten your living room or office. The pompom details add a soft and playful element, making the tree stand out in any holiday décor.
What makes this pattern truly special is how simple yet impressive it looks once completed. With just a few materials, basic stitches, and a little time, you can create something that looks store-bought but has the warmth of a handmade item. Many crocheters enjoy how relaxing it feels to craft each pompom, attach it carefully, and watch the Christmas tree come to life piece by piece.
Materials and Tools for Crochet Pompom Christmas Tree Pattern
To start your Crochet Pompom Christmas Tree Pattern, you’ll need a few basic supplies. The good news is that most of these items are already part of a crocheter’s toolkit.
First, you’ll need yarn in your preferred colors. Green shades are ideal for the tree base, while red, white, gold, or multicolored yarns are perfect for the pompoms. Acrylic yarn works well because it’s durable, affordable, and easy to find.
Next, you’ll need a crochet hook that matches your yarn weight. For medium-weight yarn, a 4 mm to 5 mm hook is usually perfect. If you want a denser and firmer texture, choose a smaller hook; if you prefer a softer finish, go one size up.
You’ll also need scissors, a tapestry needle for weaving in ends, and a pompom maker. However, if you don’t have a pompom maker, you can easily create pompoms using a fork or cardboard template. It’s a great DIY approach that adds to the charm of the craft.
Additionally, a bit of stuffing or a cone-shaped base helps your crochet tree maintain its shape. Some crafters prefer to use foam cones for a more structured appearance, while others fill the tree with fiberfill for a softer look.
Finally, gather small decorations like beads, buttons, or glittery threads if you’d like to enhance your tree’s festive sparkle. The combination of texture and light will make your Crochet Pompom Christmas Tree Pattern even more eye-catching.
Step-by-Step Instructions to Create Your Crochet Pompom Christmas Tree
Once you’ve prepared your materials, it’s time to begin crocheting your Crochet Pompom Christmas Tree Pattern. The process is straightforward and can be customized according to your preference and skill level.
Start by crocheting the base cone. Chain a few stitches and join them to form a ring, then work in continuous rounds, gradually increasing the number of stitches each row to shape the cone. Single crochet stitches work best for a dense, stable structure. Continue until your tree reaches your desired height.
Next, crochet a small circular base to attach at the bottom. This helps the tree stand upright and provides a neat finish. You can also use a cardboard or foam base if you prefer more stability.
Once your cone is complete, move on to making the pompoms. Use your leftover yarn to create small, fluffy balls. The size and color of the pompoms depend on your style—mixing different colors gives a playful touch, while using matching shades creates an elegant look.
Attach the pompoms evenly across your crochet tree using a tapestry needle. Secure them firmly so they stay in place even when the tree is handled. Take your time with this step—it’s where your creativity truly shines.
For a finishing touch, you can add a star at the top using yellow yarn or even a small wooden star ornament. This final detail makes your Crochet Pompom Christmas Tree Pattern complete and ready for display.
Decorating Ideas and Variations
The beauty of the Crochet Pompom Christmas Tree Pattern lies in its versatility. You can modify the design to suit different themes, occasions, or color schemes.
If you love the traditional Christmas aesthetic, opt for green yarn for the tree, red and white pompoms, and a golden star. This classic color combination never goes out of style and complements most holiday décor.
For a modern and minimalist look, try neutral tones such as beige, ivory, and gray. Soft pastel pompoms—like blush pink, mint, or baby blue—give your tree a whimsical Scandinavian-inspired appearance.
You can also create themed trees for different rooms in your home. A small pink and white version looks adorable in a child’s bedroom, while a silver and blue version fits perfectly in a living room or office.
Another creative variation is to use metallic yarns or add LED fairy lights to make the tree sparkle at night. Just wrap the lights carefully around the crochet base, and you’ll have a glowing handmade decoration.
If you’re making multiple trees as gifts, personalize each one by adding name tags or initials. Handmade gifts like these are thoughtful and cherished by everyone who receives them.
Tips for a Perfect Crochet Pompom Christmas Tree
To ensure your Crochet Pompom Christmas Tree Pattern looks professional and polished, a few simple tips can make a big difference.
Always check your gauge before starting. If your stitches are too tight, the cone might curl or tilt. If they’re too loose, the structure could become floppy. Adjust your hook size accordingly for a balanced texture.
When making pompoms, trim them evenly to maintain a uniform appearance. You can also roll them between your palms to make them rounder and fluffier.
Choose high-quality yarn to achieve a neat and soft finish. Budget yarns can sometimes shed or lose shape, especially for pompoms. A blend of acrylic and wool provides both structure and softness.
To make your tree more durable, reinforce the seams and ensure all pompoms are tightly secured. This way, your tree will last for years and can become a cherished part of your annual holiday decorations.
Store your crochet tree in a cool, dry place after the holidays. Wrap it in tissue paper or place it inside a box to prevent dust buildup and deformation.
Finally, don’t forget to enjoy the process. Crocheting should be relaxing and joyful—each stitch and pompom you make adds a bit of festive cheer to your surroundings.
FAQ – Crochet Pompom Christmas Tree Pattern
1. Can beginners make a Crochet Pompom Christmas Tree Pattern?
Yes! This pattern is ideal for beginners because it uses simple stitches like single crochet. The most important part is patience while shaping the cone and attaching the pompoms.
2. How long does it take to complete the tree?
Depending on size and complexity, it can take anywhere from 3 to 6 hours. Smaller trees are quicker, while larger or more detailed ones might require a full day.
3. What type of yarn is best for this pattern?
Acrylic yarn is the best choice because it holds shape well, is easy to wash, and comes in a wide range of colors perfect for pompoms.
4. Can I wash the crochet tree?
Yes, but do it gently by hand. Avoid machine washing to prevent damage to the pompoms and structure. Let it air dry completely before storing.
5. How do I make the tree stand upright?
You can insert a foam cone or stuff the crochet cone with fiberfill and place it on a flat surface. Adding a cardboard base also helps with stability.
6. Can I sell the trees I make with this pattern?
Absolutely! Handmade Crochet Pompom Christmas Tree Patterns are great for craft fairs or online shops, especially around the holiday season. Just ensure your photos highlight their charm and craftsmanship.
Conclusion
Creating your own Crochet Pompom Christmas Tree Pattern is a joyful and rewarding experience that blends creativity, skill, and holiday spirit. With a few simple materials and some imagination, you can craft a beautiful decoration that brightens any space and captures the magic of Christmas. From selecting yarn colors to shaping pompoms and adding final touches, every step offers an opportunity to express your personal style.

