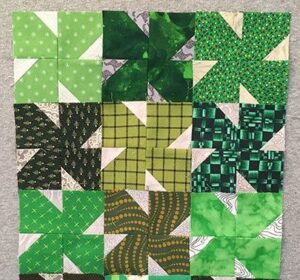
The art of sewing and quilting is a wonderful form of creative expression, and one of the most rewarding ways to create something beautiful and functional is by making a quilt.
If you’re looking for a sewing project that’s challenging and rewarding at the same time, look no further.
In this tutorial, we’ll explore the charming Four-Leaf Clover Quilt Block, a free pattern that will captivate novice and experienced sewers alike.

With four subheadings, we’ll cover each step of this project in detail so you can create a stunning quilt that will be cherished for years.
Preparing for Success
Before we dive into the design steps, it’s important to start with the right preparations. Ensure you have all the materials needed to create your Four Leaf Clover Quilt Block. Here’s a list of what you’ll need:
Sewing machine
Cotton fabrics in four different colors (green, white, yellow and blue, for example)
Cutting ruler
Rotary Cutter
cutting board
Pins
Matching sewing thread
Iron and ironing board
Four Leaf Clover Block Template (you can find free templates online)
Before cutting any fabric, be sure to wash and iron them. This will help prevent shrinkage after the project is complete.
It’s also a good idea to review the Four Leaf Clover Block pattern to understand how the different pieces fit together. Now that you’re ready, let’s start cutting the fabrics.
Cutting Fabrics Precisely
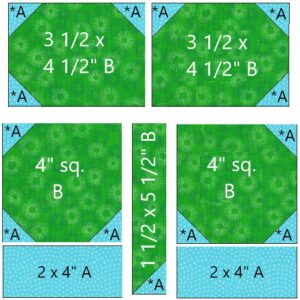
Cutting precision is essential to the success of this project. Use your cutting ruler, rotary cutter, and cutting board to ensure all fabric pieces are the correct dimensions. Remember to follow the Four Leaf Clover Block pattern and cut out the following elements:

Four 4 x 4 inch squares in each of four colors (16 squares total)
Eight 2.5 x 2.5 inch squares in an accent color (yellow, for example)
Four 2.5 x 2.5 inch squares on one background color (white)
Four 2.5 x 4.5 inch rectangles on one background color (white)
Once all of your fabrics are precisely cut, organize them into stacks for easy access during assembly. Now, let’s start assembling the four-leaf clover block.
Assembling the Four-Leaf Clover Block
This block has an intricate appearance, but is actually made up of four-patch units that are relatively simple to assemble. Let’s follow the steps to create the four-leaf clover block:
Assembling the four-patch units:
Start by matching two 4 x 4 inch squares of different colors, right sides together. Sew a 1/4-inch seam along one side.
Open the seam and press it with an iron. Repeat this process until you have four four-patch units.
Assembling the shamrock corners:
Take the 2.5 x 2.5 inch squares in an accent color (yellow) and the 2.5 x 2.5 inch squares in a background color (white).
Place an accent square in each corner of one of the four-patch squares you created in the previous step. Sew these squares together at the corners, lining up the edges.
Adding the rectangles:
Take the four 2.5 x 4.5 inch rectangles in one background color (white) and sew one to each side of the four-patch units, positioning them so the rectangles are on the long sides of the units.
This will create the sides of the four-leaf clover.
Assembling the complete block:
Now that you have the four four-patch units with the yellow corners and white rectangles on the sides, it’s time to assemble the four-leaf clover block. Join the four-patch units into a layout that forms a four-leaf clover.
Make sure the yellow corners meet in the center of the block. Sew the units together, pressing the seams open for a flatter finish.
Join our VIP list and receive exclusive free patterns. You’ll have daily access to the best designs, delivered straight to your device. Don’t miss this chance to get inspired and improve your projects with new and amazing patterns!
Assembling the Quilt and Finishing
With the four-leaf clover block completed, you are ready to assemble your quilt. Here are the final steps:
Organizing the blocks:
Arrange your four-leaf clover blocks in a layout that you find attractive. You can create a symmetrical or random design depending on your taste.
Sewing the blocks together:
Sew the blocks together in rows, ensuring that the block seams fit together precisely. Then sew the rows together to create the quilt top.
Adding the lining and filling:
Cut the quilt backing to the same size as the top and insert the batting. Pin the three layers together, ensuring everything is aligned.
Quilting and finishing:
Now comes the fun part of quilting. You can choose between machine or hand quilting depending on your preference.
Make sure to secure all three layers well and follow a quilting pattern that highlights the four-leaf clover design. After quilting, trim excess fabric and finish the edges with a binding edge.
And there it is! You’ve created your own four-leaf clover quilt, a challenging but incredibly rewarding project. Don’t forget to wash and care for your quilt properly so that it lasts for years to come and brings beauty and warmth to your home.
This Four Leaf Clover Quilt Block tutorial is a great way to hone your sewing skills and produce a handmade piece you’ll be proud to display.
Remember that practice makes perfect, so as you progress with your sewing projects, you will become a master at creating beautiful quilts and other handmade items. Have fun sewing!


