
Trip Around the World Quilt Pattern is one of the most classic and beloved designs in traditional quilting, cherished for its geometric beauty, symmetry, and the emotional storytelling it allows through color placement. This timeless pattern has been passed down for generations, and today it continues to inspire quilters across the United States and beyond.
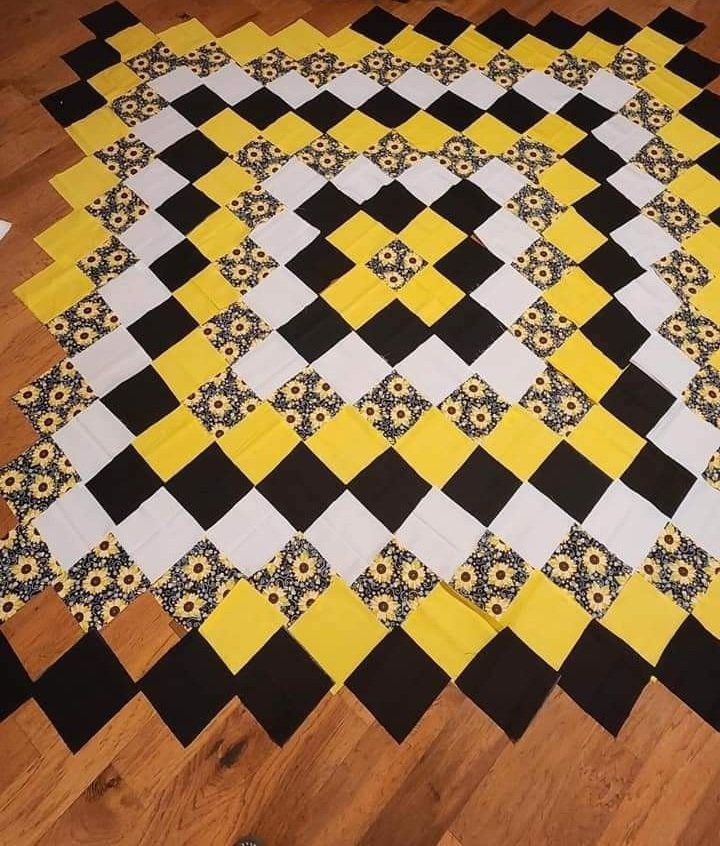
At its core, the Trip Around the World Quilt Pattern is built on the concept of radiating squares, where fabrics are arranged in concentric rings to create a stunning visual journey outward from the center. Each ring represents a “trip” farther from the starting point, giving the quilt a beautifully layered and harmonious appearance.
Before diving into the step-by-step structure and creative options, it is important to understand why the Trip Around the World Quilt Pattern remains so iconic. Its methodical layout not only results in a visually balanced design, but it also creates an emotional connection between the maker and the quilt.
Understanding the Trip Around the World Quilt Pattern
The Trip Around the World Quilt Pattern is based on a grid layout made of uniform fabric squares arranged in precise rows and columns. Each row represents a ring of color that expands outward from the center, creating a radiant, almost mosaic-like effect. Quilters often choose fabrics that gradually shift in shade to achieve a gradient movement across the quilt. This structure makes the pattern ideal for using charm packs, coordinated fabric bundles, or even meaningful fabric scraps collected over time.
One of the appealing qualities of this pattern is its accessibility. Despite its complex appearance, the construction technique is straightforward: cutting, organizing, and sewing squares. This makes it a perfect choice for confident beginners looking to challenge themselves with a more structured project. The predictable grid pattern makes errors easy to catch and correct early, reducing frustration and encouraging steady progress.
Another unique advantage is the simplicity of scaling the quilt. Because the pattern is built square by square, quilters can easily adapt the project to create anything from a small wall hanging to a full king-size quilt. Adjusting size only requires changing the number of concentric “trips” added. This ensures that every quilter can design a piece that fits their vision and practical needs.
Fabric choice plays a major role in the final look of the Trip Around the World Quilt Pattern. While some quilters choose vibrant, contrasting colors for a striking result, others prefer monochromatic or pastel palettes for a soft and cohesive aesthetic. The pattern works beautifully with solids, small prints, or a mix of both. Because each square stands individually while still contributing to a broader design, even small leftover pieces can find new purpose in this quilt.
Cutting accuracy is essential for achieving clean lines and a balanced center point. Using a rotary cutter, clear ruler, and cutting mat helps ensure each square aligns perfectly with the next. Consistency is key—the beauty of the pattern relies on precise intersections and a symmetrical layout. These foundational steps set the stage for a polished and professional finish.
Creating a Balanced Color Layout
Designing the color placement for a Trip Around the World Quilt Pattern is one of the most enjoyable steps. Usually, the process begins with selecting a focal fabric for the central square. This is the anchor of the entire quilt, and every subsequent row of squares will radiate from this point. Many quilters choose the boldest or most meaningful fabric for the center to set the tone of the piece.
From the center, the fabric rings expand outward in carefully planned color sequences. A common technique is transitioning from darker tones in the middle to lighter colors on the edges, creating a soft, glowing effect. Others may choose alternating colors to emphasize contrast and rhythm. Whatever the approach, the key is maintaining harmony between the rows to ensure the quilt looks cohesive.
When arranging colors, it helps to spread the squares on a flat surface. This makes it easier to visualize the gradual progression of the “trip.” Standing back to view the layout from a distance can help identify areas where colors may feel too heavy, too light, or too abrupt within the sequence. Adjustments at this stage significantly enhance the final aesthetic.
Using color wheels or swatch cards can also help quilters understand how hues relate to each other. Analogous colors create a soothing flow, while complementary colors generate vibrant energy. Because the pattern relies heavily on color transitions, understanding these relationships empowers quilters to be more confident in their creative choices.
Another tip for achieving a balanced look is incorporating a mix of solid fabrics and low-contrast prints. Prints add texture without overwhelming the design, especially when used sparingly. This small detail can make the difference between a flat-looking quilt and one with visual depth.
Sewing the Quilt Top Step by Step
Constructing the top of a Trip Around the World Quilt Pattern begins with joining squares into rows. The process is simple but requires patience and attention to detail. Starting with the central row, each square should be aligned edge to edge with consistent seams. Most quilters use a quarter-inch seam allowance, which is a standard in quilting and ensures uniformity across the project.
After sewing each row, pressing the seams is essential. Pressing helps the fabric lie flat and prevents bulk when the rows are connected. Quilters often alternate seam directions between rows—pressing one row to the left and the next to the right. This technique makes the intersections nest neatly, improving accuracy and giving the quilt a crisp, professional appearance.
Once all the rows are completed, the next step is to sew them together. Pinning the intersections carefully ensures that the squares align perfectly, maintaining the precise grid that defines the Trip Around the World Quilt Pattern. Taking time at this stage pays off—clean lines and aligned corners significantly enhance the quilt’s overall presentation.
As the quilt top grows, quilters can step back periodically to admire the expanding rings of color. This provides a sense of progress and reinforces the structure of the pattern. Any alignment issues or puckering can be corrected early by adjusting the next rows accordingly.
When the entire quilt top is complete, it should be pressed thoroughly to set the seams. This prepares the quilt for layering with batting and backing fabric. A well-pressed quilt top also makes the quilting process smoother and more efficient.
Quilting and Finishing Techniques
After the quilt top is completed, the next stage involves quilting the layers together. This step not only secures the layers but also adds texture and character. Simple straight-line quilting is a popular choice for the Trip Around the World Quilt Pattern because it complements the grid structure and emphasizes the concentric rings.
More advanced quilters may choose free-motion designs, though it’s important that the quilting enhances rather than distracts from the pattern. Light, consistent stitching prevents shifting while maintaining softness and flexibility in the finished quilt.
Binding is the final step, creating a clean edge around the quilt. Many quilters choose binding fabric that echoes colors used within the quilt, tying the entire design together. Double-fold binding is durable and commonly used for quilts that will be handled or washed frequently.
After binding, giving the quilt a final press ensures a polished appearance. At this stage, the quilt is ready for display, gifting, or regular use. Many quilters enjoy photographing their finished Trip Around the World Quilt Pattern to document their work and share it with others.
FAQ About the Trip Around the World Quilt Pattern
What is the Trip Around the World Quilt Pattern?
It is a traditional quilt pattern that features squares arranged in concentric rings radiating out from a central point, creating a visually dynamic and harmonious design.
Is this pattern beginner-friendly?
Yes, despite its complex look, the pattern uses simple squares and straight seams, making it suitable for confident beginners.
What fabrics work best for this quilt?
Cotton fabrics, solids, small prints, and coordinated bundles all work well. The key is choosing colors that transition smoothly to create the concentric effect.
How do I keep my squares aligned?
Accurate cutting, consistent seam allowances, and careful pressing help ensure perfect alignment and clean intersections.
Can I adjust the quilt size easily?
Yes. Because the design is built from squares, adding or removing rows allows you to scale the quilt to any desired size.
Do I need special tools?
Basic quilting tools such as a rotary cutter, acrylic ruler, cutting mat, pins, and a sewing machine are typically sufficient.
Conclusion
The Trip Around the World Quilt Pattern remains one of the most expressive and rewarding designs in the quilting world. Its radiating structure, timeless beauty, and adaptable nature make it a perfect project for quilters of all skill levels. By understanding layout, color balance, sewing techniques, and finishing methods, anyone can create a stunning quilt that tells a personal story through fabric and design.

