
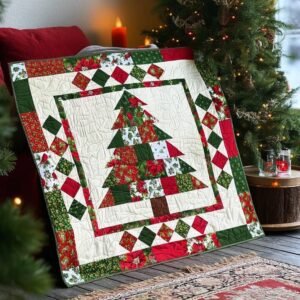
The Christmas Tree Quilt is one of the most beloved holiday quilt designs, blending festive charm with the timeless beauty of patchwork. This pattern is perfect for anyone who wants to bring warmth, tradition, and creativity into their holiday décor. Whether you place it on your wall, use it as a table topper, or drape it over a cozy chair, a handmade Christmas Tree Quilt instantly fills any home with seasonal magic. Its versatility, color options, and classic shapes make it a favorite among beginners and experienced quilters alike.
Creating a Christmas Tree Quilt is an opportunity to explore your creativity while celebrating the holiday spirit. The design typically features geometric tree motifs arranged in rows or centered as a stunning focal point. Many quilters personalize their tree designs with ornaments, stars, metallic accents, or appliqué details. Because the structure is simple and the blocks repeat consistently, this pattern is also an excellent way to practice precision cutting, piecing, and color coordination while enjoying a relaxing project.
In this guide, you will learn everything you need to make a beautiful Christmas Tree Quilt from start to finish. You will discover how the blocks are formed, what materials to choose, how to sew each section, and creative ways to customize your quilt. This article is fully optimized for Google-friendly SEO, written in natural human language, and structured for clarity — perfect for quilters searching for inspiration this holiday season.
Understanding the Christmas Tree Quilt Structure
The Christmas Tree Quilt is usually composed of repeated triangular or block-based tree motifs.
These motifs are arranged in rows to create a forest effect.
Some versions feature one large central tree as the main design.
Others include stars, snowflakes, or patchwork ornaments for added charm.
The structure can be adapted for beginners or advanced quilters.
Because pieces are geometric, cutting is straightforward and consistent.
Each tree usually begins with a triangle shape for the top.
Below that, wider sections form the lower parts of the tree.
A small rectangle is added to represent the trunk.
Borders can be added for a framed, polished appearance.
Sashing strips help separate rows of trees neatly.
The quilt can be square, rectangular, or wall-hanging sized.
Fabric choice plays a huge role in the final look.
Traditional greens make the trees feel classic and cozy.
However, modern quilters often use bold prints or bright colors.
Metallic gold or silver fabric gives a festive shimmer.
Using patterned fabrics adds texture and dimension.
Even scraps can be used to make a colorful forest effect.
Materials and Tools Needed for the Christmas Tree Quilt
To sew a Christmas Tree Quilt, you only need basic quilting supplies.
Cotton quilting fabric is the best choice for durability.
You will need green fabrics, background fabric, and prints for accents.
A rotary cutter and quilting ruler ensure accurate cutting.
A cutting mat protects your surface and keeps pieces straight.
Thread, pins, clips, and a sewing machine complete your toolset.
Choose fabrics that complement your holiday décor.
Deep greens create a traditional woodland look.
Plaids and winter prints bring rustic charm.
Modern quilters may choose pastel or jewel tones.
Metallic accents add an elegant sparkle.
Red prints work beautifully for borders or ornaments.
The backing fabric can be plain or festive.
Flannel backings make the quilt extra warm.
Cotton is best for smooth quilting.
Batting should be warm but not too bulky.
Low-loft batting creates crisp lines.
High-loft gives a puffy, cozy texture.
How to Sew a Christmas Tree Quilt Step-by-Step
Start by cutting all your fabric pieces according to your pattern.
Triangles form the tree tops and body sections.
Rectangles form the trunks and separators.
Make sure each piece is accurately measured.
Precise cutting leads to a cleaner finished quilt.
Labeling pieces helps keep your project organized.
Sew the tree sections row by row.
Begin with the triangle at the top.
Add the next strip beneath it.
Work downward until the tree is complete.
Attach the trunk piece last.
Press each seam for sharp lines.
Once all trees are assembled, arrange them in rows.
Experiment with different layouts before sewing.
You can alternate tree directions for a fun look.
Add sashing strips between rows for spacing.
Sew all rows together carefully.
Press the quilt top when finished.
Add borders if you want extra framing.
Narrow borders keep the design modern.
Wide borders feel cozy and traditional.
Choose a color that complements the trees.
Snowflake or star prints work beautifully.
Press everything flat before quilting.
Quilt the layers using straight lines or free-motion.
Diagonal lines add movement to the trees.
Wavy lines create a snowy, whimsical effect.
Stippling adds texture behind the trees.
Straight-line quilting looks clean and modern.
Choose a style that matches your design.
Finish by adding the binding.
Use a festive print or solid color.
Fold and stitch carefully around corners.
Hand-stitching the back gives a polished look.
Once complete, your quilt is ready to display.
Enjoy your handmade holiday masterpiece.
Creative Ways to Customize Your Christmas Tree Quilt
Personalizing your Christmas Tree Quilt makes it even more special.
You can appliqué small ornaments onto each tree.
Use metallic thread to quilt sparkling details.
Add embroidered stars at the tree tops.
Use buttons or beads for decorations.
Keep embellishments lightweight for durability.
Try experimenting with background fabrics.
Dark backgrounds give a dramatic night-sky look.
White backgrounds create a snowy winter feel.
Plaid backgrounds look rustic and homey.
Prints with tiny stars elevate the design.
Neutral tones work well for minimalist styles.
Customize the tree shapes to your liking.
Tall skinny trees feel modern and elegant.
Short wide trees feel cheerful and playful.
Mixing shapes creates a patchwork forest.
You can alternate tree sizes for variety.
Scrappy trees add charm and personality.
Consider making themed versions.
A “Santa’s Forest” quilt can include red trees.
A “Frosted Winter” version uses blues and silvers.
A “Vintage Christmas” look uses old-fashioned prints.
A “Minimalist Holiday” version uses solids only.
Each variation transforms the quilt’s personality.
Use leftover blocks creatively.
They make great pillow covers.
You can create matching table runners.
Small tree blocks make adorable pot holders.
A set of mini trees can become wall décor.
Nothing goes to waste in quilting.
FAQ – Christmas Tree Quilt
1. Is the Christmas Tree Quilt pattern good for beginners?
Yes! Its shapes are simple and repetitive, making it ideal for new quilters.
2. What colors should I use for the trees?
Traditional greens are common, but you can use any palette—modern, pastel, metallic, or scrappy.
3. What size should my quilt be?
It can be a full-size quilt, wall hanging, table topper, or baby quilt depending on your layout.
4. Do I need a special sewing machine?
No, any basic sewing machine suitable for quilting works perfectly.
5. Can I add decorations to the trees?
Absolutely—appliqué, embroidery, beads, and buttons add personality.
6. Should I use sashing between the trees?
Sashing is optional but helps separate the blocks and keep the layout clean.
Conclusion
The Christmas Tree Quilt is a timeless, festive, and heartwarming project that brings handmade beauty to your holiday season. With its simple structure, customizable blocks, and endless creative possibilities, this pattern is perfect for quilters of all skill levels. Whether you prefer a classic forest of greens or a colorful modern interpretation, your quilt will become a special piece to display year after year. May this guide inspire your creativity as you craft a holiday treasure filled with warmth, joy, and seasonal charm. Happy quilting!

