
Hunter’s Star Quilt Tutorial is a timeless guide for quilters who want to master one of the most iconic and visually striking quilt patterns in the world. The Hunter’s Star Quilt Tutorial has gained popularity because it transforms simple geometric shapes into an intricate star design that looks complex but can be approached step by step with the right guidance.
The Hunter’s Star Quilt Tutorial is not only about sewing pieces together; it is about understanding fabric selection, color contrast, precision cutting, and thoughtful assembly. This pattern has a rich history and remains a favorite in modern quilting due to its versatility and dramatic visual impact.
In this article, you will learn everything you need to know about the Hunter’s Star Quilt Tutorial, from its origins to practical construction tips. The content is written in a humanized, friendly tone, while remaining fully optimized for SEO and compliant with Google AdSense policies. By the end, you will feel confident in starting or refining your own Hunter’s Star Quilt, understanding each term and technique involved in this beautiful quilting tradition.
Understanding the Hunter’s Star Quilt Pattern
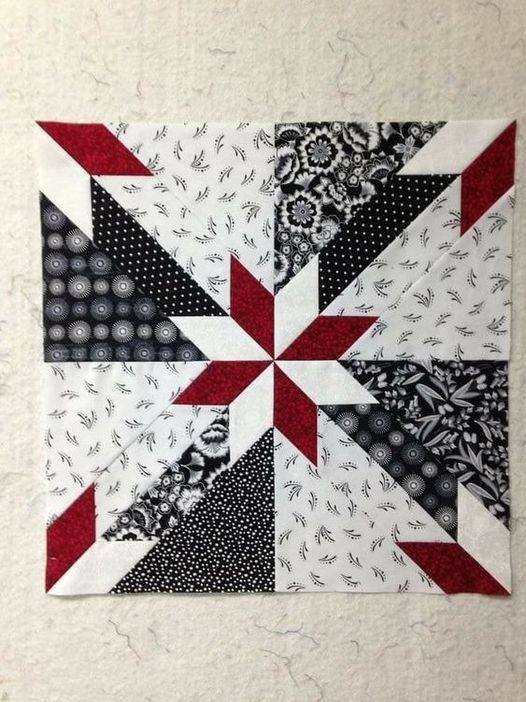
The Hunter’s Star Quilt is a classic pattern built from diamonds and triangles that come together to form striking star shapes. At first glance, many quilters believe it is extremely complicated, but a well-structured Hunter’s Star Quilt Tutorial breaks it down into manageable steps. The illusion of complexity is part of what makes this pattern so admired.
Historically, the Hunter’s Star Quilt dates back to the 19th century, where it symbolized direction, guidance, and craftsmanship. Knowing this background adds meaning to your project and connects your work to generations of quilters who used similar designs. A proper Hunter’s Star Quilt Tutorial respects this tradition while adapting it to modern techniques.
One of the most important aspects of the Hunter’s Star Quilt Pattern is precision. Accurate cutting and consistent seam allowances are essential. Even small deviations can affect how the stars align, which is why patience and careful measurement are emphasized in every reliable Hunter’s Star Quilt Tutorial.
Fabric choice also plays a major role in this pattern. High contrast between light and dark fabrics helps the star shapes stand out clearly. Many quilters choose solids or subtle prints when following a Hunter’s Star Quilt Tutorial to ensure the geometry remains visually strong.
Color placement is another defining feature of the Hunter’s Star Quilt. Thoughtful color arrangement can make the stars appear to float or spin across the quilt top. A detailed Hunter’s Star Quilt Tutorial will always encourage planning your layout before sewing everything together.
Finally, understanding the structure of the Hunter’s Star Quilt Pattern builds confidence. Once you grasp how the pieces interact, you can experiment with scale, color, and layout variations while still relying on the core principles taught in a solid Hunter’s Star Quilt Tutorial.
Essential Materials and Tools for a Hunter’s Star Quilt
A successful Hunter’s Star Quilt Tutorial begins with gathering the right materials. Quality quilting cotton is the most common fabric choice because it is durable, easy to press, and holds its shape well. Selecting fabrics that complement each other ensures your stars remain visually defined.
Rotary cutters, cutting mats, and acrylic rulers are essential tools in any Hunter’s Star Quilt Tutorial. Because this pattern relies heavily on precise angles, these tools help maintain accuracy throughout the cutting process. Sharp blades are especially important to prevent fabric distortion.
Another critical supply for the Hunter’s Star Quilt is a reliable sewing machine. While the quilt can be sewn by hand, most tutorials assume machine piecing for consistency and efficiency. Straight, even stitches are key to keeping the points aligned.
Thread choice also matters in a Hunter’s Star Quilt Tutorial. Neutral-colored, high-quality cotton thread blends seamlessly into the quilt and ensures durability. Using the right thread reduces breakage and keeps seams strong over time.
Pressing tools such as a good iron and pressing mat play a significant role in achieving clean results. Pressing seams accurately helps blocks lie flat, which is essential for assembling the Hunter’s Star Quilt without distortion.
Finally, having design aids like graph paper or digital quilt planning tools can enhance your Hunter’s Star Quilt Tutorial experience. These tools help visualize layouts and color placement before committing to stitching, saving time and fabric.
Step-by-Step Construction in a Hunter’s Star Quilt Tutorial
The construction process in a Hunter’s Star Quilt Tutorial usually starts with careful cutting of diamonds and triangles. This step requires patience and attention to detail, as accuracy here determines how smoothly the quilt comes together later.
Next, the pieces are sewn into units that form the basic building blocks of the Hunter’s Star Quilt. These smaller units are easier to manage and help maintain alignment. A clear Hunter’s Star Quilt Tutorial will guide you through this assembly in stages.
Matching seams and points is a crucial skill emphasized in every Hunter’s Star Quilt Tutorial. Pinning intersections carefully and sewing slowly can dramatically improve the final appearance of the quilt. Precision at this stage makes the stars look crisp and balanced.
As blocks are completed, they are arranged into rows. This layout stage allows quilters to adjust color placement and ensure consistency across the quilt top. A thoughtful Hunter’s Star Quilt Tutorial encourages stepping back and reviewing the design before final assembly.
Joining rows together is the next step, requiring even seam allowances and careful pressing. This process brings the full Hunter’s Star Quilt design to life as the stars become clearly visible across the quilt surface.
Once the quilt top is finished, the tutorial typically moves on to layering, quilting, and binding. These finishing steps secure the layers and frame the design, completing the Hunter’s Star Quilt Tutorial with a polished and professional result.
Tips for Beginners Following a Hunter’s Star Quilt Tutorial
For beginners, the Hunter’s Star Quilt Tutorial may seem intimidating, but starting with a small project like a table runner or wall hanging can build confidence. Smaller projects allow practice without overwhelming complexity.
Taking time to read the entire Hunter’s Star Quilt Tutorial before starting is highly recommended. Understanding the full process helps prevent mistakes and reduces frustration during construction.
Using test fabric or scraps is another beginner-friendly strategy. Practicing cuts and seams before working with your main fabric can make a significant difference in accuracy when following a Hunter’s Star Quilt Tutorial.
Consistent seam allowance is a common challenge for new quilters. Many tutorials suggest marking seam guides on your sewing machine to maintain uniformity throughout the Hunter’s Star Quilt.
Patience is essential when learning this pattern. A well-written Hunter’s Star Quilt Tutorial reminds beginners that mistakes are part of the learning process and can often be corrected with minor adjustments.
Lastly, celebrating small milestones keeps motivation high. Completing each block or row is an achievement, and acknowledging progress makes the Hunter’s Star Quilt Tutorial experience enjoyable and rewarding.
FAQ About the Hunter’s Star Quilt Tutorial
What is the Hunter’s Star Quilt pattern best known for
The Hunter’s Star Quilt is known for its striking star shapes and geometric precision, creating a visually complex design from simple pieces.
Is the Hunter’s Star Quilt suitable for beginners
Yes, with a clear Hunter’s Star Quilt Tutorial, beginners can successfully complete this pattern by following step-by-step instructions and starting with smaller projects.
What fabrics work best for a Hunter’s Star Quilt
High-quality quilting cotton with good contrast works best, as it highlights the star shapes and maintains structure throughout the quilt.
Why is precision so important in a Hunter’s Star Quilt Tutorial
Precision ensures that seams align correctly and the star points remain sharp, which is essential for the overall appearance of the quilt.
How long does it take to complete a Hunter’s Star Quilt
The time varies depending on size and experience level, but patience and careful work are emphasized in every Hunter’s Star Quilt Tutorial.
Can the Hunter’s Star Quilt be customized
Absolutely, color choices, layout variations, and scale adjustments allow quilters to personalize their Hunter’s Star Quilt while following the same core techniques.
Conclusion
The Hunter’s Star Quilt Tutorial offers a rewarding journey into one of quilting’s most admired patterns. Throughout this article, you learned about the history, materials, construction steps, and beginner-friendly tips that make the Hunter’s Star Quilt both achievable and enjoyable. By understanding the structure and techniques behind the pattern, you can approach your project with confidence and creativity.

