
The Crochet Star Stitch is one of the most beautiful and intricate stitches you can learn. Whether you’re a beginner or an experienced crocheter, mastering this stitch will add a touch of elegance to your crochet projects. In this Crochet Star Stitch tutorial, we’ll break down the process, step by step, to help you understand how to work this stitch with ease.
The Star Stitch creates a lovely, raised star pattern, which makes it stand out in any project. While it may seem complex at first glance, once you get the hang of it, the stitch is quite manageable.
By the end of this tutorial, you’ll be confident in your ability to execute the Crochet Star Stitch with precision. We’ll cover everything from how to set up your stitches, how to work each row, and how to incorporate the stitch into your own creations.
What is the Crochet Star Stitch?
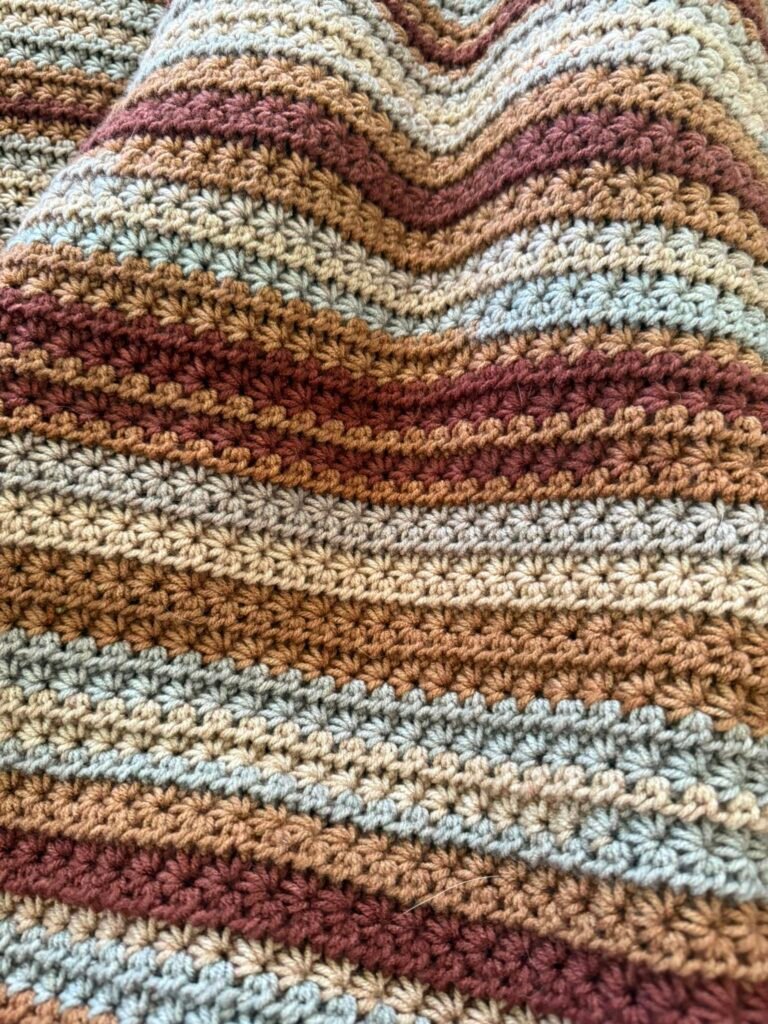
The Crochet Star Stitch is a textured stitch that creates a star-shaped pattern, often used for its beautiful, intricate look. It’s worked by making a combination of double crochet stitches into a single stitch, forming a cluster that looks like a little star. This stitch adds both texture and depth to your project, making it a popular choice for blankets, scarves, and even garments.
The technique for this stitch is fairly simple, but it requires a bit of attention to detail. The stitch involves inserting your hook multiple times into the same space to create the star pattern, which can seem a bit tricky at first. However, once you get the rhythm of it, you’ll be able to work it seamlessly into your crochet projects.
The Star Stitch is perfect for adding a sophisticated touch to any project. Whether you’re creating a blanket, a scarf, or a decorative piece, the texture that this stitch provides can elevate the overall look and feel of your piece. This stitch is highly customizable, too, as it can be worked in different colors or with varying yarn weights to create unique effects.
How to Work the Crochet Star Stitch
Learning to work the Crochet Star Stitch involves a few steps that you must follow carefully. Once you understand the basic principles, you’ll be able to incorporate it into many different crochet projects. Below, we’ll break down the steps involved in creating this stunning stitch.
Step 1: Starting the Foundation Chain
To begin the Crochet Star Stitch, start with a foundation chain that’s a multiple of two plus one. For example, if you want to create a row of stars, you might chain 21 for a small project. This foundation chain will serve as the base for your stitches. The number of chains you start with will depend on the project you’re working on and how wide you want the row to be.
Step 2: Make Your First Double Crochet
Once you have your foundation chain, you’ll start by working a double crochet (DC) stitch into the second chain from the hook. This is where the Star Stitch will begin to take shape. Continue to work a double crochet into each stitch across the row until you reach the last stitch.
Step 3: Creating the Star Cluster
After you’ve worked your row of double crochets, you’ll begin forming the star shape. For the Star Stitch, you’ll work multiple double crochet stitches into the same stitch from the previous row. These stitches will form the “points” of the star. Depending on your pattern, you may be instructed to work 5 to 7 double crochets into the same stitch.
Step 4: Closing the Star
Once you’ve completed your cluster of double crochets, it’s time to close the star. To do this, you’ll pull your working yarn through all of the loops on your hook. This step pulls the stitches together, creating the signature star shape.
Step 5: Repeat the Process
Repeat the process across the row. After completing the first star, you’ll skip a few stitches from the previous row, usually two, and then start the process again to create the next star. Once you finish your row, turn your work and repeat the process for the following rows.
Step 6: Finishing and Weaving in Ends
Once you’ve completed your stars, you can finish off your project by fastening off the yarn and weaving in the loose ends. This will ensure that your project stays neat and tidy.
Variations of the Crochet Star Stitch
While the basic Crochet Star Stitch creates a simple yet beautiful pattern, there are many variations that you can try once you’ve mastered the basic technique. These variations allow you to explore different textures and effects within your crochet project. Below are a few ways you can experiment with this versatile stitch:
1. Mini Star Stitch
The Mini Star Stitch is a smaller version of the traditional star, created by using fewer double crochets in the cluster. This is ideal for projects where you want a more delicate, less bulky look.
2. Double Star Stitch
For an even more dramatic effect, the Double Star Stitch involves working two star clusters into the same stitch. This adds extra texture and makes the stars appear larger and more defined.
3. Three-Point Star Stitch
Another fun variation is the Three-Point Star Stitch, where each star has three points instead of the usual five or six. This variation adds a bit of asymmetry to your pattern, which can be a fun twist for certain projects.
4. Colorful Star Stitch
You can also play with color by changing yarn colors for each star. This is a great way to add visual interest and create a multicolored effect, especially if you’re working on a blanket or throw.
Common Mistakes to Avoid
When learning a new crochet stitch like the Crochet Star Stitch, it’s important to be aware of common mistakes that can affect the outcome of your project. Below are some tips for avoiding these pitfalls:
1. Skipping Stitches
A common mistake is skipping stitches when working the star clusters. Make sure to count your stitches carefully to ensure that each cluster has the correct number of double crochets.
2. Tight Tension
If you crochet too tightly, the star pattern may not form correctly. Try to maintain a consistent, relaxed tension while working to get the best results.
3. Not Closing the Stars Properly
Be sure to pull your yarn through all the loops on your hook to properly close each star. This step is essential for creating the distinct, raised star shape.
FAQ – Frequently Asked Questions
Q: How long will it take to master the Crochet Star Stitch?
A: Mastering the Crochet Star Stitch may take some practice, especially for beginners. With patience, you should be able to work this stitch comfortably after a few tries.
Q: Can I use the Star Stitch for blankets?
A: Yes, the Star Stitch is an excellent choice for blankets. Its raised texture adds warmth and visual appeal to your project.
Q: Is the Star Stitch suitable for beginners?
A: While the Star Stitch might seem complicated at first, beginners can absolutely learn it with a little practice. Start with a small swatch to get comfortable.
Q: Can I use different yarns for the Crochet Star Stitch?
A: Yes, you can use any yarn you prefer. Just be sure to adjust your hook size accordingly to match the yarn weight.
Q: What are some projects where I can use the Crochet Star Stitch?
A: The Crochet Star Stitch works well in a variety of projects such as blankets, scarves, hats, and even garments like sweaters.
Conclusion
In this Crochet Star Stitch tutorial, we’ve explored the step-by-step process of mastering this beautiful, textured stitch. From the initial foundation chain to the final star closure, you now have the knowledge to incorporate this versatile stitch into your crochet projects. Whether you’re making blankets, scarves, or other accessories, the Star Stitch will add a stunning touch of detail and texture to your work.

