
Crochet Hat with a Relief Stitch | Step-by-Step is a popular project among yarn lovers who want texture, warmth, and professional-looking results using accessible techniques. A well-made Crochet Hat with a Relief Stitch | Step-by-Step approach allows even confident beginners to create a structured, stretchy, and visually rich hat using post stitches and simple shaping.
Many crafters choose a Crochet Hat with a Relief Stitch | Step-by-Step tutorial when they want to move beyond flat stitches and explore dimension in crochet. Relief stitches create raised lines and rib-like textures that make the hat look more advanced without requiring complicated construction.
Another reason the Crochet Hat with a Relief Stitch | Step-by-Step format is so appreciated is that it supports size adjustments and style variations. By changing yarn weight, hook size, and stitch counts, you can adapt the Crochet Hat with a Relief Stitch | Step-by-Step project for children, teens, and adults while keeping the same core technique.
What Is a Crochet Hat with a Relief Stitch | Step-by-Step
A Crochet Hat with a Relief Stitch | Step-by-Step project uses post stitches to create raised vertical or diagonal texture. Relief stitches are formed by working around the post of a stitch instead of into the top loops. This creates a ribbed effect that is thicker and more flexible.
Front post and back post stitches are the foundation of a Crochet Hat with a Relief Stitch | Step-by-Step design. Alternating them produces stretchy ribbing that closely resembles knit fabric. This makes the finished hat snug and comfortable.
Texture is not only decorative. In a Crochet Hat with a Relief Stitch | Step-by-Step pattern, relief stitches also improve insulation by adding thickness. That makes these hats especially suitable for cooler weather.
Most Crochet Hat with a Relief Stitch | Step-by-Step patterns are worked in the round. This avoids seams and keeps the texture continuous around the hat body. Continuous rounds also speed up the process.
The crown is usually shaped with regular stitches first. Many Crochet Hat with a Relief Stitch | Step-by-Step designs begin with standard double crochet rounds before transitioning into relief texture for the sides.
Because relief stitches are easy to repeat, a Crochet Hat with a Relief Stitch | Step-by-Step layout is ideal for rhythm crocheting once you understand the stitch placement.
Materials for Crochet Hat with a Relief Stitch | Step-by-Step
Choosing the right yarn is important for a Crochet Hat with a Relief Stitch | Step-by-Step project. Medium-weight yarn is the most common choice because it highlights texture without becoming too bulky.
Wool and wool blends perform very well. A Crochet Hat with a Relief Stitch | Step-by-Step made with wool blend yarn has natural elasticity and warmth, which complements the ribbed structure.
Acrylic yarn is also widely used. Many Crochet Hat with a Relief Stitch | Step-by-Step hats use acrylic because it is affordable, washable, and available in many colors.
Hook size should match the yarn label as a starting point. However, some Crochet Hat with a Relief Stitch | Step-by-Step projects benefit from going half a size down to keep stitches defined.
You will also need stitch markers. In a Crochet Hat with a Relief Stitch | Step-by-Step workflow, markers help track the start of rounds and crown decrease points.
A yarn needle and scissors are essential. Finishing a Crochet Hat with a Relief Stitch | Step-by-Step neatly depends on proper yarn tail weaving.
Core Stitches Used in Crochet Hat with a Relief Stitch | Step-by-Step
The most important stitches in a Crochet Hat with a Relief Stitch | Step-by-Step design are front post and back post double crochet. These are the stitches that create the raised lines.
Front post stitches push forward. In a Crochet Hat with a Relief Stitch | Step-by-Step pattern, they form the visible ridges on the outside surface.
Back post stitches recede slightly. Alternating them in a Crochet Hat with a Relief Stitch | Step-by-Step sequence creates stretch and ribbing.
Standard double crochet is often used in the crown. Many Crochet Hat with a Relief Stitch | Step-by-Step instructions begin with flat increases using regular stitches.
Chains are used for height and spacing. A Crochet Hat with a Relief Stitch | Step-by-Step round usually starts with chain stitches that count as the first stitch.
Slip stitches may be used to join rounds. This keeps the Crochet Hat with a Relief Stitch | Step-by-Step texture aligned from round to round.
Step-by-Step Structure of Crochet Hat with a Relief Stitch | Step-by-Step
The first step in a Crochet Hat with a Relief Stitch | Step-by-Step build is creating the crown circle. This is usually started with a magic ring or chained loop and increased evenly.
Increase rounds form the top diameter. A Crochet Hat with a Relief Stitch | Step-by-Step crown grows until it matches the head size needed.
Transition rounds come next. Many Crochet Hat with a Relief Stitch | Step-by-Step patterns include one plain round between crown and texture to stabilize stitch count.
Relief stitch rounds build the body. This is where the Crochet Hat with a Relief Stitch | Step-by-Step texture becomes visible and repeatable.
Length is adjusted by repeating rounds. A Crochet Hat with a Relief Stitch | Step-by-Step hat can be made slouchy or fitted depending on the number of body rounds.
The brim is often ribbed more tightly. Some Crochet Hat with a Relief Stitch | Step-by-Step designs switch to smaller hooks or denser ribbing at the edge.
Sizing a Crochet Hat with a Relief Stitch | Step-by-Step
Head circumference guides sizing. A Crochet Hat with a Relief Stitch | Step-by-Step crown diameter should be proportional to the wearer’s measurement.
Stretch factor matters. Because a Crochet Hat with a Relief Stitch | Step-by-Step fabric stretches, the hat is usually made slightly smaller than the actual head size.
Round counts determine size. Adding or removing increase rounds changes the Crochet Hat with a Relief Stitch | Step-by-Step fit.
Height is customizable. A Crochet Hat with a Relief Stitch | Step-by-Step can be shortened for a beanie or lengthened for a slouch style.
Try-on checks help accuracy. Testing the Crochet Hat with a Relief Stitch | Step-by-Step during progress prevents sizing surprises.
Keep notes for pairs. Recording stitch counts ensures you can repeat the same Crochet Hat with a Relief Stitch | Step-by-Step size again.
Design Variations for Crochet Hat with a Relief Stitch | Step-by-Step
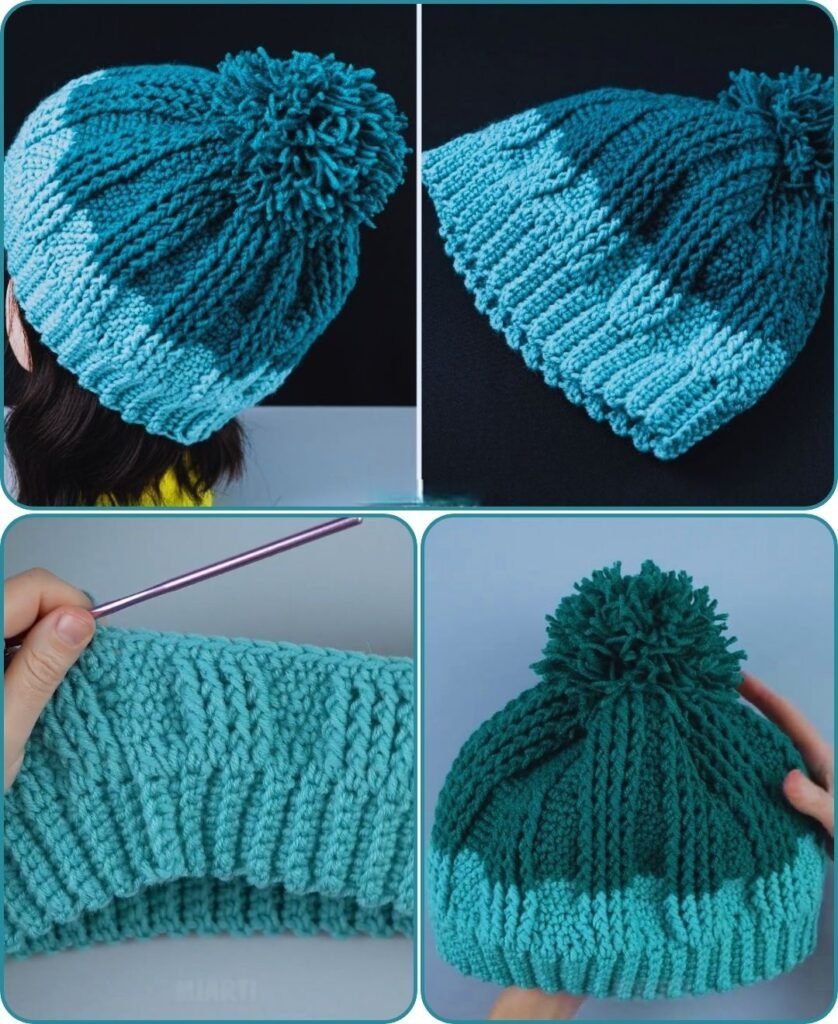
Color changes highlight texture. A striped Crochet Hat with a Relief Stitch | Step-by-Step emphasizes the raised columns.
Pom-poms add personality. Many makers finish a Crochet Hat with a Relief Stitch | Step-by-Step with a matching top accent.
Folded brims add warmth. Extending the rib section in a Crochet Hat with a Relief Stitch | Step-by-Step allows a double-layer edge.
Mixed relief patterns create complexity. Advanced versions of Crochet Hat with a Relief Stitch | Step-by-Step alternate stitch groupings for unique surfaces.
Chunky yarn creates bold texture. A thick-yarn Crochet Hat with a Relief Stitch | Step-by-Step works up quickly and looks dramatic.
Subtle yarn shows stitch detail. Solid-color yarn makes the Crochet Hat with a Relief Stitch | Step-by-Step texture more visible.
FAQ — Crochet Hat with a Relief Stitch | Step-by-Step
What is a Crochet Hat with a Relief Stitch | Step-by-Step?
A Crochet Hat with a Relief Stitch | Step-by-Step is a textured hat made using post stitches worked around stitch posts to create raised ribbing.
Is a Crochet Hat with a Relief Stitch | Step-by-Step beginner friendly?
Yes, a Crochet Hat with a Relief Stitch | Step-by-Step is suitable for beginners who already know basic double crochet and working in the round.
Are relief stitches harder than regular stitches?
Relief stitches in a Crochet Hat with a Relief Stitch | Step-by-Step feel different at first but become easy after a few rounds of practice.
Does relief stitch fabric stretch?
Yes, a Crochet Hat with a Relief Stitch | Step-by-Step usually has excellent stretch due to post stitch ribbing.
What yarn works best for relief stitch hats?
Wool blends and medium-weight acrylic yarns work very well for a Crochet Hat with a Relief Stitch | Step-by-Step.
Can I adjust the size easily?
Yes, you can resize a Crochet Hat with a Relief Stitch | Step-by-Step by changing crown increase rounds and body length.
Conclusion
The Crochet Hat with a Relief Stitch | Step-by-Step method is an excellent way to create a warm, stretchy, and visually rich hat using approachable crochet techniques. We covered how relief stitches work, materials, stitch structure, sizing strategy, construction flow, and design variations that help you succeed with a Crochet Hat with a Relief Stitch | Step-by-Step project. With consistent tension and correct post placement, the result is both functional and stylish.

