
Tiger crochet bookmark pattern is a fun and creative project that combines the charm of handmade crochet with the playful spirit of animal-inspired designs. This adorable bookmark is perfect for book lovers, students, and anyone who enjoys adding a personal touch to their reading routine. Because it is small, quick to make, and highly giftable, this pattern has become increasingly popular among crocheters of all skill levels.
One of the reasons the tiger crochet bookmark pattern stands out is its versatility. It can be made in realistic tiger colors for a bold look or in softer, whimsical shades for a cute and friendly style. The design usually features a slim body that fits neatly between book pages, along with a decorative tiger face that peeks out from the top, making it both functional and decorative.
In this complete guide, you will learn everything needed to create a beautiful tiger crochet bookmark pattern, from understanding the structure to choosing the right materials and mastering the key techniques. By the end of the article, you will feel confident starting your own project and customizing it to match your creative vision.
Understanding the Tiger Crochet Bookmark Pattern
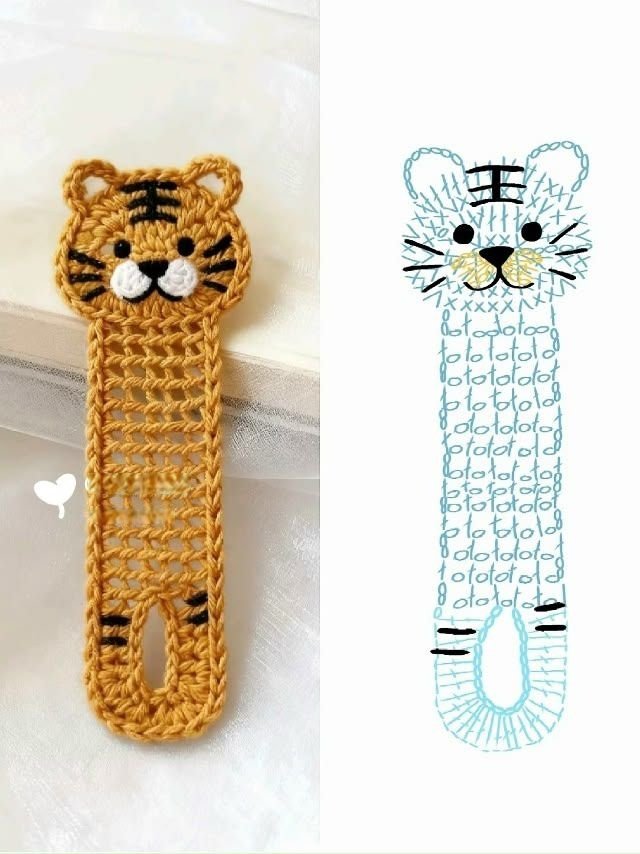
The tiger crochet bookmark pattern typically combines a flat, narrow body with a detailed animal head. This structure allows the bookmark to stay securely inside the book while showcasing the tiger design on the outside. Most patterns are worked in separate parts and then assembled.
The body of the bookmark is usually made with simple stitches such as single crochet or half double crochet. This keeps the piece thin and flexible so it slides easily between pages. Maintaining even tension is essential to prevent the bookmark from curling.
The tiger head is the focal point of the tiger crochet bookmark pattern. It often includes small ears, embroidered eyes, and stitched stripes that give the character personality. Although the details look intricate, they are usually beginner-friendly when worked step by step.
Color placement plays a big role in bringing the tiger to life. Traditional versions use orange, black, and white yarns. However, many crafters enjoy creating pastel or cartoon-style variations for a more playful look.
Proportion is another key element. The head should be slightly wider than the body so it rests securely on the book’s edge. This balance ensures the tiger crochet bookmark pattern remains both decorative and practical.
Overall, this project is ideal for practicing small amigurumi-style details while still completing something quick and useful.
Essential Materials and Tools
Choosing the right supplies will make your tiger crochet bookmark pattern look polished and professional. Because the project is small, quality materials make a noticeable difference in the final result.
Cotton yarn is highly recommended for the bookmark body. It provides good stitch definition and helps the piece stay flat. Lightweight yarn such as sport or DK weight works best for achieving the proper thickness.
You will typically need three main colors for a classic tiger crochet bookmark pattern: orange for the base, black for stripes and facial details, and white or cream for the muzzle and inner ears. Using high-contrast colors helps the tiger features stand out clearly.
Hook size should be slightly smaller than usual for your yarn weight. A smaller hook creates tighter stitches, which is especially important for the tiger head so the stuffing (if used) does not show through.
Basic tools include a yarn needle, stitch markers, sharp scissors, and optional safety eyes or embroidery thread. Many bookmark patterns use embroidered eyes instead of plastic ones to keep the piece flat.
Optional materials such as a small amount of stuffing for the head or fabric stiffener for the body can enhance the durability of your tiger crochet bookmark pattern, but they are not always required.
Step-by-Step Technique Tips
When starting your tiger crochet bookmark pattern, begin with the bookmark body. Most designs use foundation chains followed by rows of single crochet. Keep your tension consistent so the strip remains straight and even.
Count your stitches at the end of every row. Because the bookmark is narrow, even one missed stitch can cause the edges to slant. Stitch markers can help beginners maintain accuracy.
Next, crochet the tiger head, which is usually worked in the round. Using a magic ring creates a neat, tight center. Increase gradually to form a smooth circular shape for the face.
Pay special attention to the tiger crochet bookmark pattern details such as ears and muzzle. These small pieces give the character its personality. Take your time when attaching them to ensure proper placement and symmetry.
Embroidery is what truly brings the tiger to life. Use black yarn or embroidery floss to stitch the stripes, nose, and whisker details. Clean, simple lines will make your bookmark look much more professional.
Finally, attach the head securely to the bookmark body. Reinforce the seam well since this area experiences the most handling. Weave in all ends carefully to complete your tiger crochet bookmark pattern.
Creative Variations and Styling Ideas
One of the best things about the tiger crochet bookmark pattern is how easy it is to personalize. With small adjustments, you can create many unique versions of this cute accessory.
Try experimenting with different facial expressions. Changing the eye shape or mouth style can make your tiger look sleepy, happy, or playful. These tiny tweaks give each bookmark its own personality.
Color variations are another fun option. While classic orange is traditional, pastel tigers, rainbow versions, or even themed school colors can make your tiger crochet bookmark pattern stand out.
You can also adjust the length of the bookmark body. A longer strip works well for large novels, while a shorter one suits planners or small books. This flexibility makes the project very practical.
Adding texture to the body is another creative idea. Simple ribbing, surface slip stitches, or subtle stripe patterns can enhance the visual appeal without making the bookmark too bulky.
For those who sell handmade items, packaging matters. Pairing your tiger crochet bookmark pattern with a themed card or gift wrap can increase its appeal as a thoughtful handmade gift.
FAQ About Tiger Crochet Bookmark Pattern
Is the tiger crochet bookmark pattern beginner-friendly?
Yes, most versions are suitable for beginners who know basic stitches and are willing to practice simple shaping and embroidery.
What yarn is best for a crochet bookmark?
Cotton yarn is ideal for the tiger crochet bookmark pattern because it keeps the piece flat and provides crisp stitch definition.
Why is my bookmark curling?
Curling usually happens when stitches are too tight or uneven. Try loosening your tension slightly and consider blocking your finished bookmark.
Do I need stuffing for the tiger head?
Not always. Some tiger crochet bookmark pattern designs keep the head flat, while others use a very small amount of stuffing for dimension.
How long does this project take?
Most crocheters can complete a tiger crochet bookmark pattern in 1 to 3 hours, making it a great quick project.
Can I sell bookmarks made from this pattern?
In most cases yes, especially if the pattern permits handmade sales. Animal bookmarks are popular at craft fairs and online shops.
Conclusion
The tiger crochet bookmark pattern is a delightful project that combines creativity, functionality, and adorable design in one quick make. Throughout this guide, you learned how the bookmark is structured, which materials work best, and the key techniques that ensure a clean and professional finish.
This project is perfect for practicing small amigurumi details while creating something truly useful. Whether you prefer a realistic tiger or a cute cartoon version, the tiger crochet bookmark pattern offers endless opportunities for customization and personal expression.

