
Crochet Butterfly Top – Tutorial is one of the most searched and loved projects among crochet enthusiasts who want to create a stylish, feminine, and trendy handmade garment. This beautiful top is inspired by the delicate shape of butterfly wings and is known for its flattering fit, lightweight feel, and eye-catching design. Whether you are crafting for yourself, for gifts, or to sell handmade fashion, this project is a wonderful addition to your crochet portfolio.
The popularity of the crochet butterfly top has grown rapidly thanks to social media and the rise of handmade fashion trends. Crafters love it because it works up relatively quickly and allows for many creative variations in color, strap style, and sizing. The butterfly top tutorial is especially appealing to confident beginners who are ready to move beyond basic squares and try garment construction.
In this complete Crochet Butterfly Top – Tutorial, you will learn the essential structure, recommended materials, step-by-step techniques, and creative customization ideas. By the end of this guide, you will feel confident starting your own butterfly top and adapting it to suit your personal style.
Understanding the Crochet Butterfly Top Design
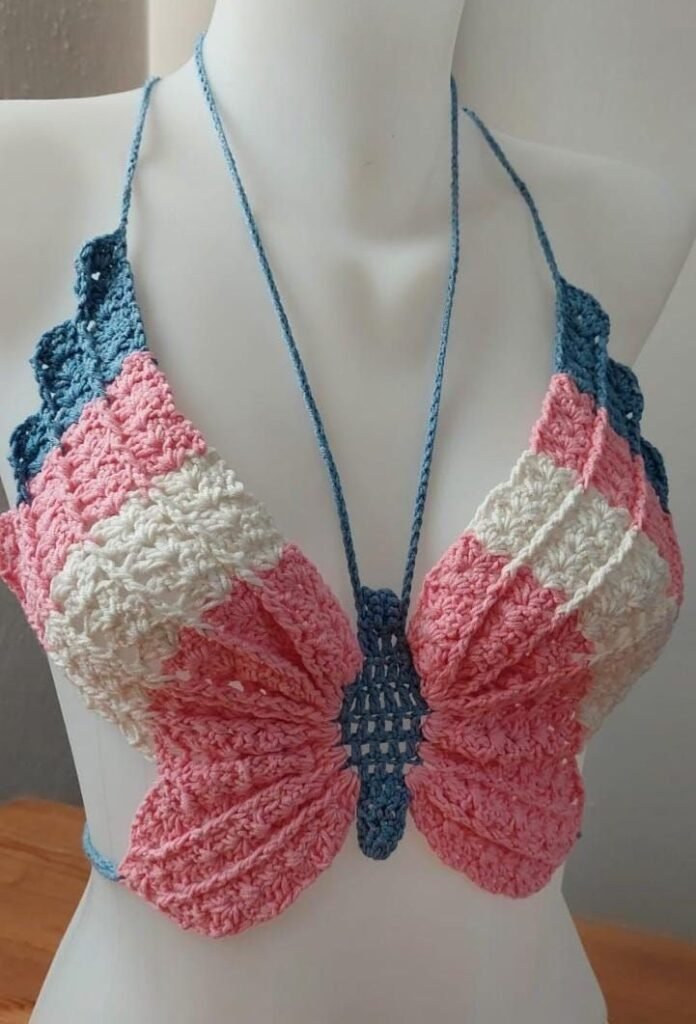
The crochet butterfly top is designed to resemble the spread wings of a butterfly when laid flat. Its signature shape comes from strategic increases and decreases that create two wing-like panels connected at the center. This construction gives the top its flattering drape and unique silhouette.
Most versions of the butterfly top tutorial begin at the center and work outward. This method allows you to control the width and height easily, making it adaptable for different body sizes. Understanding this construction is key to achieving the correct fit.
The central portion usually forms a small triangle or band that sits at the bust. From there, the wings expand using double crochet or treble crochet stitches. The open stitch pattern keeps the crochet butterfly top lightweight and breathable, perfect for warm weather.
Another defining feature is the strap system. Many designs use simple chain straps, halter ties, or adjustable back ties. These flexible options make the butterfly top tutorial beginner-friendly and customizable.
Edge finishing also plays an important role. Picot edges, scallops, or simple single crochet borders help define the wing shape and give the garment a polished look.
Once you understand the basic geometry of the crochet butterfly top, you can easily modify the size, coverage, and style.
Essential Materials and Tools
Choosing the right supplies will greatly affect the final look of your Crochet Butterfly Top – Tutorial project. Because this is a wearable piece, comfort and drape are especially important.
Cotton yarn or cotton blends are the most recommended fibers for a crochet butterfly top. They are breathable, soft against the skin, and hold their shape well after washing. Lightweight yarn such as sport or DK weight works best for a delicate finish.
Hook size typically ranges from 2.5 mm to 4.0 mm, depending on your yarn choice and desired drape. A slightly larger hook can create a softer, more flowing fabric, while a smaller hook produces more structure.
Color choice is where creativity shines. Solid colors highlight the elegant wing shape, while ombré or gradient yarns make the butterfly top tutorial look especially eye-catching and modern.
You will also need basic tools such as scissors, stitch markers, and a yarn needle for weaving in ends. Because fit matters, having a measuring tape nearby is highly recommended.
Optional additions like removable bra cups, elastic thread, or decorative beads can enhance the comfort and appearance of your crochet butterfly top, but they are not required for the basic version.
Step-by-Step Technique Tips
When starting your Crochet Butterfly Top – Tutorial, begin by creating the foundation chain or magic ring specified in your pattern. This central section determines the symmetry of the entire top.
Maintaining even tension is crucial. Because the wings expand outward, uneven stitches can cause the crochet butterfly top to look lopsided. Take your time, especially in the early rows.
Carefully follow increase instructions. The wing shape depends on placing increases in the correct positions each row. Using stitch markers can help you keep track of key points in the butterfly top tutorial.
Try the top on as you work whenever possible. One advantage of this design is that it is easy to adjust width and length mid-project. This ensures your crochet butterfly top fits comfortably and provides the coverage you want.
When working the straps, keep them firm but not tight. Adjustable ties are popular because they allow flexibility for different body shapes and styling preferences.
Finally, finish with a clean border around the edges. A neat edging transforms the Crochet Butterfly Top – Tutorial from homemade to boutique-quality.
Styling and Customization Ideas
One of the biggest advantages of the crochet butterfly top is how customizable it is. With a few creative changes, you can create multiple unique versions from the same basic pattern.
Color experimentation is the easiest way to personalize your butterfly top tutorial. Soft pastels create a romantic look, while bold neon shades give the top a trendy festival vibe.
You can also adjust the coverage. Adding extra rows to the wings creates a fuller top, while fewer rows produce a more minimal style. This flexibility makes the crochet butterfly top suitable for many preferences.
Strap variations offer another design opportunity. Try halter ties, cross-back straps, or shoulder straps to completely change the look and support level of your top.
Adding texture is another fun idea. Shell stitches, mesh sections, or subtle ribbing can give your butterfly top tutorial more visual interest without complicating the pattern too much.
For those who sell handmade clothing, offering custom sizing and color combinations can make your crochet butterfly top highly attractive to buyers looking for unique summer fashion.
FAQ About Crochet Butterfly Top – Tutorial
Is the crochet butterfly top beginner-friendly?
Yes, confident beginners can complete the Crochet Butterfly Top – Tutorial, especially if they are comfortable with basic stitches and simple increases.
What yarn is best for this project?
Cotton or cotton-blend yarn is ideal for a crochet butterfly top because it is breathable and holds shape well.
How do I adjust the size?
Most butterfly top tutorial designs can be resized by adding or reducing rows in the wing sections and adjusting strap length.
Will the top stretch over time?
Cotton yarn stretches minimally, but proper tension and optional elastic support can help your crochet butterfly top maintain its shape.
How long does it take to make one top?
Most crocheters complete a Crochet Butterfly Top – Tutorial in about 4 to 8 hours, depending on experience and complexity.
Can I sell tops made from this pattern?
In most cases yes, especially if the pattern allows handmade sales. The crochet butterfly top is very popular in summer markets.
Conclusion
The Crochet Butterfly Top – Tutorial is a beautiful and rewarding project that blends fashion with handmade artistry. Throughout this guide, you learned how the butterfly construction works, which materials provide the best results, and the key techniques that help create a well-fitted garment.
This stylish crochet butterfly top continues to trend because it is quick to make, highly customizable, and perfect for warm-weather wardrobes. By experimenting with colors, straps, and sizing adjustments, you can create a piece that truly reflects your personal style.

