
The Sewing Fabric Storage Baskets – tutorial is a practical and satisfying project that combines creativity with everyday organization. These versatile baskets are perfect for storing craft supplies, toys, toiletries, or household essentials while adding a handmade decorative touch to your space. Whether you are new to sewing or looking for a quick and useful project, fabric storage baskets are an excellent choice.
One of the best things about the Sewing Fabric Storage Baskets – tutorial is how approachable it is for beginners. The construction is straightforward, the materials are easy to find, and the results look impressively professional. With just basic sewing skills and a bit of patience, you can create sturdy baskets that are both functional and beautiful.
In this complete guide, you will learn everything you need to confidently follow the Sewing Fabric Storage Baskets – tutorial. We will cover essential materials, step-by-step instructions, customization ideas, and expert tips to help your baskets hold their shape and look polished. By the end of this article, you will be ready to sew stylish storage solutions for any room in your home.
Why Sewing Fabric Storage Baskets Is Perfect for Beginners
The Sewing Fabric Storage Baskets – tutorial is especially beginner-friendly because it uses mostly straight seams and simple construction techniques. Even if you are still learning to control your sewing machine, this project is very manageable.
Another reason this tutorial is so popular is the quick completion time. Most small to medium baskets can be finished in a single afternoon, making it a great project when you want fast, satisfying results.
This project is also highly practical. Unlike decorative-only crafts, fabric baskets serve a real purpose in keeping your home organized and clutter-free.
The Sewing Fabric Storage Baskets – tutorial is also very forgiving. Minor stitching imperfections are often hidden in seams or corners, which helps beginners build confidence.
Additionally, the pattern is extremely customizable. You can adjust the size, fabric type, or handle style to suit different storage needs.
Most importantly, sewing fabric baskets is fun and rewarding, especially when you see them in daily use around your home.
Materials Needed for Sewing Fabric Storage Baskets
Before starting your Sewing Fabric Storage Baskets – tutorial, gathering the right supplies will ensure your baskets turn out sturdy and professional-looking.
First, choose your main fabric. Medium-weight cotton fabric is ideal because it is easy to sew and holds its shape well. Canvas or home décor fabric works great for more structured baskets.
Next, select a lining fabric. Quilting cotton is commonly used and allows you to add a fun contrasting interior.
You will also need interfacing or fusible fleece. This is the key material that gives the basket its structure and stability. Heavy fusible interfacing is recommended for firm baskets.
Thread that matches or complements your fabric is important for a clean finish. Polyester thread is strong and works well for most projects.
Basic sewing tools are essential, including sharp fabric scissors or a rotary cutter, pins or clips, a ruler, and a sewing machine.
Having these materials ready will make your Sewing Fabric Storage Baskets – tutorial process smooth and enjoyable.
Step-by-Step Sewing Fabric Storage Baskets – Tutorial
Following the Sewing Fabric Storage Baskets – tutorial is simple when you break it into clear, manageable steps and work carefully.
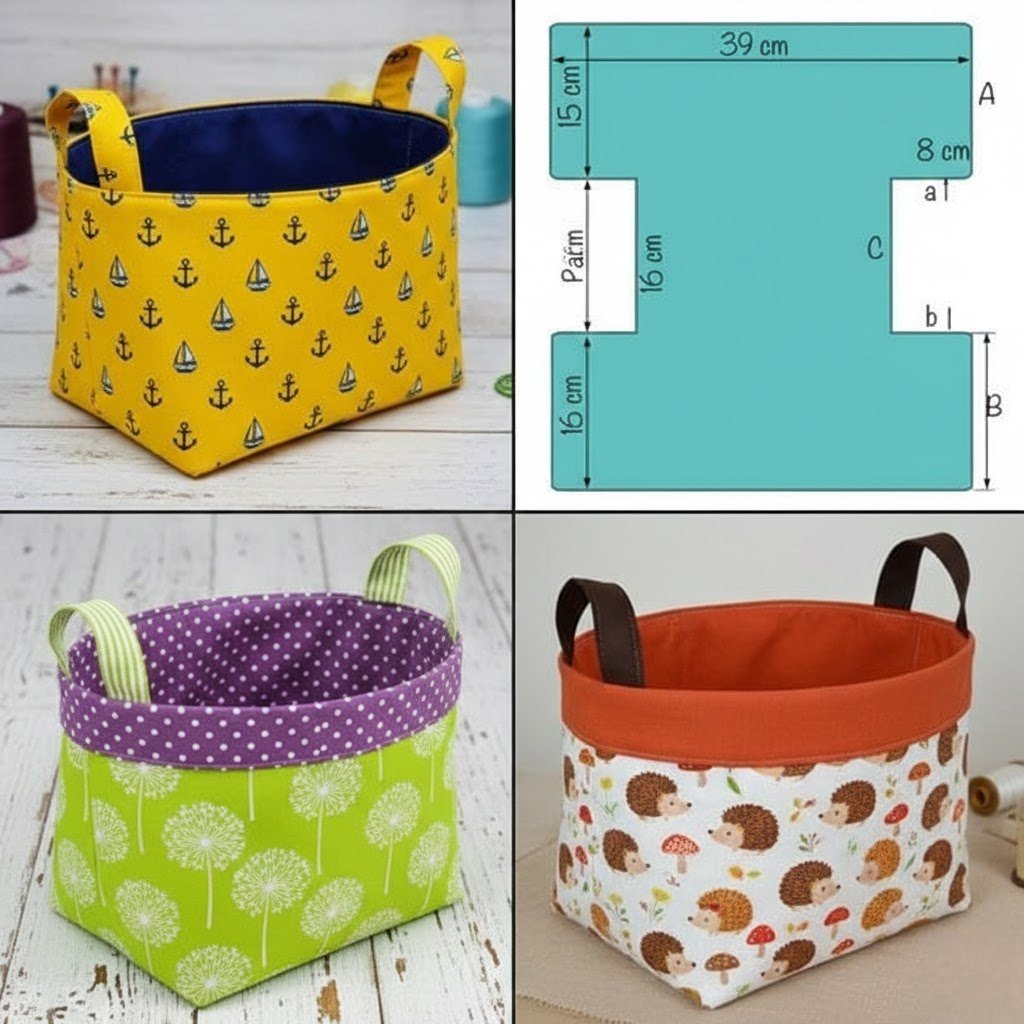
Begin by cutting your fabric pieces. Typically, you will cut one outer fabric piece, one lining piece, and matching interfacing according to your desired basket size.
Next, fuse the interfacing to the wrong side of the outer fabric following the manufacturer’s instructions. This step is essential for creating a sturdy basket.
Fold the outer fabric in half with right sides together and sew the side seam. Repeat the same step with the lining piece.
To create the boxed corners, pinch each bottom corner so the side seam aligns with the bottom fold, then sew straight across the corner. Trim the excess fabric.
Repeat the boxed corner step for the lining. This gives the basket its three-dimensional shape.
Place the outer basket inside the lining with right sides facing, align the top edges, and sew around the top, leaving a small turning gap.
Turn the basket right side out through the opening, push the lining inside, and press the top edge neatly.
Topstitch around the upper edge for a clean, professional finish. Your Sewing Fabric Storage Baskets – tutorial project is now complete.
Creative Customization Ideas for Fabric Storage Baskets
One of the best parts of the Sewing Fabric Storage Baskets – tutorial is how easy it is to personalize your baskets to match your style and needs.
Try mixing bold prints with neutral linings for a modern designer look. This creates visual interest while keeping the basket versatile.
You can also add fabric handles to the sides for easier carrying. This is especially useful for toy storage or craft baskets.
Consider varying the basket size. Small baskets are perfect for desks and bathrooms, while larger ones work well for laundry or blankets.
Adding labels or embroidery is another great way to customize. Personalized baskets make thoughtful handmade gifts.
You might also experiment with reversible baskets by using two decorative fabrics instead of a plain lining.
The Sewing Fabric Storage Baskets – tutorial is incredibly flexible, so don’t hesitate to get creative.
Pro Tips for Professional-Looking Fabric Storage Baskets
If you want your Sewing Fabric Storage Baskets – tutorial results to look store-quality, a few expert tips can make a big difference.
Always cut fabric pieces accurately. Even small measurement errors can affect the final basket shape.
Use plenty of pins or clips when aligning layers. This prevents shifting and keeps seams straight.
Press your seams at each step. Proper pressing is one of the secrets to professional-looking sewing projects.
Choose the right interfacing weight. Too light and the basket will collapse; too heavy and it may be difficult to turn.
When sewing boxed corners, measure carefully to keep both sides even.
Finally, take your time with the topstitching. A neat top edge gives your Sewing Fabric Storage Baskets – tutorial project a polished, finished look.
FAQ About Sewing Fabric Storage Baskets – Tutorial
Is the Sewing Fabric Storage Baskets – tutorial suitable for beginners?
Yes. This project mainly uses straight seams and basic techniques, making it ideal for beginners.
What fabric works best for storage baskets?
Medium-weight cotton, canvas, or home décor fabric works best because it provides good structure.
Why is my fabric basket floppy?
This usually happens when the interfacing is too light. Try using heavy fusible interfacing or fusible fleece.
Can I wash fabric storage baskets?
Yes, if you use washable fabrics and interfacing. Air drying is recommended to maintain shape.
Do I need a sewing machine for this project?
While possible by hand, a sewing machine makes the Sewing Fabric Storage Baskets – tutorial much faster and neater.
How long does this project take?
Most baskets take between 1 and 3 hours, depending on size and experience level.
Conclusion
The Sewing Fabric Storage Baskets – tutorial is a practical, beginner-friendly project that delivers beautiful and useful results. In this guide, you learned why fabric baskets are so popular, what materials to prepare, how to follow the step-by-step construction process, and how to customize your baskets to suit any space.
With just a little practice, you can create durable, stylish storage solutions for every room in your home. Now it’s your turn to try the Sewing Fabric Storage Baskets – tutorial and enjoy the satisfaction of handmade organization. If this tutorial helped you, please leave your honest opinion and share your suggestions—your feedback is always welcome and helps inspire future tutorials. Happy sewing!

