
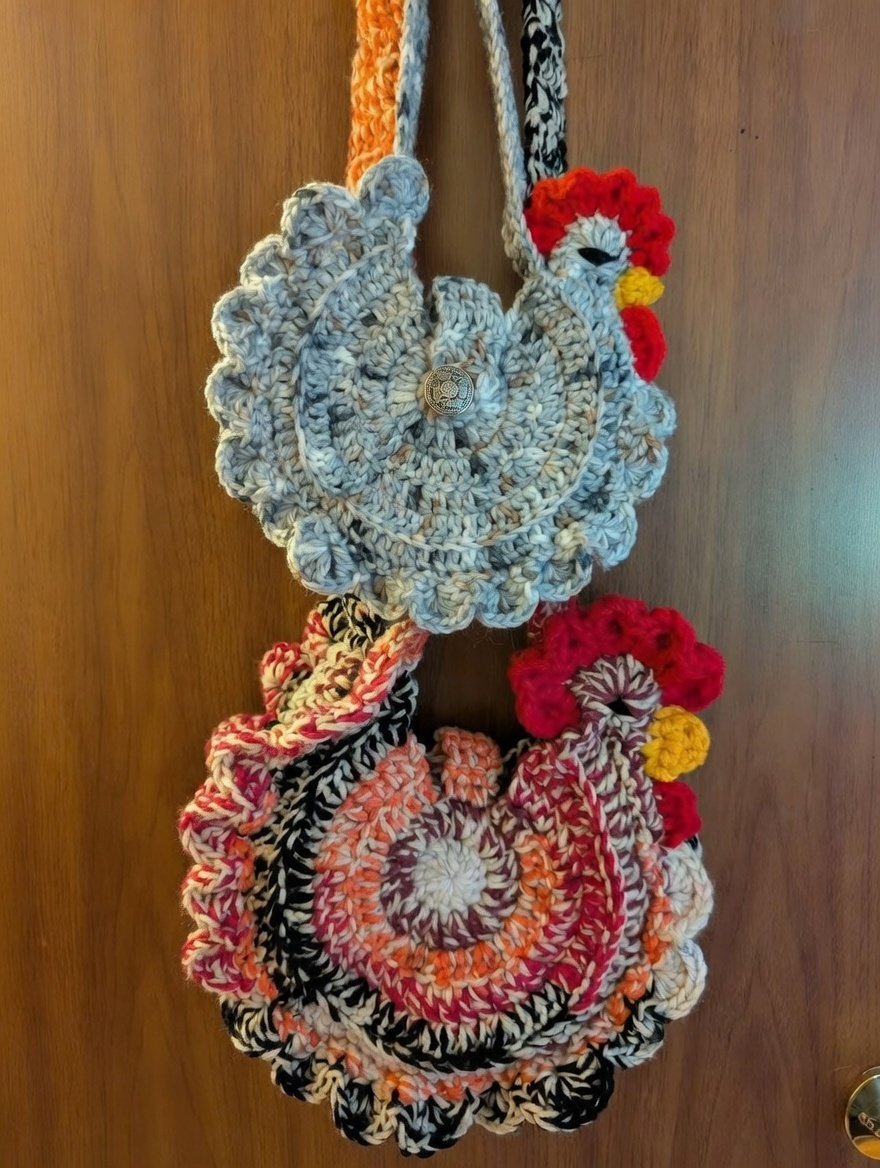
The How to Make a Crochet Chicken Bags Pattern guide is a fun and practical project for anyone who loves creative crochet pieces with personality. These adorable chicken-shaped bags are perfect for storing small items, organizing craft supplies, holding eggs, or even serving as unique gift packaging. With their playful look and useful design, crochet chicken bags have become increasingly popular among crafters of all skill levels.
In this detailed Crochet Chicken Bags Pattern tutorial, you will learn how to select the right materials, shape the bag properly, and add charming chicken details that bring the design to life. The pattern is beginner-friendly but still offers enough creative freedom for experienced crocheters who want to customize their project.
Throughout this step-by-step guide, we will explore the essential techniques behind the crochet chicken bag tutorial, share expert tips for structure and durability, and suggest creative variations so you can make your chicken bag truly unique. By the end, you’ll feel confident creating your own functional and adorable crochet chicken bag.
Materials and Tools for Crochet Chicken Bags Pattern
Before starting your How to Make a Crochet Chicken Bags Pattern, gathering the proper supplies will make the process smoother and more enjoyable. The right materials also help your bag keep its shape.
First, choose a sturdy yarn. Cotton yarn is highly recommended for any Crochet Chicken Bags Pattern because it provides structure and durability. Worsted-weight cotton works especially well for bags that need to hold their shape.
Next, select the appropriate crochet hook. Most crochet chicken bag tutorial designs use hooks between 3.5 mm and 5.0 mm, depending on yarn thickness. Using a slightly smaller hook helps create tight stitches, which is important for bags.
You will also need scissors for trimming yarn ends neatly. Clean finishing always improves the look of your Crochet Chicken Bags Pattern.
A yarn needle or tapestry needle is essential for sewing parts together and weaving in ends securely. This step gives your project a polished, professional finish.
Optional materials include safety eyes or black embroidery thread for the eyes, small amounts of contrasting yarn for the comb and beak, and stitch markers to track rounds.
Finally, consider adding a drawstring cord, button, or zipper depending on the closure style you want for your crochet chicken bag tutorial.
Step-by-Step Crochet Chicken Bag Tutorial
This How to Make a Crochet Chicken Bags Pattern section walks you through the basic construction process. Work slowly and check your stitch count often for best results.
Begin by creating a magic ring and crocheting the base of the bag in continuous rounds. Most Crochet Chicken Bags Pattern designs start with single crochet increases to form a flat circular bottom.
Once the base reaches your desired size, stop increasing and work even rounds to build the sides of the bag. This is where your crochet chicken bag tutorial starts taking shape as a pouch.
Continue crocheting until the bag reaches the desired height. Keep your tension consistent so the fabric remains firm and structured.
Next, create the chicken head features. Crochet small separate pieces for the comb, beak, and wings. Many Crochet Chicken Bags Pattern variations use simple half double or double crochet shapes for these details.
Sew the decorative pieces securely onto the bag body using a yarn needle. Proper placement is key to achieving the cute chicken look.
Finally, add the closure. This may be a crocheted drawstring, flap with button, or zipper, depending on your preferred crochet chicken bag tutorial style. Weave in all loose ends neatly.
Tips for a Sturdy and Cute Crochet Chicken Bag
Even simple projects benefit from expert finishing techniques. These tips will help your How to Make a Crochet Chicken Bags Pattern look polished and durable.
Use tight stitches whenever possible. Bags need structure, and loose stitches can cause your Crochet Chicken Bags Pattern to sag.
Choose cotton yarn over very soft acrylic when possible. Cotton helps the bag maintain its shape better in most crochet chicken bag tutorial projects.
Consider lining the bag with fabric. A simple sewn lining adds strength and prevents small items from slipping through stitches.
Position the chicken face carefully before sewing. Small adjustments can dramatically improve the personality of your Crochet Chicken Bags Pattern.
If the bag feels too soft, try using a smaller hook size. This is a common technique used by experienced crocheters.
Finally, reinforce the drawstring or handle area. These stress points in any crochet chicken bag tutorial benefit from extra stitching.
Creative Variations for Crochet Chicken Bags Pattern
One of the most enjoyable aspects of the How to Make a Crochet Chicken Bags Pattern is the ability to customize it in many ways.
Try using farmhouse-inspired colors like white, red, and yellow for a traditional chicken look. These color palettes are very popular in Crochet Chicken Bags Pattern designs.
You can also create mini versions for party favors or gift packaging. Smaller bags work up quickly and are great stash-busting projects.
Consider adding textured stitches such as bobbles or popcorn stitches to mimic feathers in your crochet chicken bag tutorial.
For a modern twist, experiment with pastel or bright color combinations instead of realistic chicken tones.
You might also add a handle to turn the pouch into a small handbag. This variation makes the Crochet Chicken Bags Pattern both decorative and functional.
Finally, personalize your bag with embroidery, names, or themed decorations for holidays and special occasions.
FAQ About How to Make a Crochet Chicken Bags Pattern
Is the Crochet Chicken Bags Pattern beginner-friendly?
Yes, most crochet chicken bag tutorial designs use basic stitches like single crochet and simple shaping, making them suitable for beginners with some practice.
What yarn is best for this project?
Cotton yarn is highly recommended because it provides structure and durability for the Crochet Chicken Bags Pattern.
How long does it take to make one bag?
Most crocheters can complete a basic How to Make a Crochet Chicken Bags Pattern project in 2 to 4 hours, depending on size and experience.
Do I need to line the bag?
Lining is optional but recommended for extra durability and a more professional finish in your crochet chicken bag tutorial.
Can I resize the bag?
Yes. You can adjust the base size and height or change yarn weight and hook size to customize your Crochet Chicken Bags Pattern.
What can I store in the chicken bag?
These bags are great for eggs, candies, small toys, craft supplies, or gift items.
Conclusion
In this complete How to Make a Crochet Chicken Bags Pattern guide, you learned how to select the right materials, follow step-by-step construction, apply expert tips for durability, and explore creative ways to personalize your project. The Crochet Chicken Bags Pattern is a delightful blend of functionality and charm, perfect for beginners and experienced crocheters alike.
With practice, your stitches will become more even, your shaping more refined, and your finishing more professional. Take your time, enjoy the creative process, and don’t hesitate to experiment with colors and details to make each chicken bag uniquely yours. If this How to Make a Crochet Chicken Bags Pattern tutorial helped you, please leave your honest opinion and share your suggestions. Your feedback is greatly appreciated and helps improve future crochet guides.

