
Bucket Hat Pattern is one of the most searched and loved topics in the world of DIY fashion and handmade crafts, and it’s easy to understand why. This timeless accessory combines practicality, comfort, and style, making it a favorite among beginners and experienced crafters alike. Whether you are into sewing or crochet, creating your own Bucket Hat Pattern allows you to personalize every detail, from fabric choice to color combinations, resulting in a truly unique piece.
In today’s creative landscape, handmade items are gaining more value than ever before. A well-designed Bucket Hat Pattern not only reflects personal style but also promotes sustainability by encouraging people to reuse fabrics and reduce waste. As trends continue to shift toward conscious fashion, making your own bucket hat becomes both a creative and responsible choice. Plus, the process itself can be incredibly relaxing and rewarding.
Another reason for the popularity of the Bucket Hat Pattern is its versatility. It suits all seasons, can be styled in multiple ways, and adapts to different skill levels. From simple beginner-friendly designs to more complex and textured patterns, there is something for everyone. In this article, you will learn everything you need to know about creating a bucket hat, including materials, techniques, customization ideas, and expert tips to elevate your final result.
Understanding the Basics of a Bucket Hat Pattern
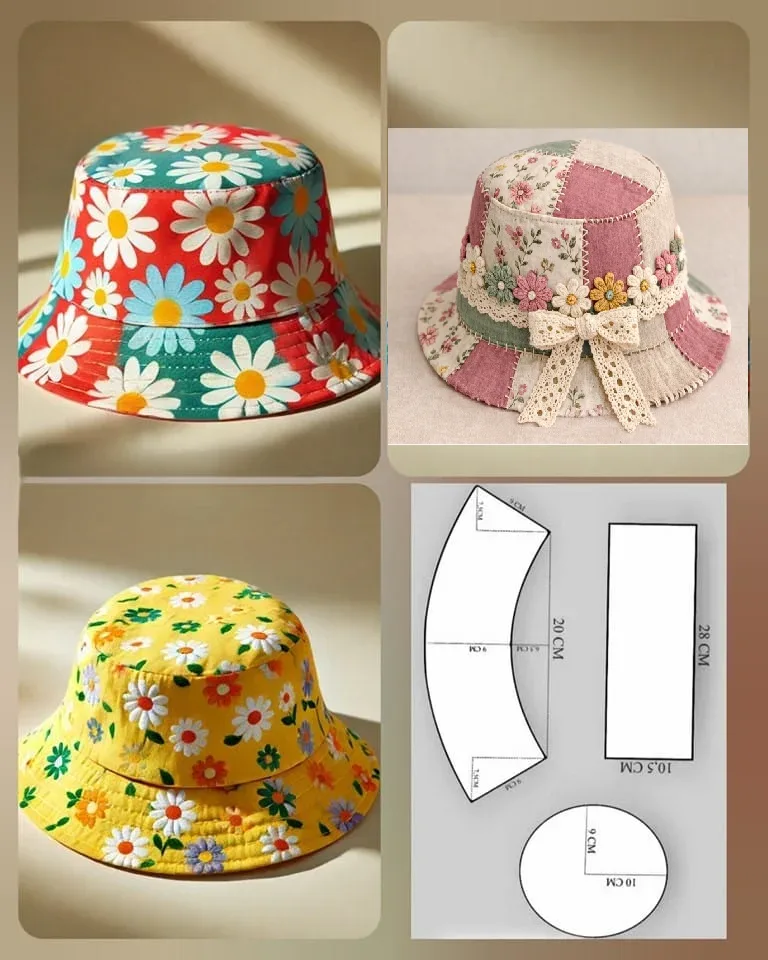
A Bucket Hat Pattern typically consists of three main parts: the crown, the side band, and the brim. Each piece plays an essential role in shaping the hat and ensuring a comfortable fit. Understanding how these components work together is the first step toward successfully creating your own bucket hat.
The crown is the top circular part of the hat that sits on your head. When working with a Bucket Hat Pattern, precision in measuring and cutting this piece is crucial. A well-fitted crown ensures the hat sits comfortably without being too tight or too loose.
The side band connects the crown to the brim and gives the hat its recognizable bucket shape. In many Bucket Hat Pattern designs, this section can be adjusted in height to create different styles, from shallow and trendy looks to deeper, more classic fits.
The brim is what provides shade and protection from the sun. Depending on the Bucket Hat Pattern you choose, the brim can be narrow, wide, floppy, or structured. Reinforcing this area with interfacing or thicker yarn (in crochet) helps maintain its shape.
Choosing the right materials is also a fundamental part of the process. Cotton fabrics are popular for sewing patterns, while cotton yarn or acrylic blends work well for crochet versions. The right material enhances both comfort and durability.
Finally, understanding pattern instructions is key. Most Bucket Hat Pattern guides include measurements, seam allowances, and step-by-step instructions. Taking time to read and follow these carefully will make the crafting process smoother and more enjoyable.
Materials and Tools for Your Bucket Hat Pattern
Selecting the appropriate materials can make a significant difference in the outcome of your Bucket Hat Pattern project. For sewing, lightweight to medium-weight fabrics such as cotton, denim, or canvas are excellent choices. These fabrics provide structure while remaining breathable.
If you are working with a crochet Bucket Hat Pattern, yarn selection is equally important. Cotton yarn is often recommended because it holds shape well and is comfortable for warm weather. Acrylic yarn can also be used for more flexibility and color variety.
Basic tools for sewing include scissors, pins, a sewing machine (or needle for hand sewing), measuring tape, and an iron. These tools ensure accuracy and help achieve a professional finish in your Bucket Hat Pattern.
For crochet, you will need a suitable hook size, stitch markers, and a yarn needle for finishing. Following the recommended hook size in your Bucket Hat Pattern helps maintain the correct tension and sizing.
Interfacing is an optional but highly recommended addition, especially for the brim. It adds structure and helps the hat maintain its shape over time. This small detail can elevate the overall quality of your Bucket Hat Pattern.
Lastly, having a printed or digital copy of your pattern within easy reach can save time and reduce mistakes. Staying organized throughout your project ensures a smoother and more enjoyable crafting experience.
Step-by-Step Guide to Creating a Bucket Hat Pattern
Starting your Bucket Hat Pattern project begins with preparing your materials and cutting your fabric or yarn according to the pattern instructions. Accuracy at this stage is essential to ensure all pieces fit together correctly.
Next, assemble the crown by stitching or crocheting it into a circular shape. In sewing, this involves attaching the top circle to the side band. In crochet, it usually involves increasing stitches evenly to form a flat circle.
Once the crown is ready, attach the side band. This step defines the height of the hat and contributes to its overall structure. Following your Bucket Hat Pattern closely here will help maintain symmetry and balance.
The brim is constructed separately and then attached to the side band. This part requires attention to detail, as even stitching or consistent crochet tension ensures a neat and polished finish.
After assembling all parts, finishing touches are applied. This may include topstitching, adding decorative elements, or weaving in loose yarn ends. These details enhance the appearance of your Bucket Hat Pattern.
Finally, try on your hat and make any necessary adjustments. Whether it’s tightening a seam or reshaping the brim, small refinements can make a big difference in the final result.
Creative Variations and Styling Ideas
One of the most exciting aspects of working with a Bucket Hat Pattern is the opportunity for customization. You can experiment with different fabrics, colors, and textures to create a hat that reflects your personality.
Reversible bucket hats are a popular variation. By using two different fabrics, you can enjoy two styles in one. This approach maximizes versatility and makes your Bucket Hat Pattern even more functional.
Adding embellishments such as embroidery, patches, or appliqués can elevate your design. These creative touches turn a simple Bucket Hat Pattern into a standout fashion piece.
For crochet versions, playing with stitch patterns can create unique textures. From simple single crochet to more intricate designs, the possibilities are endless when customizing your Bucket Hat Pattern.
Seasonal adaptations are also worth exploring. Lightweight fabrics and breathable yarns are ideal for summer, while thicker materials can make your Bucket Hat Pattern suitable for cooler weather.
Finally, consider making matching sets or gifts. A handmade bucket hat is a thoughtful and practical present, showcasing both creativity and care.
FAQ About Bucket Hat Pattern
What is the easiest Bucket Hat Pattern for beginners?
The easiest Bucket Hat Pattern is one that uses basic shapes and simple stitches or straight seams. Look for patterns labeled as beginner-friendly with step-by-step instructions.
How long does it take to make a bucket hat?
Depending on your experience level, a Bucket Hat Pattern project can take anywhere from 2 to 6 hours. Beginners may take longer, while experienced crafters can complete it more quickly.
What size should I make my bucket hat?
Most Bucket Hat Pattern designs include size charts. Measuring your head circumference accurately ensures the best fit.
Can I sell bucket hats made from a pattern?
In most cases, yes. However, always check the licensing terms of the specific Bucket Hat Pattern you are using to ensure compliance.
What is the best fabric for a bucket hat?
Cotton is the most popular choice for a Bucket Hat Pattern due to its breathability and ease of use.
Do I need a sewing machine?
No, many Bucket Hat Pattern designs can be completed by hand sewing or crochet, although a sewing machine can speed up the process.
Conclusion
Throughout this article, we explored everything you need to know about creating a Bucket Hat Pattern, from understanding its basic structure to selecting materials, following step-by-step instructions, and adding creative variations. This versatile and stylish accessory is perfect for anyone looking to combine fashion with handmade craftsmanship.
By following the tips and techniques shared here, you can confidently start your own Bucket Hat Pattern project and customize it to suit your personal style. Whether you are making it for yourself or as a gift, the result is both practical and rewarding.

