
Crochet Bucket Hat Pattern is one of the most stylish and versatile crochet projects you can create, combining fashion, comfort, and creativity in a single handmade piece. From the very first stitch, the Crochet Bucket Hat Pattern allows you to transform simple yarn into a trendy accessory that can be worn all year round. Whether you are crafting for yourself, making gifts, or even creating items to sell, this project offers endless possibilities.
The growing popularity of the Crochet Bucket Hat Pattern is no surprise. Bucket hats have made a strong comeback in fashion, and the handmade crochet version adds a unique and personal touch that stands out from store-bought items. You can customize colors, textures, and sizes, making each hat completely one-of-a-kind.
Another reason why the Crochet Bucket Hat Pattern is so appealing is that it is suitable for different skill levels. Beginners can start with simple stitches and basic shapes, while more experienced crocheters can experiment with textures, colorwork, and intricate designs. In this complete and detailed guide, you will learn everything you need to know—from understanding the structure to mastering techniques, step-by-step instructions, creative ideas, and expert tips to achieve professional results.
Understanding the Crochet Bucket Hat Pattern
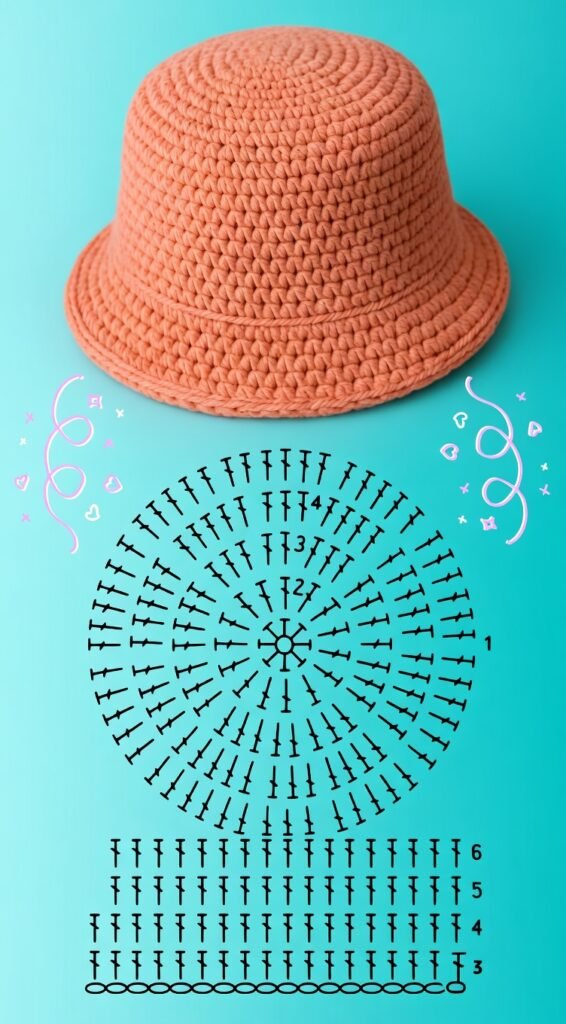
To successfully create a Crochet Bucket Hat Pattern, it is essential to understand its structure. A bucket hat is typically made in three main sections: the crown, the body (or sides), and the brim.
The crown is the top portion of the hat. It is usually crocheted in a circular shape, starting from the center and gradually increasing outward. This part determines the overall size of the hat and must be measured carefully to ensure a good fit.
The body of the hat is created by working rounds without increasing stitches. This forms the sides that wrap around the head. The height of this section can be adjusted depending on how deep you want the hat to sit.
The brim is the final section and gives the bucket hat its signature look. By increasing stitches again, the brim flares outward, creating shade and style.
Another important aspect of the Crochet Bucket Hat Pattern is stitch selection. Basic stitches like single crochet, half double crochet, and double crochet are commonly used. Each stitch creates a different texture and level of flexibility.
Tension is also crucial. Consistent tension ensures that the hat maintains its shape and fits properly. Loose stitches may cause the hat to lose structure, while tight stitches may make it too stiff.
Understanding these structural elements is the foundation for mastering the Crochet Bucket Hat Pattern.
Materials and Tools Needed
Before starting your Crochet Bucket Hat Pattern, gathering the right materials and tools is essential for achieving the best results.
Yarn selection plays a major role in the final outcome. Cotton yarn is highly recommended for summer hats because it is breathable and lightweight. For colder weather, acrylic or wool blends provide warmth and comfort.
The crochet hook should match the yarn size. Using the correct hook ensures proper stitch definition and helps maintain the right tension.
A yarn needle is necessary for weaving in loose ends and finishing your project neatly.
Scissors are essential for cutting yarn cleanly and efficiently.
Stitch markers are very helpful when working in rounds, as they allow you to keep track of your progress.
Optional materials include decorative elements such as ribbons, beads, or embroidery thread to personalize your hat.
Choosing high-quality materials will greatly enhance the durability and appearance of your Crochet Bucket Hat Pattern.
Step-by-Step Guide to Making a Crochet Bucket Hat
Following a structured process is the best way to successfully complete your Crochet Bucket Hat Pattern.
Start by creating a magic ring. This will serve as the center of the crown.
Work in rounds, increasing stitches evenly to create a flat circle. Continue until the crown reaches the desired diameter based on the head size.
Once the crown is complete, stop increasing and begin working even rounds. This forms the body of the hat.
Continue crocheting until the body reaches the desired height. Make sure to check the fit as you go.
To create the brim, begin increasing stitches again. This causes the fabric to flare outward.
Continue working the brim until it reaches your preferred width. A wider brim provides more shade, while a narrower brim creates a subtle look.
Finish by fastening off the yarn and weaving in all loose ends carefully.
Your Crochet Bucket Hat Pattern is now complete and ready to wear.
Creative Ideas to Customize Your Bucket Hat
One of the most exciting parts of the Crochet Bucket Hat Pattern is the ability to customize your design and make it unique.
Experiment with bold color combinations to create eye-catching hats.
Use striped patterns or color blocking for a modern and trendy look.
Try textured stitches to add depth and visual interest.
Add decorative elements such as crochet flowers, appliqués, or embroidery.
Create reversible hats by using different colors or patterns on each side.
Adjust the brim size to achieve different styles, from casual to dramatic.
Incorporate seasonal themes, such as bright colors for summer or earthy tones for autumn.
Personalizing your Crochet Bucket Hat Pattern allows you to express your creativity and create something truly special.
Tips for Achieving Professional Results
When working on your Crochet Bucket Hat Pattern, these tips can help you achieve a polished and professional finish.
Maintain consistent tension throughout your work to ensure even stitches.
Use stitch markers to keep track of rounds and increases.
Measure your hat as you go to ensure the correct fit.
Choose high-quality yarn for better durability and comfort.
Block your finished hat if necessary to shape it properly.
Pay attention to finishing details, as they greatly impact the overall appearance.
Practice patience and take your time to achieve the best results.
These tips will help elevate your Crochet Bucket Hat Pattern from simple to professional quality.
FAQ – Frequently Asked Questions
1. Is the Crochet Bucket Hat Pattern suitable for beginners?
Yes, beginners can successfully complete this project using basic stitches.
2. What type of yarn is best?
Cotton yarn is ideal for warm weather, while wool blends are better for colder seasons.
3. How long does it take to complete?
Most bucket hats can be completed in a few hours to a day.
4. Can I customize the size?
Yes, you can adjust the number of stitches and rows to fit different head sizes.
5. Can I wash the hat?
Yes, but always follow the care instructions for your chosen yarn.
6. Can I sell crochet bucket hats?
Yes, they are popular handmade items and can be sold online or at craft fairs.
Conclusion
The Crochet Bucket Hat Pattern is a fun, stylish, and highly versatile project that allows you to create a wearable piece of art. From understanding the structure to experimenting with creative designs, each step helps you develop your crochet skills and express your personal style.
Now it’s your turn to explore the Crochet Bucket Hat Pattern. Try different styles, play with colors, and enjoy every moment of the creative process. Don’t forget to leave your honest opinion and share your suggestions—your feedback can inspire even more beautiful crochet creations!

