
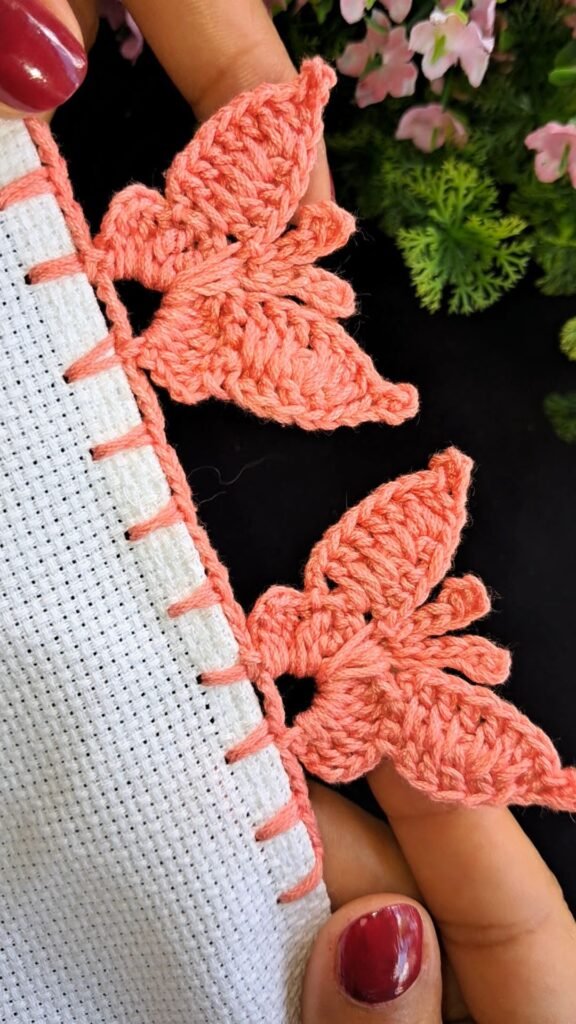
Crochet Butterfly Border Edging Pattern is a delicate and elegant way to elevate any crochet project with a touch of intricate beauty. The Crochet Butterfly Border Edging Pattern stands out as a decorative finish that transforms simple pieces like blankets, shawls, table runners, or garments into something truly special. From the very first row, this pattern introduces a sense of refinement and creativity, making it a favorite choice for crocheters who want to add a unique and eye-catching detail to their work.
One of the most appealing aspects of a Crochet Butterfly Border Edging Pattern is how it combines functionality with artistry. While borders are often used to provide structure and a clean finish, this particular design goes a step further by incorporating butterfly motifs that create movement and visual interest. The result is a border that not only completes a project but also becomes its highlight.
Another reason why the Crochet Butterfly Border Edging Pattern is so popular is its versatility. It can be adapted to suit different styles, whether you prefer a soft and romantic look or something more bold and decorative. By adjusting yarn types, colors, and stitch variations, you can create a border that perfectly complements your project while showcasing your personal style.
Materials Needed for a Crochet Butterfly Border Edging Pattern
Choosing the right materials is essential for achieving a polished and professional-looking Crochet Butterfly Border Edging Pattern. The yarn you select will have a significant impact on the final appearance of your border. Lightweight yarns, such as cotton or fine acrylic, are often preferred because they create clean and well-defined stitches.
The weight of the yarn plays an important role in your Crochet Butterfly Border Edging Pattern. Thinner yarns produce a more delicate and intricate border, while thicker yarns result in a bolder and more textured finish. Selecting the appropriate yarn weight ensures that your border complements the main project.
The crochet hook size should match your yarn choice. For a Crochet Butterfly Border Edging Pattern, a slightly smaller hook can help create tighter stitches, enhancing the clarity of the butterfly motifs.
Additional tools such as scissors, stitch markers, and a yarn needle are necessary for completing your Crochet Butterfly Border Edging Pattern. These tools help maintain accuracy and ensure a neat finish.
Color selection is another important consideration. A Crochet Butterfly Border Edging Pattern can be made using a single color for a subtle effect or multiple colors to highlight the butterfly shapes.
Optional embellishments, such as beads or metallic threads, can add extra detail to your Crochet Butterfly Border Edging Pattern, making it even more unique and decorative.
Step-by-Step Guide to Creating a Crochet Butterfly Border Edging Pattern
To begin your Crochet Butterfly Border Edging Pattern, start by preparing the edge of your project. This may involve working a foundation row of single crochet stitches to create a smooth and even base.
Once the foundation is ready, you can begin the first row of the border. A Crochet Butterfly Border Edging Pattern often starts with simple stitches that establish the structure for the more intricate butterfly motifs.
The butterfly design is created using a combination of chain stitches, double crochets, and slip stitches. These stitches are arranged in a way that forms the wings and body of the butterfly, giving your Crochet Butterfly Border Edging Pattern its distinctive look.
Spacing is crucial when working on a Crochet Butterfly Border Edging Pattern. Ensuring consistent spacing between motifs helps maintain symmetry and balance throughout the border.
As you continue along the edge, repeat the butterfly motif pattern evenly. This repetition creates a cohesive and visually appealing Crochet Butterfly Border Edging Pattern.
Finally, finish by securing the last stitch and weaving in any loose ends. A well-finished Crochet Butterfly Border Edging Pattern should look neat, balanced, and professionally crafted.
Tips for Perfecting Your Crochet Butterfly Border Edging Pattern
Maintaining consistent tension is one of the most important aspects of creating a beautiful Crochet Butterfly Border Edging Pattern. Even stitches ensure that the border lays flat and looks polished.
Practicing the butterfly motif separately before applying it to your project can improve your results. This helps you achieve a more precise and symmetrical Crochet Butterfly Border Edging Pattern.
Choosing the right yarn and hook combination is essential. A well-matched set will enhance the clarity and definition of your Crochet Butterfly Border Edging Pattern.
Pay attention to spacing and alignment. Keeping your motifs evenly spaced will result in a more balanced and professional-looking Crochet Butterfly Border Edging Pattern.
Take your time with finishing details. Carefully weaving in ends and securing stitches ensures that your Crochet Butterfly Border Edging Pattern remains durable and attractive.
Experimenting with different stitch variations can also add uniqueness to your design. This allows you to create personalized versions of the Crochet Butterfly Border Edging Pattern.
Creative Variations of a Crochet Butterfly Border Edging Pattern
One of the most exciting aspects of a Crochet Butterfly Border Edging Pattern is its adaptability. You can create different variations by adjusting the size and shape of the butterfly motifs.
Using multiple colors can bring your Crochet Butterfly Border Edging Pattern to life. Each butterfly can feature a different shade, creating a vibrant and playful effect.
Layering stitches is another creative option. Adding extra rows or textured stitches can give your Crochet Butterfly Border Edging Pattern more depth and dimension.
Incorporating beads into the design can enhance the elegance of your Crochet Butterfly Border Edging Pattern, making it suitable for special occasions.
Seasonal themes are also a great way to customize your border. A Crochet Butterfly Border Edging Pattern can be adapted with colors that reflect different times of the year.
You can also combine this border with other edging styles. Mixing patterns allows you to create a truly unique Crochet Butterfly Border Edging Pattern that stands out.
FAQ About Crochet Butterfly Border Edging Pattern
What skill level is required for this pattern?
The Crochet Butterfly Border Edging Pattern is suitable for beginners with some basic crochet knowledge, as well as intermediate crocheters.
What type of yarn works best?
Lightweight yarns like cotton are ideal for a Crochet Butterfly Border Edging Pattern because they create clean and defined stitches.
Can I use this border on any project?
Yes, the Crochet Butterfly Border Edging Pattern can be used on blankets, shawls, garments, and more.
How long does it take to complete?
The time required depends on the size of the project, but a Crochet Butterfly Border Edging Pattern can usually be completed in a few hours to a day.
Can I customize the design?
Absolutely. The Crochet Butterfly Border Edging Pattern is highly customizable in terms of color, size, and stitch variations.
How do I keep the border from curling?
Maintaining proper tension and using the correct hook size will help your Crochet Butterfly Border Edging Pattern lay flat.
Conclusion
The Crochet Butterfly Border Edging Pattern is a beautiful and versatile technique that adds elegance and charm to any crochet project. By combining functional structure with decorative artistry, this pattern transforms simple edges into stunning focal points.
Throughout this article, we explored the materials, step-by-step process, helpful tips, and creative variations that can help you master the Crochet Butterfly Border Edging Pattern. With practice and attention to detail, you can create a border that enhances your projects and showcases your creativity.

