Rectangular Fabric Pencil Case is a practical and creative sewing project that turns a few pieces of fabric into a useful handmade organizer. With its clean shape, convenient size, and simple construction, this pencil case can be used for school supplies, art tools, sewing notions, small accessories, or everyday essentials. The rectangular design provides enough room for pencils, pens, markers, erasers, and other items while remaining easy to carry inside a backpack or bag. By choosing beautiful fabrics and adding a secure zipper, you can create a fabric pencil case that is both functional and visually appealing.
One of the best features of a Rectangular Fabric Pencil Case is the opportunity to personalize every detail. The exterior can be made with quilting cotton, canvas, denim, or other suitable fabrics, while the inside can feature a coordinating or contrasting lining. A colorful zipper can become part of the design, and decorative quilting can add texture and structure. The size can also be adjusted according to the intended use. A small case is ideal for a few favorite pens, while a longer or deeper version can hold markers, brushes, craft tools, or other supplies.
Making a rectangular pencil case is also an excellent way to practice important sewing skills. The project can help beginners learn accurate cutting, straight stitching, zipper installation, lining construction, topstitching, turning, and neat finishing. More experienced sewists can personalize the case with patchwork, quilted panels, decorative fabric combinations, or additional internal details. Since the project requires relatively little fabric, it is also a useful way to transform leftover materials into something practical.
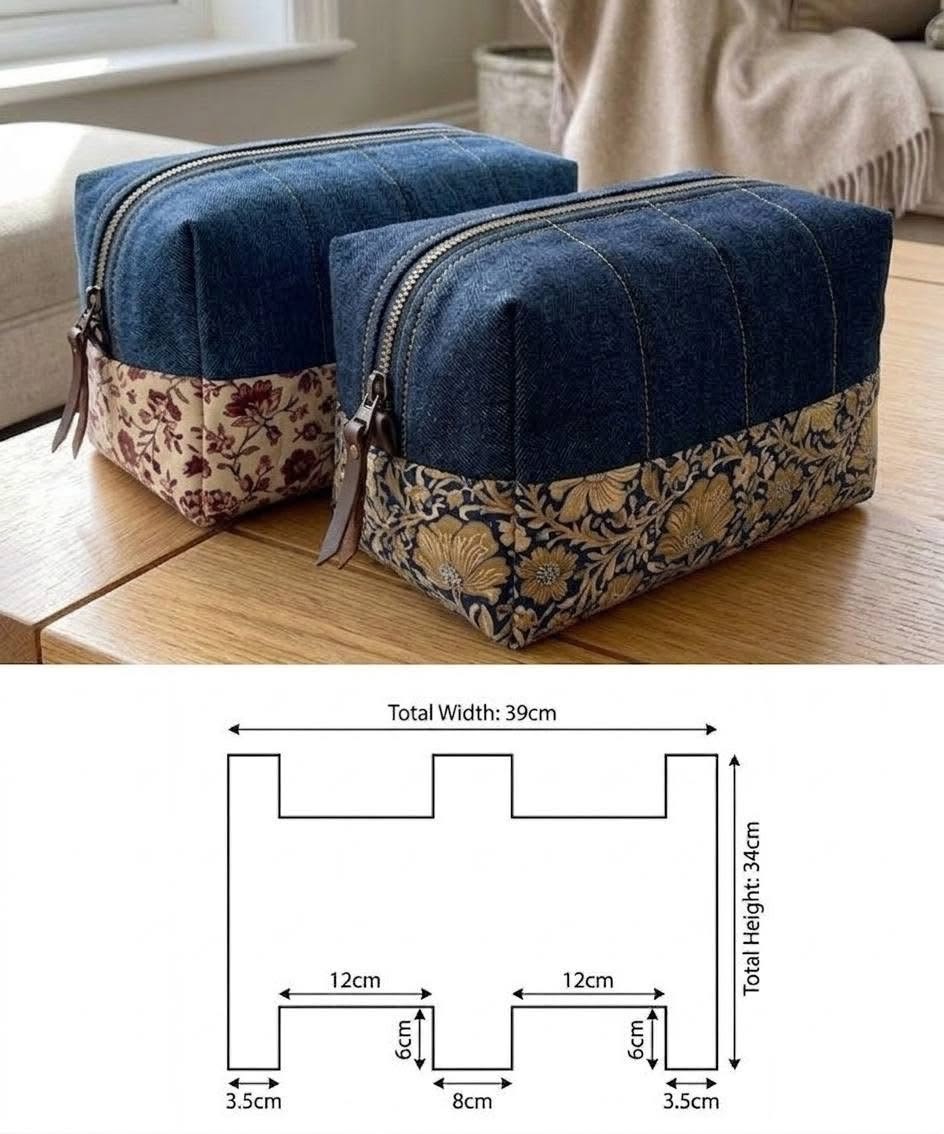
Materials, Fabric Selection, and Preparation for the Pencil Case
The first step in making a Rectangular Fabric Pencil Case is selecting the exterior fabric. Quilting cotton is a popular choice because it is easy to cut, press, and sew. It is available in many prints and colors, making it ideal for a personalized project. Since quilting cotton is relatively lightweight, interfacing or batting can be added to provide more structure.
Canvas is another excellent option for a handmade pencil case. It is naturally firmer than standard quilting cotton and can create a durable exterior. Lightweight denim can also work well and is especially useful for a casual or modern design. If using heavier fabric, make sure the sewing machine and needle are appropriate for the number of layers involved.
The lining fabric should be smooth and easy to sew. Quilting cotton works well because it adds little bulk and can be coordinated with the exterior. A bright lining can make small items easier to find inside the case. Choose a fabric that complements the outer design while adding a pleasant surprise when the zipper is opened.
You will also need a zipper that is suitable for the width of the case. A zipper slightly longer than necessary can often be easier to install because the zipper pull can be moved away from the sewing area. The excess can be trimmed later after the ends have been secured. Choose a zipper color that blends with the fabric or creates an intentional contrast.
Additional supplies include coordinating thread, scissors, a rotary cutter, cutting mat, acrylic ruler, pins or sewing clips, an iron, and a sewing machine. Interfacing, fusible fleece, or thin batting can be added when extra structure is desired. A zipper foot is especially useful because it allows the machine to stitch close to the zipper teeth.
Before cutting, press all fabrics to remove wrinkles. Decide on the finished dimensions and remember to include seam allowances. Cut matching exterior and lining rectangles according to the desired size. If interfacing or batting is being used, prepare those pieces as well. Accurate cutting helps the finished Rectangular Fabric Pencil Case remain straight and symmetrical.
How to Sew the Zipper and Assemble the Rectangular Pencil Case
Begin the Rectangular Fabric Pencil Case by preparing the exterior panels. If you are using fusible interfacing, follow the appropriate instructions and attach it to the wrong side of the exterior fabric. Make sure it is positioned smoothly without folds or bubbles. Allow the pieces to cool before continuing.
Place the zipper along the top edge of the first exterior rectangle with the right side of the zipper facing the right side of the fabric. Align the edges carefully. Place one lining rectangle over the zipper with its right side facing the exterior fabric. The zipper should now be positioned between the exterior and lining layers.
Secure the layers with clips or pins, then sew along the zipper edge using a zipper foot. Work slowly and maintain an even seam. If the zipper pull is in the way, stop sewing with the needle down, lift the presser foot, move the zipper pull carefully, lower the foot, and continue stitching.
Fold the exterior and lining fabrics away from the zipper and press carefully. Topstitch close to the folded edge if desired. Topstitching creates a neat appearance and helps prevent the fabric from catching in the zipper teeth. Repeat the same process with the remaining exterior and lining rectangles on the opposite side of the zipper.
After both sides are attached, open the fabric panels and check the zipper. Make sure it moves freely and that the lining does not interfere with the teeth. Press the fabric again if necessary. The zipper should sit neatly between the exterior panels while the lining remains smooth on the inside.
Before sewing the outer edges, open the zipper at least halfway. This step is extremely important because the zipper opening will be used to turn the fabric zipper pouch right side out. Bring the exterior pieces together with right sides facing, and place the lining pieces together in the same way. Align the edges and secure the layers.
Sewing, Turning, and Finishing the Fabric Pencil Case
Sew around the outer edges of the Rectangular Fabric Pencil Case, leaving an opening in the lining for turning. Use a consistent seam allowance and reinforce the stitches near the zipper ends. Be careful when sewing across bulky areas. Move slowly and avoid forcing the fabric through the machine.
The zipper ends can affect the final shape of the case. Make sure they are positioned consistently before sewing the side seams. Depending on the chosen construction, the zipper teeth may face toward the lining or be arranged in another specific direction. The most important point is keeping both ends balanced.
Trim unnecessary bulk from the seam allowances, especially near the corners and zipper ends. Do not cut through the stitching. Carefully reducing excess fabric can help the corners turn more neatly. If the case uses thick batting or interfacing, additional trimming may be necessary.
Turn the rectangular pencil pouch right side out through the opening in the lining and the partially open zipper. Work gently and avoid pulling aggressively on the zipper. Use your fingers or a suitable blunt tool to shape the corners carefully. Do not use a sharp object that could damage the fabric.
Once the case has been turned, inspect the exterior shape and zipper placement. Push the lining back through the zipper opening temporarily if you need to adjust any details. When everything looks correct, close the opening in the lining with a narrow machine stitch or neat hand stitching.
Push the lining completely inside the case and smooth it into the corners. Give the finished project a gentle final press, protecting the zipper and following the care requirements of the fabric. The completed Rectangular Fabric Pencil Case should have straight edges, a secure zipper, and a smooth interior.
Creative Ideas, Helpful Tips, Frequently Asked Questions, and Conclusion
The Rectangular Fabric Pencil Case can be personalized with many different fabric combinations. A simple version can use one exterior print and one lining fabric, while a more decorative case can combine several coordinating fabrics. Patchwork panels are an excellent way to use smaller scraps and create a completely unique exterior.
Quilting can add texture and structure. Layer the exterior fabric with thin batting and stitch simple straight lines, a grid, or another decorative design before assembling the case. Quilted panels can make the fabric pencil pouch feel more substantial while giving the exterior a handmade appearance.
A denim version can be especially durable. Old denim fabric in good condition can sometimes be repurposed into a practical case. Combine denim with a colorful cotton lining for contrast. When working with thicker materials, use an appropriate needle and sew slowly over bulky seams.
The size can be adjusted for different purposes. A long narrow case is suitable for pencils and brushes, while a wider version can hold markers or small craft supplies. The same basic rectangular zipper pouch construction can also be adapted for cosmetics, sewing notions, charging cables, or other small items.
Small decorative details can make the project more personal. A fabric tab can be added near the zipper end, or a small loop can provide a convenient way to hold the case. Decorative labels, carefully positioned fabric motifs, and contrasting topstitching can also enhance the finished appearance.
Consistent sewing habits improve the final result. Cut accurately, press at each important stage, use the correct presser foot, and check the zipper before closing the outer seams. These simple steps can help the Rectangular Fabric Pencil Case look polished and remain useful for a long time.
Conclusion
The Rectangular Fabric Pencil Case is a practical sewing project that combines useful construction techniques with endless opportunities for creative fabric choices. By preparing accurate rectangles, adding suitable structure, installing the zipper carefully, joining the exterior and lining, and finishing the seams neatly, you can create a useful handmade organizer.
Throughout this guide, you learned about selecting fabrics, choosing a zipper, adding interfacing, preparing the pieces, sewing the zipper between the exterior and lining, topstitching, assembling the case, turning the project, and completing the final details.