
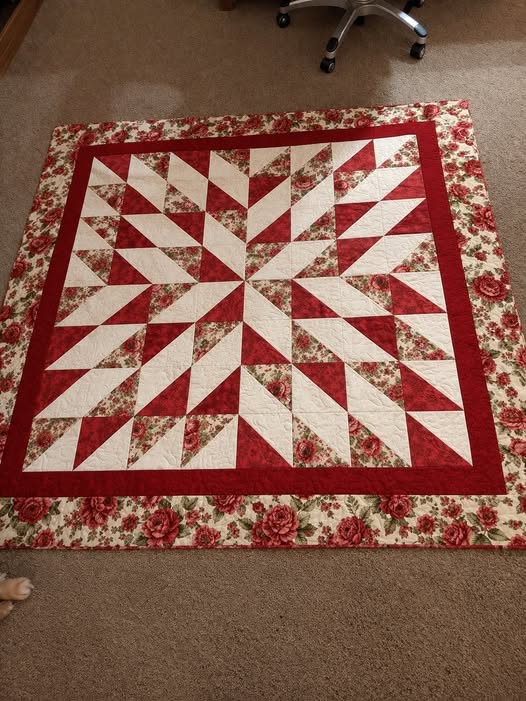
Starburst Quilt Tutorial is the perfect guide for quilters who love bold geometric designs and quilts filled with movement and visual energy. The Starburst Quilt Tutorial combines traditional patchwork techniques with striking star-inspired layouts, creating a quilt that appears to radiate light from its center. Whether you choose bright modern fabrics, vintage prints, or coordinated color collections, the finished quilt becomes an eye-catching centerpiece that showcases both precision and creativity. The pattern is suitable for quilts of many sizes, from decorative wall hangings to large bed quilts.
One of the reasons the Starburst Quilt Tutorial remains a favorite among quilters is its versatility. By simply rotating blocks or changing fabric placement, the finished design can look completely different. Some versions feature dramatic high-contrast stars against neutral backgrounds, while others create softer transitions using coordinated shades within the same color family. This flexibility makes the project appealing to beginners who want to learn new piecing techniques as well as experienced quilters looking for a visually rewarding design.
Making a Starburst quilt is also an excellent opportunity to improve quilting skills. Accurate cutting, consistent seam allowances, careful pressing, matching points, and thoughtful color placement all play important roles in creating crisp star points and balanced blocks. Although the completed quilt appears detailed, the construction becomes manageable when divided into smaller units that are assembled one step at a time. This guide covers fabric selection, cutting, piecing, block assembly, layout planning, quilting, finishing, and creative ideas to help you complete a beautiful Starburst Quilt Pattern.
Choosing Fabrics, Colors, and Supplies
The first step in any successful Starburst Quilt Tutorial is choosing fabrics that emphasize the star design. High-quality quilting cotton is the preferred choice because it is easy to cut, press, and sew while maintaining accurate dimensions throughout the project. Using fabrics with similar weights helps ensure that all blocks fit together consistently.
Color selection has a significant impact on the finished quilt. Bright yellows, oranges, reds, blues, and purples can create dramatic starbursts that appear to glow across the quilt surface. Alternatively, soft neutrals combined with one accent color produce a calm and elegant appearance. Many quilters enjoy selecting one dominant color family and adding lighter and darker shades to create depth.
Color value is just as important as the actual colors. Strong contrast between the star points and the background helps define the design. If neighboring fabrics have similar values, the star may blend into the surrounding blocks instead of standing out. Mixing light, medium, and dark fabrics gives the quilt greater dimension.
Scrap fabrics also work beautifully for a Starburst Quilt Pattern. Each star point can feature a different print while the background remains consistent. This approach creates a lively, colorful quilt without sacrificing the clarity of the overall design. Coordinated scrap collections can produce especially charming results.
Essential quilting tools include a rotary cutter, self-healing cutting mat, acrylic quilting ruler, sewing machine, coordinating thread, pins or clips, an iron, ironing board, and a quarter-inch presser foot. Accurate tools make cutting and piecing more enjoyable while helping every block remain consistent.
Before preparing enough pieces for the entire quilt, make one complete sample block. This allows you to confirm measurements, seam allowances, color placement, and pressing directions before committing to the full project. A successful sample block often saves both time and fabric later.
Cutting and Piecing the Starburst Blocks
Begin by pressing every fabric before cutting. Wrinkles can affect measurements and lead to slight inaccuracies that become more noticeable as additional blocks are assembled. Smooth, flat fabric provides the best foundation for accurate patchwork.
Cut all required pieces carefully using a sharp rotary cutter and quilting ruler. Many Starburst quilt blocks contain triangles, squares, and smaller units that must fit together precisely. Taking extra time during cutting greatly improves the accuracy of the finished quilt.
Organize the cut pieces according to block or color. Small trays, containers, or labeled groups make assembly easier and reduce the chance of mixing similar fabrics. Good organization also helps maintain an efficient sewing process when multiple blocks are being constructed.
Lay out one complete block before sewing. This allows you to verify the position of every piece and make adjustments to the color arrangement if necessary. Taking a quick photograph of the layout can provide a helpful reference while sewing.
Begin by assembling the smaller units first. Combine squares and triangles into manageable sections before joining them into larger components. Maintain a consistent quarter-inch seam allowance throughout every step. Accurate seams are essential for preserving sharp star points.
Press each seam carefully after sewing. Set the seam with the iron first, then press in the desired direction using an up-and-down motion instead of sliding the iron across the fabric. Proper pressing reduces distortion and helps every completed Starburst quilt block lie flat.
Arranging the Quilt Top and Completing the Quilt
Once several blocks have been completed, arrange them on a design wall, clean floor, or large table. Experiment with different rotations before sewing the rows together. Small changes in orientation can create entirely new secondary patterns throughout the quilt.
Pay close attention to the balance of colors across the layout. Spread darker blocks evenly throughout the design and avoid placing all bright fabrics in one area unless that effect is intentional. Balanced color placement helps the finished Starburst Quilt Pattern feel harmonious and visually appealing.
When joining blocks into rows, match intersections carefully. Pins or clips may be helpful at important seam crossings. Sew slowly through these areas to maintain sharp points and reduce shifting. Accurate alignment contributes greatly to the polished appearance of the finished quilt.
After completing the rows, join them to create the quilt top. Press the row seams carefully and inspect the quilt for any areas that require minor adjustments. Once satisfied, prepare the backing and batting to create the quilt sandwich.
Choose a quilting design that complements the radiating appearance of the stars. Straight-line quilting emphasizes the geometric structure, while echo quilting around the stars highlights their shape. Gentle curves can soften the overall design while still preserving the visual impact of the patchwork.
Finish the quilt by trimming the edges evenly and attaching quilt binding. A binding that coordinates with the background creates a subtle finish, while a contrasting binding can frame the quilt dramatically. After the final stitches are completed, give the quilt a gentle press and enjoy your finished handmade creation.
Creative Variations, Helpful Tips, Frequently Asked Questions, and Conclusion
The Starburst Quilt Tutorial offers endless opportunities for creativity. Traditional quilts often use coordinated prints with cream backgrounds, while contemporary versions feature oversized stars, negative space, and bold solids. Every fabric choice changes the overall personality of the quilt.
A gradient color arrangement creates the illusion of light spreading across the quilt. Begin with lighter shades near the center of each star and gradually transition to darker fabrics toward the outer edges. This technique adds remarkable depth to the design.
Scrap quilts are another excellent option. By combining favorite leftover fabrics, every Starburst quilt block becomes unique while contributing to a colorful overall composition. A consistent background fabric helps unify the many different prints.
The same blocks can also be adapted into smaller projects such as pillows, table runners, tote bags, placemats, or decorative wall hangings. These projects provide an excellent opportunity to practice the construction process before making a full-sized quilt.
Developing consistent habits improves every quilting project. Measure frequently, maintain accurate seam allowances, press carefully after each step, and compare completed blocks before joining them together. Small corrections made early help ensure an accurate finished quilt.
Most importantly, enjoy the creative journey. The Starburst Quilt Tutorial demonstrates how simple geometric shapes can become an impressive quilt filled with movement, color, and personality through thoughtful planning and careful craftsmanship.
Conclusion
The Starburst Quilt Tutorial combines classic patchwork techniques with a bold geometric design that never goes out of style. By selecting beautiful fabrics, cutting accurately, assembling blocks carefully, and planning a balanced layout, you can create a quilt that showcases both technical skill and artistic creativity.
Throughout this guide, you learned how to choose fabrics, understand color value, prepare accurate pieces, assemble star blocks, arrange the quilt top, quilt the finished layers, and personalize the design with your own unique fabric combinations. These techniques provide a solid foundation for creating quilts that are both beautiful and durable.

