
Starburst Quilt Tutorial is the perfect project for quilters who love striking geometric designs combined with timeless patchwork techniques. The beautiful quilt block featured in this tutorial creates the illusion of a radiant star expanding outward from the center, producing movement, depth, and elegance with every carefully pieced section. Whether you are creating a full-sized quilt, a table runner, decorative pillows, or a wall hanging, the Starburst Quilt Tutorial offers a rewarding quilting experience that helps improve precision while producing an eye-catching finished project. This versatile design looks equally beautiful in soft florals, modern solids, batiks, or traditional quilting prints, making it suitable for every quilting style.
One of the reasons the Starburst Quilt Tutorial continues to be a favorite among quilting enthusiasts is its ability to create dramatic visual impact using simple patchwork units. At first glance, the design appears complex, but it is actually built from accurately cut squares, half-square triangles, and carefully assembled rows. The placement of light and dark fabrics creates the illusion of rays extending from the center, giving the quilt block its signature “starburst” appearance. With careful preparation and consistent sewing techniques, even confident beginners can achieve beautiful, professional-looking results.
In this complete Starburst Quilt Tutorial, you’ll learn every stage of the construction process, from selecting coordinating fabrics and cutting accurate pieces to assembling the block, pressing seams properly, and finishing your project with confidence. You’ll also discover practical quilting tips that improve accuracy, reduce bulk, and help maintain perfectly aligned points. By the end of this guide, you’ll have the skills needed to recreate this elegant quilt block and incorporate it into countless quilting projects for your home or as thoughtful handmade gifts.
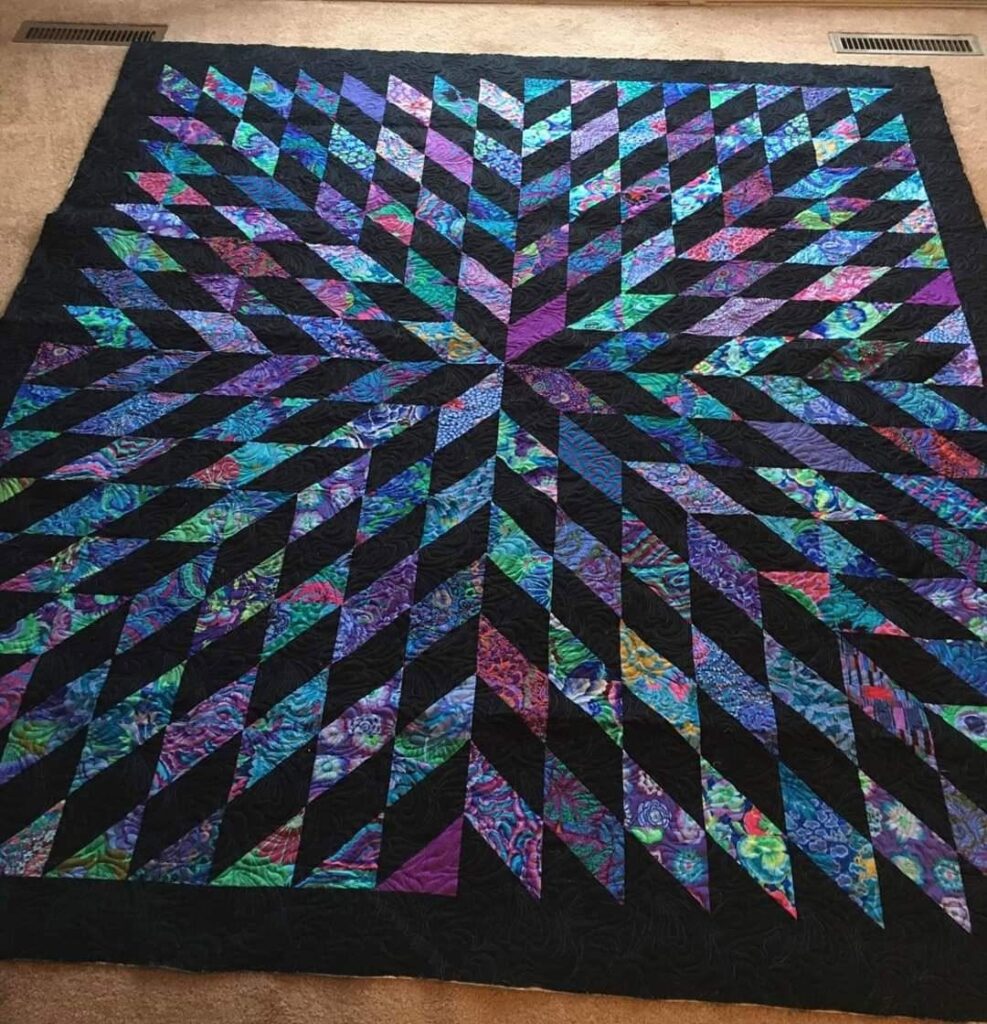
Choosing Fabrics and Preparing for the Starburst Quilt Tutorial
The first step in creating a successful Starburst Quilt Tutorial project is selecting fabrics that provide strong visual contrast. Contrast is what allows the radiating star effect to stand out clearly once all the pieces are assembled.
Choose a light-colored background fabric such as white, ivory, cream, or soft beige. Neutral backgrounds create negative space that highlights the starburst shape without overwhelming the design. Tone-on-tone prints also work beautifully because they add texture while maintaining a clean appearance.
For the starburst sections, select medium and dark fabrics that contrast with the background. Rich jewel tones, floral prints, batiks, reproduction fabrics, or modern solids all create stunning results. Combining several coordinating shades within the starburst adds movement and visual depth.
A center accent fabric can become the focal point of the entire block. Choosing a bold floral print, vibrant solid, or metallic-accented quilting cotton naturally draws the eye toward the center while emphasizing the radiating pattern.
Gather your quilting tools before cutting. A rotary cutter, acrylic quilting ruler, self-healing cutting mat, sewing machine, cotton thread, fine pins, fabric clips, seam roller, measuring tape, and a steam iron will help ensure clean, accurate construction throughout the project.
Finally, press every fabric carefully before cutting. Smooth fabric improves cutting accuracy, reduces measurement errors, and helps maintain consistent seam allowances, all of which contribute to a polished finished Starburst Quilt Tutorial project.
Cutting and Piecing the Starburst Quilt Tutorial
Accurate cutting forms the foundation of every successful Starburst Quilt Tutorial. Measure carefully and cut each square, rectangle, and triangle according to your chosen block dimensions. Taking your time during this stage significantly improves final assembly.
Begin by preparing the half-square triangle units that create many of the radiating star points. Pair light and dark squares, draw a diagonal line, sew on both sides of the marked line, then cut along the center before pressing the units open.
Trim every half-square triangle to identical dimensions using a square quilting ruler. Consistent sizing prevents alignment problems later and ensures crisp points throughout the completed quilt block.
Lay out all the cut units on a design board or flat table before sewing. Following the starburst arrangement allows you to confirm fabric placement and verify that each triangle is facing the correct direction before stitching begins.
Sew the units together into smaller sections first. Assemble each row individually using an accurate quarter-inch seam allowance. Press every completed row before joining it to the next to reduce bulk and improve seam matching.
Join the completed rows while carefully pinning every seam intersection. Matching these intersections accurately creates the clean geometric lines and sharp points that give the Starburst Quilt Tutorial its beautiful finished appearance.
Building Precision and Enhancing the Starburst Design
One of the defining characteristics of the Starburst Quilt Tutorial is its symmetry. Every point contributes to the illusion of light radiating outward, making careful construction especially important.
Maintain a consistent quarter-inch seam allowance throughout the project. Even small variations in seam width can affect the alignment of the star points and reduce the overall precision of the design.
Press seams consistently after every step. Some quilters prefer pressing toward the darker fabric, while others choose to press seams open to reduce bulk. Either technique works well when used consistently throughout the block.
If you’re making multiple starburst blocks, organize your pieces into labeled stacks before sewing. This simple habit helps maintain consistent orientation and speeds up assembly while reducing the likelihood of mistakes.
Experiment with different color combinations to create unique visual effects. High-contrast fabrics produce dramatic starbursts, while low-volume prints and soft florals create elegant, subtle versions suitable for romantic quilts and heirloom projects.
Before adding your completed block to a larger quilt, measure it carefully. A perfectly square block with accurate dimensions simplifies quilt assembly and ensures borders, sashing, and neighboring blocks align beautifully.
Finishing Your Starburst Quilt Tutorial Project
After completing several Starburst Quilt Tutorial blocks, arrange them on a design wall or large flat surface before joining them together. This allows you to balance colors, distribute prints evenly, and create a visually pleasing overall layout.
Consider adding sashing between the blocks. Narrow sashing emphasizes each individual starburst, while wider sashing creates a cleaner, more contemporary quilt design with additional negative space.
Borders provide another opportunity to enhance your quilt. A simple solid border frames the design elegantly, while pieced borders echo the geometric theme established by the central blocks.
Layer the quilt top with batting and backing fabric. Smooth every layer carefully before basting to prevent shifting during quilting and ensure a professional-quality finish.
Select quilting designs that complement the radiating movement of the starburst. Straight-line quilting reinforces the geometric appearance, while echo quilting, feathers, spirals, or free-motion floral motifs introduce beautiful texture without overpowering the pieced design.
Complete the quilt with a carefully sewn binding. A matching binding creates a seamless look, while a contrasting binding frames the quilt and highlights the vibrant starburst pattern. Once finished, your Starburst Quilt Tutorial project is ready to be displayed, gifted, or enjoyed for many years.
FAQ About Starburst Quilt Tutorial
Is the Starburst Quilt Tutorial suitable for beginners?
Yes. Confident beginners who understand basic quilting techniques, including quarter-inch seam allowances and half-square triangles, can successfully complete this project.
What fabrics work best?
High-quality quilting cotton is the best choice because it cuts accurately, presses well, and maintains stable dimensions throughout construction.
How important is fabric contrast?
Fabric contrast is essential because it creates the visual rays that define the starburst effect. Combining light backgrounds with darker star fabrics produces the strongest results.
Can I make the block in different sizes?
Absolutely. The Starburst Quilt Tutorial can be adapted to many block sizes by adjusting the cutting measurements while maintaining the same overall proportions.
What projects can use this quilt block?
The block works beautifully in bed quilts, lap quilts, baby quilts, table runners, pillows, tote bags, wall hangings, placemats, and seasonal home décor.
How do I keep my points sharp?
Accurate cutting, consistent seam allowances, trimming half-square triangles precisely, careful pressing, and pinning seam intersections all help maintain crisp points.
Can I use fabric scraps?
Yes. Scrappy versions of the Starburst Quilt Tutorial create vibrant, colorful quilts while making excellent use of leftover quilting fabrics.
Conclusion
The Starburst Quilt Tutorial is a rewarding quilting project that combines classic piecing techniques with an elegant geometric design that never goes out of style. Throughout this guide, you learned how to select complementary fabrics, prepare accurate cuts, construct half-square triangles, assemble the radiating starburst layout, press seams for professional results, and complete a beautifully finished quilt block ready for a wide variety of creative projects. These essential quilting techniques not only help you recreate this striking pattern but also strengthen the precision and confidence needed for many future quilting adventures.
One of the greatest advantages of the Starburst Quilt Tutorial is its incredible versatility. By experimenting with different color palettes, fabric collections, and block sizes, you can create everything from traditional heirloom quilts to modern statement pieces that reflect your own personal style. Every finished block becomes a beautiful expression of creativity, craftsmanship, and attention to detail.

