
Joy Quilt Pattern is a timeless quilting project that beautifully combines creativity, warmth, and meaningful design into one handmade masterpiece. Whether you are sewing a quilt for your own home, creating a thoughtful handmade gift, or decorating for a special season, the Joy Quilt Pattern offers a perfect balance of classic patchwork techniques and modern style. Its clean layout allows quilters of all experience levels to experiment with color combinations, fabric collections, and quilting motifs while creating a project that will be treasured for years.
One of the reasons the Joy Quilt Pattern has become a favorite among quilting enthusiasts is its incredible versatility. Depending on the fabrics you select, the finished quilt can feel festive, elegant, rustic, contemporary, or even vintage-inspired. Bright holiday fabrics create a cheerful seasonal quilt, while soft neutrals produce a cozy year-round design. Because of its flexible layout, the pattern is equally suitable for lap quilts, baby quilts, wall hangings, table toppers, and full-size bed quilts.
In this complete tutorial, you will learn exactly how to create a beautiful Joy Quilt Pattern step by step. Every stage of the construction process has been carefully explained using beginner-friendly language while following quilting techniques widely used in the United States. From preparing your materials and accurately cutting the fabric to assembling the quilt blocks, arranging the layout, quilting the layers, and adding the finishing touches, this guide will help you confidently recreate the project shown in the photo with professional-looking results.
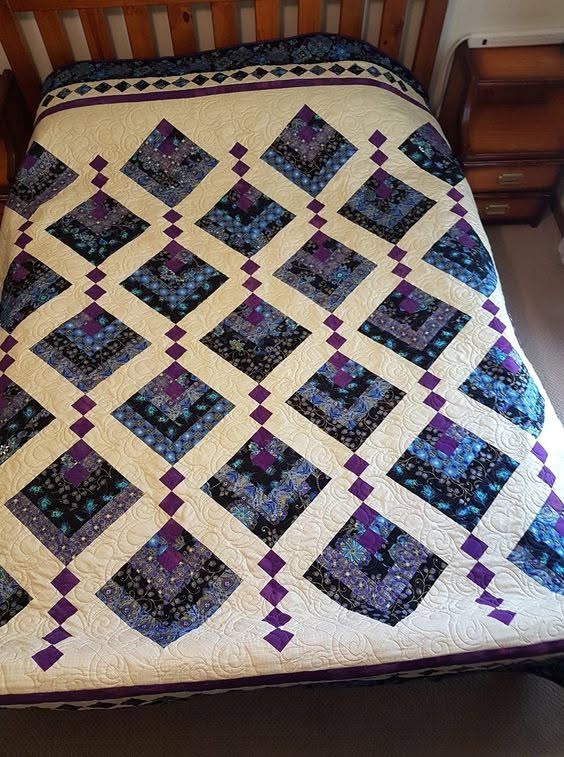
Prepare Your Materials and Plan the Joy Quilt Pattern
Before beginning your Joy Quilt Pattern, gather all the essential quilting supplies. You will need quilting cotton, rotary cutter, self-healing cutting mat, quilting ruler, sewing machine, coordinating thread, fabric clips or pins, batting, backing fabric, binding fabric, and a hot iron. Organizing your workspace before sewing makes the entire process more efficient and enjoyable.
Select high-quality quilting cotton that complements your desired theme. Traditional holiday fabrics create a festive appearance, while floral prints, solids, or modern geometric fabrics produce a quilt that can be displayed throughout the year. Choosing a balanced color palette before cutting helps maintain harmony across the finished quilt.
Wash, dry, and carefully press every fabric before cutting. Prewashing minimizes future shrinkage and removes excess dye, while pressing eliminates wrinkles that may affect cutting accuracy. Smooth fabric allows every patchwork piece to fit together more precisely.
Using your quilting ruler and rotary cutter, carefully cut every piece according to the dimensions required for your chosen layout. Accurate cutting is one of the most important foundations of successful quilting because it ensures that seams align properly throughout assembly.
Lay all the pieces on a design board or flat surface before sewing. Rearranging colors and prints at this stage allows you to create a balanced composition while identifying any adjustments before stitching begins.
Take a few moments to organize the cut pieces into labeled groups. Separating units for blocks, borders, sashing, or decorative sections keeps the project organized and prevents confusion as construction progresses.
Step-by-Step Guide to Sewing the Joy Quilt Pattern
Begin by sewing the smallest patchwork units first. Pair matching pieces together using an accurate quarter-inch seam allowance and press every seam immediately after stitching. Consistent seam allowances help ensure that every block finishes at the correct size.
Continue joining the smaller units into larger sections according to the quilt layout. Work slowly and check alignment frequently, especially where multiple seam intersections meet. Precision at this stage greatly improves the overall appearance of the finished quilt.
As each quilt block is completed, square it using your quilting ruler if necessary. Trimming blocks to consistent dimensions makes assembling the quilt top much easier and prevents uneven edges later.
Arrange all completed blocks on a design wall or large flat surface. Step back occasionally to evaluate the overall composition, ensuring that colors, prints, and values are distributed evenly across the quilt. Making layout adjustments before sewing rows together often results in a more visually pleasing design.
Sew the blocks together row by row while carefully matching seam intersections. Pinning at important joining points helps maintain alignment and creates clean, crisp patchwork that reflects professional craftsmanship.
After completing the quilt top, give it one final careful press from the back. This removes any remaining wrinkles, flattens the seams, and prepares the quilt for layering with batting and backing fabric.
Helpful Tips for Professional Quilting Results
Maintain a consistent quarter-inch seam allowance throughout every step of the Joy Quilt Pattern. Even slight variations can affect how accurately the blocks fit together, especially in larger quilts containing many repeated units.
Press seams rather than sliding the iron across the fabric. Lifting and lowering the iron helps preserve accurate measurements while reducing unwanted stretching and distortion of the quilt pieces.
Select thread colors that blend naturally with your fabrics unless decorative topstitching is part of your design. Coordinating thread creates clean, polished stitching that allows the patchwork itself to remain the visual focus.
Experiment with fabric placement before final assembly. Sometimes simply rotating or swapping a few blocks creates a more balanced appearance and adds movement across the entire quilt.
If you are creating a seasonal version of the Joy Quilt Pattern, consider incorporating festive prints, metallic accents, snowflakes, stars, or subtle holiday-themed fabrics. These additions create extra visual interest while remaining elegant and timeless.
Work patiently and avoid rushing through difficult sections. Careful sewing, frequent pressing, and regular accuracy checks contribute significantly to achieving professional-quality quilting results that you will be proud to display.
Finishing the Quilt and Adding Creative Details
Once the quilt top has been completed, prepare your quilt sandwich by layering the backing fabric, batting, and quilt top together. Smooth each layer carefully to eliminate wrinkles before securing everything with safety pins or basting spray.
Select a quilting design that complements the overall style of your Joy Quilt Pattern. Straight-line quilting creates a modern appearance, while loops, feathers, gentle curves, or echo quilting add texture and softness to the finished quilt.
Quilt from the center outward whenever possible. This technique helps distribute fullness evenly across the quilt and minimizes the possibility of puckers or shifting during stitching.
After quilting has been completed, trim away any excess batting and backing fabric using a rotary cutter and quilting ruler. Straight, even edges make attaching the binding much easier and produce a cleaner finished appearance.
Prepare the binding by joining strips together, pressing them in half lengthwise, and sewing them around the quilt perimeter with neat, consistent stitching. Finish the binding by hand or machine according to your preferred method.
Once your Joy Quilt Pattern is complete, gently wash the quilt if desired and allow it to dry according to the fabric manufacturer’s recommendations. The finished quilt will develop the soft texture and cozy appearance that handmade quilts are loved for while showcasing your sewing skills and creative fabric choices.
Frequently Asked Questions
Is the Joy Quilt Pattern suitable for beginners?
Yes. The Joy Quilt Pattern is an excellent project for beginners because it focuses on fundamental quilting techniques such as accurate cutting, straight sewing, pressing seams, and assembling quilt blocks.
What fabrics work best for this pattern?
High-quality quilting cotton is the preferred choice because it is easy to sew, presses beautifully, and is available in countless coordinating colors and prints suitable for every style.
Can I customize the color palette?
Absolutely. One of the greatest strengths of the Joy Quilt Pattern is its flexibility. You can create seasonal quilts, modern designs, vintage-inspired projects, or colorful scrap quilts simply by changing your fabric selection.
How large can I make this quilt?
The pattern can easily be adapted for baby quilts, lap quilts, throw quilts, bed quilts, wall hangings, and table runners by adjusting the number of quilt blocks included in the final layout.
What quilting designs look best with this project?
Straight-line quilting, gentle curves, echo quilting, meandering stitches, feathers, and light geometric motifs all complement the clean structure of the Joy Quilt Pattern while enhancing its visual texture.
Should I prewash my fabrics?
Many quilters recommend prewashing to reduce shrinkage and prevent color bleeding. However, some prefer unwashed fabric for slightly crisper piecing. Both approaches work when applied consistently throughout the project.
How can I improve my quilting accuracy?
Careful measuring, accurate cutting, consistent quarter-inch seam allowances, regular pressing, and checking alignment during assembly all contribute to cleaner and more professional results.
Can this quilt be given as a handmade gift?
Yes. A completed Joy Quilt Pattern makes a thoughtful gift for birthdays, holidays, weddings, anniversaries, baby showers, housewarmings, or simply as a heartfelt expression of care and appreciation.
Conclusion
The Joy Quilt Pattern is a beautiful quilting project that combines timeless patchwork techniques with endless opportunities for creativity and personalization. Throughout this tutorial, you learned how to prepare your quilting materials, accurately cut the fabric, assemble each quilt block step by step, organize the overall layout, quilt the finished layers, attach a durable binding, and complete the project with professional finishing techniques. These methods help create a quilt that is both visually beautiful and durable enough to be enjoyed for many years.
As your quilting experience continues to grow, the Joy Quilt Pattern can easily be adapted using different color palettes, seasonal fabrics, decorative quilting motifs, and creative layouts to produce truly unique handmade quilts. Every finished project becomes a reflection of your personal style and craftsmanship while providing warmth and comfort to those who receive it. If you enjoyed this tutorial, please leave your honest opinion and share your suggestions for future quilting projects. Your feedback is greatly appreciated and helps inspire even more creative sewing and quilting ideas for the entire quilting community.

