
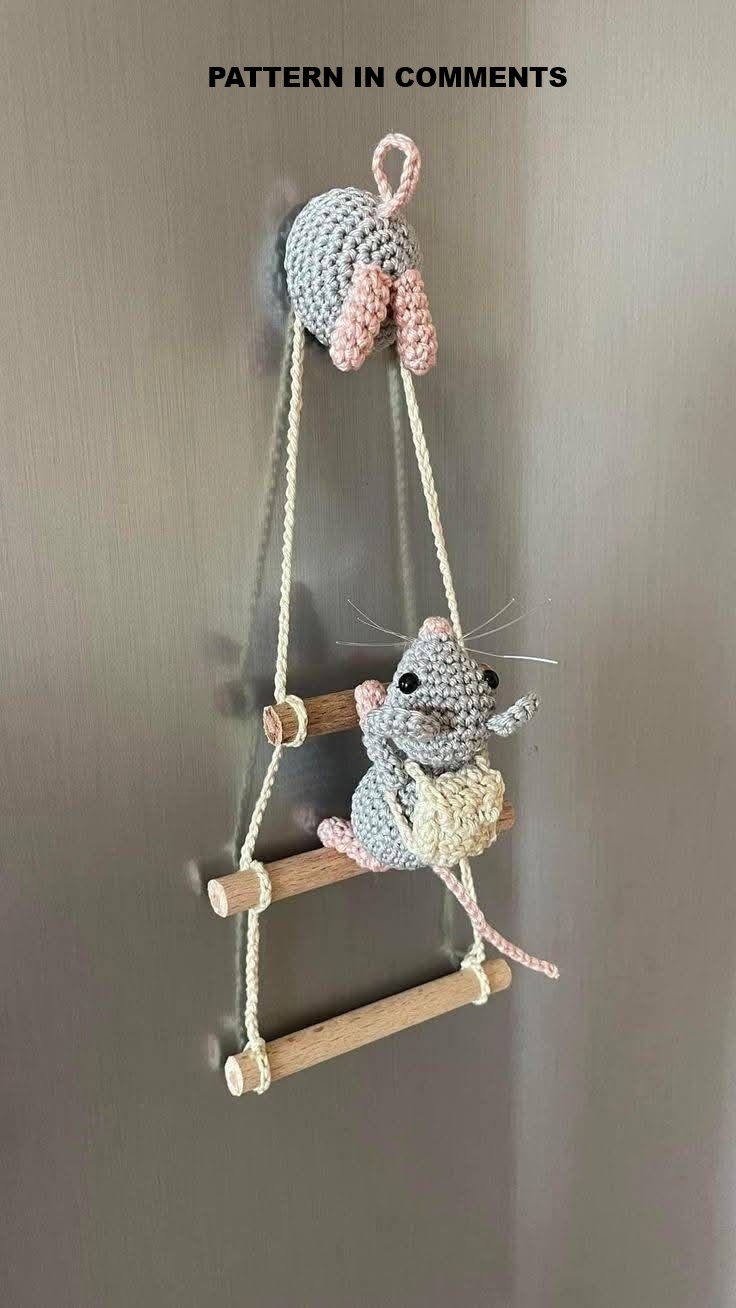
Hanging Mice Amigurumi Pattern is a delightful crochet project that combines the charm of amigurumi with the creativity of handmade decorations. These tiny crocheted mice can be used as ornaments, nursery decorations, seasonal décor, keychains, gift toppers, backpack charms, or playful accents for your home. Whether you are an experienced amigurumi maker or just beginning your crochet journey, the Hanging Mice Amigurumi Pattern is an enjoyable project that helps improve shaping techniques while creating an irresistibly cute finished piece.
One of the reasons the Hanging Mice Amigurumi Pattern has become so popular is its versatility. The finished mice can be made in classic gray tones, soft pastel colors, or even bright, playful shades to match different decorating styles. Their compact size makes them perfect for using leftover yarn, and because they require only basic amigurumi techniques, they can usually be completed in just a few hours. Every finished mouse has its own unique personality, making each project truly one of a kind.
This complete tutorial will guide you through every step of creating your own Hanging Mice Amigurumi Pattern. You will learn which materials work best, understand the essential crochet stitches, follow a detailed construction process, discover creative customization ideas, and learn professional finishing techniques. By the end of this guide, you will have the confidence to create adorable hanging mice that are perfect for decorating, gifting, or simply enjoying as part of your handmade crochet collection.
Materials and Basic Crochet Stitches for a Hanging Mice Amigurumi Pattern
Before beginning your Hanging Mice Amigurumi Pattern, gather all of your materials. Careful preparation makes the crochet process smoother and helps produce a polished finished toy.
Cotton yarn or high-quality acrylic yarn works beautifully for amigurumi. Cotton creates excellent stitch definition, while acrylic provides a softer appearance. Medium-weight yarn is ideal because it creates a sturdy fabric while keeping the mouse lightweight.
Select a crochet hook that is slightly smaller than the yarn recommendation. A 2.5 mm to 3.5 mm hook is commonly used because tighter stitches prevent the stuffing from showing through the fabric.
Additional supplies include polyester fiberfill stuffing, a yarn needle, stitch markers, scissors, black embroidery thread for facial details, and optional safety eyes if the finished decoration is intended only for display. If the toy is for a young child, embroidered facial features are generally a safer decorative choice than attached plastic pieces.
The primary stitches used in a Hanging Mice Amigurumi Pattern include the magic ring, chain (ch), slip stitch (sl st), single crochet (sc), increase (inc), and invisible decrease (dec). These stitches create the smooth shaping that gives amigurumi its distinctive appearance.
Before starting your project, practice maintaining consistent tension. Even stitches help create symmetrical shaping while producing a professional-looking finished mouse.
Step-by-Step Hanging Mice Amigurumi Pattern Instructions
Every successful Hanging Mice Amigurumi Pattern begins by crocheting the body in continuous rounds. Working without joining rounds creates a smooth and seamless appearance.
Step 1: Begin with a magic ring and crochet six single crochet stitches into the center. Pull the ring tightly closed and place a stitch marker to indicate the beginning of each round.
Step 2: Continue increasing evenly during the next few rounds until the body reaches the desired width. Once the widest section is complete, crochet several rounds without increasing to build the body length.
Step 3: Gradually shape the head using carefully spaced invisible decreases. Before closing the opening, firmly stuff the body with polyester fiberfill. Add small amounts of stuffing at a time to maintain an even shape without stretching the stitches.
Step 4: Crochet two rounded ears separately using a magic ring and a few increase rounds. Flatten each ear slightly before sewing it securely onto the top of the head. Crochet a long narrow tail by making a chain and working slip stitches back along the chain before attaching it to the back of the body.
Step 5: Embroider the eyes, nose, and tiny whiskers using embroidery thread. Small details give every mouse its own unique personality while maintaining the classic amigurumi style.
Step 6: To create the hanging loop, attach yarn to the top of the head and crochet a chain long enough for hanging. Join the chain securely with a slip stitch, fasten off, weave in every loose end, and gently shape the finished mouse using your hands.
Creative Ways to Customize Your Hanging Mice Amigurumi Pattern
One of the most enjoyable aspects of making a Hanging Mice Amigurumi Pattern is the opportunity to personalize every detail according to your own creative vision.
Experiment with different yarn colors instead of traditional gray. White, cream, beige, pastel pink, light blue, or even multicolored yarn creates charming decorative mice suitable for different seasons and celebrations.
Dress the mice with tiny crochet accessories such as miniature scarves, bows, hats, flowers, or tiny backpacks. These additions create themed decorations that reflect holidays or special occasions.
Embroidery offers endless possibilities for personalization. You can add smiling expressions, sleepy eyes, tiny freckles, or delicate stitched details that give every mouse its own distinctive character.
If you are creating several mice, vary their ear sizes, tail lengths, or facial expressions to make each one unique while maintaining the same overall pattern.
The finished mice can be attached to wreaths, nursery mobiles, seasonal garlands, decorative branches, gift wrapping, backpacks, zipper pulls, or holiday trees. Their lightweight construction makes them suitable for many creative display ideas.
As your confidence grows, experiment with textured yarn, striped clothing, miniature crochet cheese pieces, or tiny decorative hearts to create even more imaginative variations of the Hanging Mice Amigurumi Pattern.
Finishing Techniques and Caring for Your Hanging Mice Amigurumi Pattern
Professional finishing techniques help ensure your Hanging Mice Amigurumi Pattern remains attractive for many years.
After completing the crochet work, inspect every seam carefully. Secure all stitched pieces firmly to prevent movement during handling or display.
Weave in every loose yarn end using a yarn needle. Proper finishing prevents unraveling while giving the mouse a clean, professional appearance.
Shape the stuffing evenly throughout the body using your fingers. Smooth shaping creates balanced proportions and enhances the overall look of the finished amigurumi.
If the mouse becomes dusty after display, gently clean it using a soft brush or a cool stream of air. Spot cleaning with a damp cloth is usually sufficient for small decorative pieces.
Store finished amigurumi in a clean, dry location away from excessive humidity and prolonged direct sunlight. Proper storage helps preserve both the yarn quality and the vibrant colors.
The Hanging Mice Amigurumi Pattern also makes a thoughtful handmade gift for birthdays, baby showers, nursery decorations, seasonal celebrations, craft fairs, and anyone who appreciates handcrafted crochet creations. Because each mouse is made by hand, every finished piece carries its own special charm and personality.
FAQ About Hanging Mice Amigurumi Pattern
Is the Hanging Mice Amigurumi Pattern suitable for beginners?
Yes. Beginners who understand basic amigurumi stitches such as the magic ring, single crochet, increases, and decreases can successfully complete this project.
What yarn is best for amigurumi mice?
Cotton yarn is highly recommended because it creates excellent stitch definition, although high-quality acrylic yarn also works well.
Which crochet hook should I use?
A hook between 2.5 mm and 3.5 mm is commonly used because tighter stitches prevent stuffing from becoming visible.
How long does it take to make one mouse?
Most crocheters can complete one hanging mouse within two to four hours, depending on experience and decorative details.
Can I make larger mice?
Absolutely. Simply use thicker yarn and a larger crochet hook while maintaining the same stitch sequence to create larger versions.
What type of stuffing works best?
Polyester fiberfill is the most commonly used stuffing because it is lightweight, washable, and helps the mouse maintain its shape.
Can I wash the finished mouse?
Yes. Gentle hand washing with mild detergent followed by air drying is usually the safest cleaning method for handmade amigurumi.
What can I use the finished hanging mouse for?
The completed Hanging Mice Amigurumi Pattern can be used as a decorative ornament, nursery mobile, backpack charm, keychain, holiday decoration, gift topper, or handmade keepsake.
Conclusion
The Hanging Mice Amigurumi Pattern is a delightful crochet project that combines creativity, adorable design, and enjoyable amigurumi techniques. Throughout this guide, you learned how to choose the best materials, master the essential crochet stitches, follow a detailed step-by-step construction process, personalize your mice with creative accessories and embroidery, and apply professional finishing techniques that enhance both durability and appearance. Whether you create a single decorative mouse or an entire collection in different colors and styles, this project offers endless opportunities to practice your crochet skills while making charming handmade decorations. We hope this tutorial inspires you to begin your own Hanging Mice Amigurumi Pattern and experiment with new ideas, colors, and creative details. If you enjoyed this article, please leave your honest opinion and share your suggestions for future crochet tutorials. Your feedback is greatly appreciated and helps us continue creating inspiring crochet content for makers around the world.

