
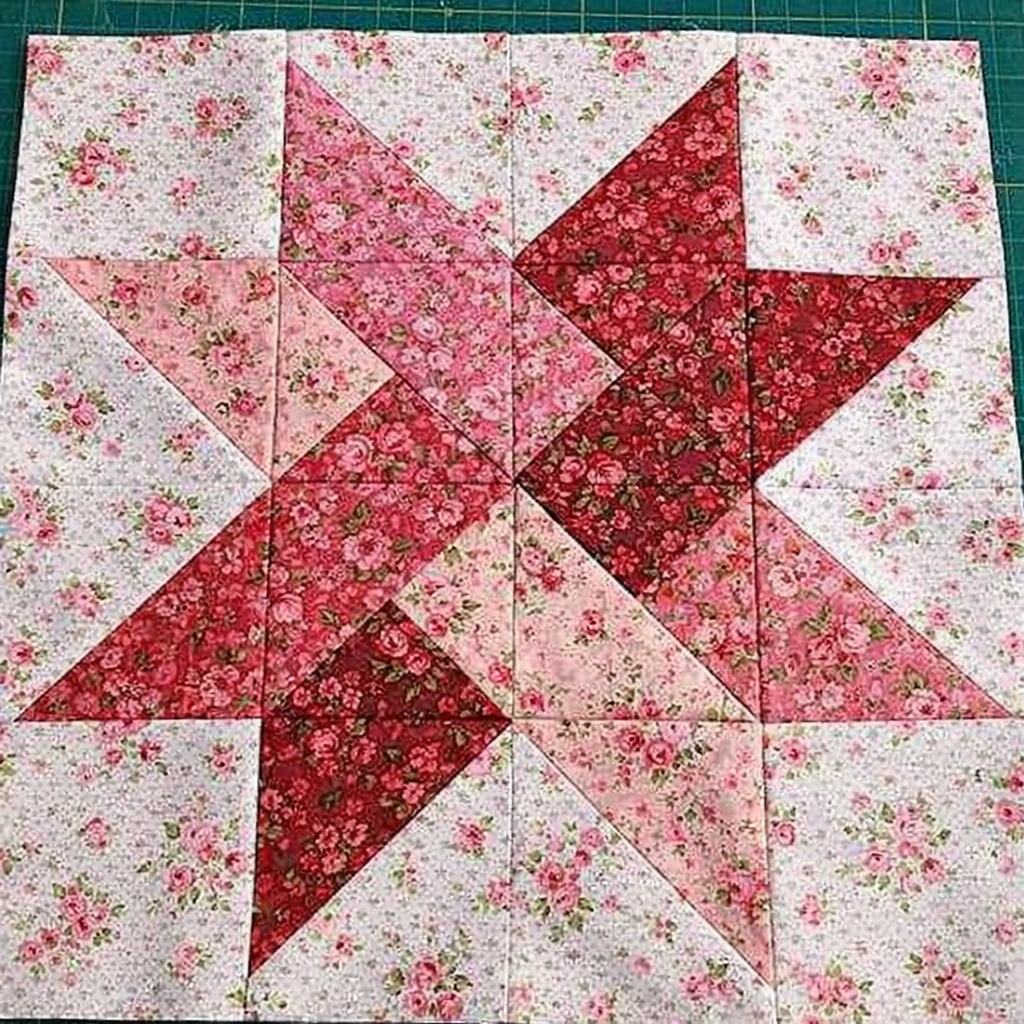
Woven Quilt Star Block Pattern is a striking patchwork design that combines the classic beauty of a star block with a clever woven visual effect. By arranging contrasting fabric strips, squares, and angled units in a carefully planned sequence, the finished block can appear as though pieces of fabric are passing over and under one another. This illusion gives the block depth and movement while preserving the balanced geometry that makes star quilts so appealing. Whether you prefer traditional quilting fabrics, modern solids, or colorful scraps, this block offers plenty of opportunities to create a distinctive handmade project.
One of the most enjoyable aspects of the Woven Quilt Star Block Pattern is the freedom it provides when choosing colors. Strong contrast helps define both the star points and the woven sections, so selecting fabrics thoughtfully can dramatically influence the finished appearance. Two bold colors against a light background can create a clean and graphic block, while several coordinated prints produce a more detailed patchwork effect. Scraps can also work beautifully, especially when repeated colors are used strategically to maintain the illusion that individual fabric bands continue through the design.
Making a Woven Quilt Star Block is also a useful exercise for developing essential quilting skills. Accurate cutting, consistent quarter-inch seam allowances, careful pressing, precise intersections, and organized assembly all contribute to a successful result. Although the finished block may initially look complicated, it becomes much easier to understand when divided into smaller units. In this tutorial, you will learn how to prepare the fabric, create the individual components, arrange the woven star, assemble the complete block, and incorporate your finished blocks into a beautiful quilt or smaller decorative project.
Materials and Cutting for the Woven Quilt Star Block Pattern
Begin the Woven Quilt Star Block Pattern by selecting quality quilting cotton. A stable cotton fabric is ideal because it cuts accurately, holds its shape during piecing, and presses cleanly. Using fabrics of similar weight will also make the completed block flatter and easier to assemble.
For the woven illusion to remain clearly visible, choose at least two contrasting colors along with a background fabric. For example, blue and gold against cream can produce a traditional appearance, while black, white, and a bright accent color can create a contemporary interpretation.
You can also use multiple fabrics from the same color family. A combination of light, medium, and dark values can create subtle depth while maintaining a coordinated look. The important factor is ensuring that neighboring pieces have enough contrast to keep the woven quilt design recognizable.
Gather your rotary cutter, cutting mat, acrylic ruler, sewing machine, coordinating thread, pins or clips, and iron. A square quilting ruler is particularly useful when checking individual units and trimming the completed block.
The exact dimensions of the pieces will depend on the finished block size you want to create. Generally, you will need background squares, contrasting squares or rectangles for the woven sections, and pieces that will form the points of the quilt star block. Prepare one test block before cutting fabric for an entire quilt.
After cutting, arrange every piece on a flat surface in its approximate final position. This is especially important for a woven design because accidentally reversing one color can interrupt the over-and-under illusion. Keep the pieces organized in rows or individual block groups until you are ready to sew.
How to Sew the Woven Quilt Star Block Step by Step
Start by creating the smaller patchwork units required for the star points. Depending on your chosen construction method, these may be made with half-square triangles, flying-geese-style units, or other angled pieces. The goal is to create sharp directional shapes that will eventually form the star.
When making half-square triangle units, place two appropriate squares right sides together, mark the required diagonal sewing line, and stitch according to your chosen method. Cut and press the units carefully, then trim them to the correct dimensions before continuing.
If your version uses flying geese units, make each component accurately and verify that the star point reaches the intended seam intersection without losing its seam allowance. Consistent measurements at this stage will greatly improve the final block.
Next, assemble the rectangular or strip-based pieces that produce the woven appearance. Follow your planned color arrangement carefully. If one band visually passes over another at one intersection, the color placement at the next intersection should support the intended weaving sequence.
Lay all completed units back on your work surface. Arrange them into the final Woven Quilt Star Block Pattern before joining anything permanently. Look at the block from a short distance and make sure the star is balanced and the woven paths appear continuous.
Once satisfied with the arrangement, sew neighboring components together to form rows or larger sections. Use a consistent quarter-inch seam allowance throughout. Press each seam carefully before joining the next section so the block remains flat and the important intersections stay easy to match.
Assembling Accurate Blocks and Creating the Quilt Layout
When joining the rows of your Woven Quilt Star Block, pay close attention to intersections. Match seams carefully and use pins when necessary. Accurate intersections help preserve the woven illusion because the colored bands need to appear continuous across neighboring units.
Pressing direction can make assembly easier. When possible, press seams in opposite directions on adjacent rows so they nest together. This reduces shifting while sewing and can help create cleaner intersections throughout the star.
After completing the block, place it on your cutting mat and check its measurements. A quilting ruler can help determine whether the block is square. Avoid aggressive trimming because cutting too much from the outer edges could remove important seam allowances around the star points.
If the block is slightly distorted, gentle pressing may help. Avoid pulling it into shape because stretching can cause additional problems when multiple blocks are joined. Identifying inaccurate units and correcting them before final assembly generally produces better results.
For a complete Woven Star Quilt, repeat the block construction until you have enough blocks for the desired project size. Lay the finished blocks on a design wall, table, or clean floor and experiment with different orientations before sewing them together.
You can place the blocks directly beside one another or separate them with quilt sashing. Direct placement creates a continuous geometric design, while sashing gives each star more visual breathing room. Once you select the arrangement, sew the blocks into rows and join the rows to complete the quilt top.
Quilting, Finishing, and Creative Woven Star Variations
Prepare the finished quilt top by pressing it carefully and removing loose threads. Cut the batting and backing slightly larger than the quilt top on all sides. Place the backing wrong side up, position the batting over it, and add the Woven Star quilt top right side up.
Smooth all three layers before basting. Work from the center toward the edges so wrinkles do not become trapped between the layers. Secure the quilt sandwich using your preferred basting technique before beginning the quilting.
Straight-line quilting works particularly well with the geometric structure of the Woven Quilt Star Block Pattern. Lines following the star points or woven bands can reinforce the shapes and make the visual illusion even more noticeable.
Another option is echo quilting around the star. Repeating the outline at regular intervals creates texture while allowing the patchwork design to remain the main attraction. Simpler background quilting can provide additional contrast around the detailed star.
Once quilting is complete, trim the excess batting and backing evenly. Prepare binding strips, join them into one continuous length, and attach the binding around the perimeter. Take extra care when forming the corners for a clean and durable finish.
Remember that you do not need to make an entire bed quilt to enjoy this pattern. A single Woven Quilt Star Block can become a pillow front, mini quilt, tote bag panel, or wall decoration. Several blocks can also be combined into a table runner or centerpiece.
FAQ About the Woven Quilt Star Block Pattern
Is the Woven Quilt Star Block Pattern suitable for beginners?
A confident beginner can make this block successfully, especially after practicing basic half-square triangles or similar units. The most important skills are accurate cutting, consistent seams, and careful organization.
What fabric is best for a Woven Quilt Star Block?
Quilting cotton is an excellent choice because it is stable, easy to cut, and simple to press. Using fabrics with similar weights will also help the block lie flat.
How many colors should I use?
Three fabrics are a practical starting point: two contrasting colors for the woven star and one background fabric. However, additional colors can be incorporated once you understand the design.
How do I make the woven effect more visible?
Use fabrics with clear differences in color or value and maintain consistent color placement. The illusion depends on making the bands appear to travel continuously through the block.
Can I make a scrappy Woven Star Quilt?
Absolutely. Scraps can create a beautiful version, but try organizing them by color families so the woven sections remain recognizable rather than becoming visually confusing.
Why don’t my star points match?
Inaccurate cutting, inconsistent seam allowances, or incorrectly trimmed units are common causes. Check the dimensions of every component before assembling the complete block.
How can I avoid cutting off star points?
Make sure there is a proper seam allowance beyond the tip of each star point before joining blocks or adding borders. Sew accurately along the intended quarter-inch seam line.
Should I press seams open or to one side?
Both approaches can work. Pressing seams to alternating sides is useful for nesting intersections, while pressing open can reduce bulk in areas where many pieces meet.
Can I enlarge the Woven Quilt Star Block Pattern?
Yes. You can use appropriately resized units to create a larger block. Whenever changing dimensions, make a test block first to verify that all components fit together correctly.
Can I add sashing between the blocks?
Yes. Quilt sashing can emphasize each individual star and simplify the visual composition, especially when the blocks contain many colors or prints.
What quilting design works best with woven star blocks?
Straight lines, echo quilting, geometric designs, or restrained free-motion quilting can all work beautifully. Choose quilting that supports the patchwork instead of competing with it.
What projects can I make with one block?
A single block can be used for a cushion cover, wall hanging, tote bag panel, mini quilt, or decorative table piece. This also makes a single block a practical way to test colors before beginning a larger quilt.
Conclusion
The Woven Quilt Star Block Pattern combines two captivating visual ideas—the timeless star and the appearance of interlaced fabric—to create a block filled with movement, dimension, and personality. While the finished design may appear intricate, constructing it from smaller, manageable patchwork units makes the process much easier to understand.
Throughout this tutorial, you learned how to select contrasting quilting fabrics, prepare and organize the individual pieces, construct star-point units, establish the woven effect, maintain an accurate quarter-inch seam allowance, match intersections, assemble blocks, plan a quilt layout, and finish the project with batting, backing, quilting, and binding. Accuracy during the early stages is particularly important because well-sized components make the final assembly significantly smoother.

