
Crochet Mini Purse Keychain – Tutorial is a charming project that transforms a small amount of yarn into an adorable miniature accessory. Designed to look like a tiny handbag or purse, this crochet project can be attached to keys, backpacks, handbags, zipper pulls, or handmade gifts. Its compact size makes it relatively quick to create, while the small details provide plenty of opportunities for personalization. You can experiment with different yarn colors, handles, decorative flowers, buttons, stripes, or contrasting edges to create a crochet mini purse keychain that reflects your own creative style.
Another wonderful feature of the Crochet Mini Purse Keychain is that it can help you use leftover yarn from larger projects. Only a small quantity is generally required, so those short lengths of cotton or acrylic yarn stored in your craft collection can become useful again. The project also provides valuable practice with essential techniques such as the chain stitch, single crochet, slip stitch, working in rounds, increasing stitches, and weaving in ends. Because the finished piece is miniature, you can practice these skills without committing to a large or time-consuming project.
Following this Crochet Mini Purse Keychain – Tutorial is suitable for adventurous beginners as well as experienced crocheters looking for a cute and practical project. The basic idea is to crochet a small purse body, shape the opening, create handles or a strap, finish the edges, and securely add a keychain attachment. Exact dimensions can easily be adjusted depending on your yarn and preferred size. Once you understand the basic construction, you can make several variations using different colors and embellishments, turning a simple pattern into an entire collection of miniature crochet purses.
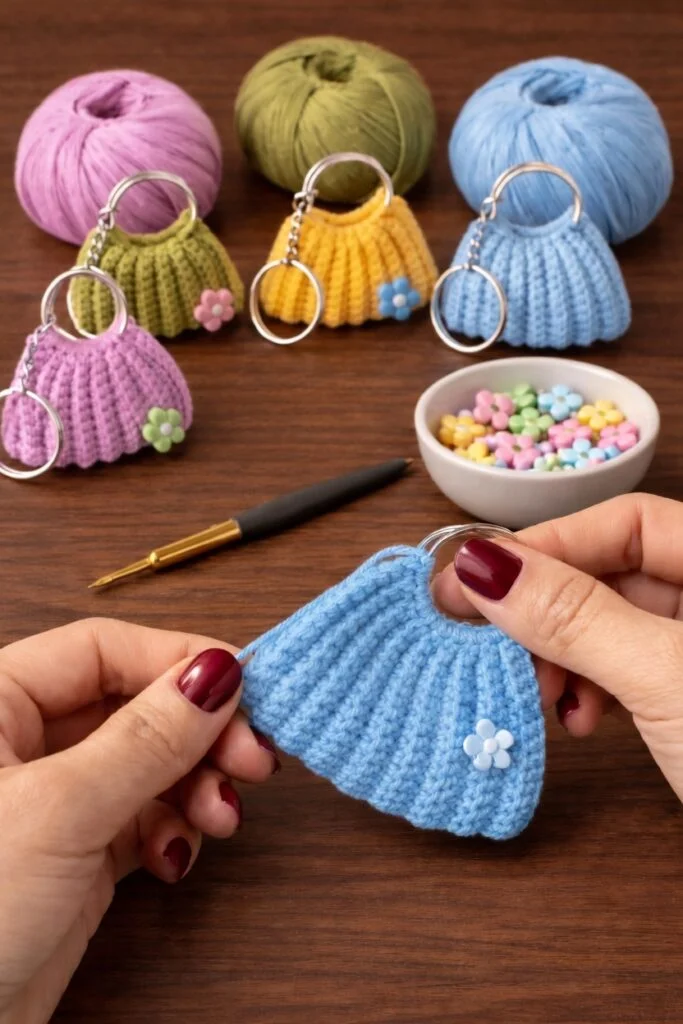
Materials and Basic Stitches for the Crochet Mini Purse Keychain
Start your Crochet Mini Purse Keychain – Tutorial by choosing a lightweight or medium-weight yarn with good stitch definition. Cotton is an excellent option because it creates firm stitches and helps the miniature purse maintain its shape. Acrylic yarn can also be used for a softer result.
Select a crochet hook appropriate for your chosen yarn. For miniature projects, using a slightly smaller hook than usual can help create a dense fabric with fewer visible spaces. However, avoid crocheting so tightly that inserting the hook becomes uncomfortable.
You will also need scissors, a yarn needle, stitch markers, and a key ring or suitable keychain attachment. Optional decorations might include small crochet flowers, tassels, beads, or buttons, provided any embellishments are attached securely and the finished item is used appropriately.
Before starting, review the chain stitch (ch). Make a slip knot, place it on your hook, yarn over, and pull through the loop. Repeat this process to create the foundation chain. Chains are useful for beginning the purse and creating handles.
The single crochet (sc) is the main stitch for this project because it creates a compact and durable fabric. Insert your hook into the stitch, yarn over and pull up a loop, then yarn over again and pull through both loops on the hook.
You will also use the slip stitch (sl st) for joining and finishing. Insert the hook into the required stitch, yarn over, and pull the yarn directly through both the stitch and the loop on your hook. Keeping these basic techniques consistent will help your miniature purse look neat.
How to Crochet the Mini Purse Body Step by Step
Begin the crochet mini purse with a short foundation chain. For a small keychain-sized purse, chain approximately 10 to 12 stitches as a practical starting point. The exact number can be increased or decreased depending on your yarn and desired dimensions.
Starting in the second chain from your hook, work one single crochet into each chain until you reach the final chain. Instead of turning immediately, continue working around the opposite side of the foundation chain. This creates an oval foundation and allows the purse body to be crocheted seamlessly in rounds.
Work additional single crochet stitches around the base, increasing carefully at both ends if necessary to keep the foundation flat. Join the round with a slip stitch if you are working in joined rounds, or use a stitch marker if you prefer continuous rounds.
Continue crocheting one single crochet into each stitch around without adding further increases. As you complete additional rounds, the sides will begin rising naturally and forming the miniature bag shape. Keep counting stitches periodically to prevent accidental increases or decreases.
Continue until the purse reaches your desired height. A miniature Crochet Purse Keychain should remain compact enough to hang comfortably from keys or a bag, so periodically compare its height and width while crocheting.
Finish the final body round with a slip stitch and fasten off if you plan to make the handles separately. Alternatively, keep the working yarn attached if the handle design can be created directly from the upper edge. Gently shape the purse with your fingers before continuing.
Creating the Handles and Decorating the Mini Purse
To create a simple handle, identify two points along the upper edge of the purse. Attach your yarn at the first point and make a chain long enough to form a small arch. The number of chains will depend on how large you want the handle to appear.
Attach the chain to the second point with a slip stitch or single crochet. For a stronger handle, work single crochet stitches back across the chain before fastening off. Repeat on the opposite side if you want the miniature purse to have two matching handles.
Another option is to create one longer strap. Crochet a chain from one side of the purse to the other and reinforce it with slip stitches or single crochet. A contrasting yarn color can make this detail stand out beautifully.
Once the basic Crochet Mini Purse Keychain is assembled, add decorative details. A small crocheted flower can be sewn onto the front, or you can embroider simple shapes directly onto the purse using a yarn needle.
A contrasting border around the opening is another easy customization. Attach a second yarn color and work one round of single crochet or slip stitches around the upper edge. This small detail can give the finished project a more defined appearance.
For an extra decorative touch, create a tiny tassel using short pieces of yarn and secure it to one side. Keep embellishments proportional to the miniature purse so they enhance the design without overwhelming its small shape.
Adding the Keychain and Finishing the Crochet Mini Purse
Before adding the keychain hardware, weave in all loose yarn ends. Thread each tail onto a yarn needle and pass it through several stitches on the inside of the purse. Change direction once or twice before trimming the remaining yarn.
Choose a strong location for attaching the key ring. The attachment point should connect to several stitches rather than pulling against one isolated loop. Reinforcing this area with additional yarn stitches can improve durability.
If your keychain attachment has a small chain, clasp, or jump-ring-style connector, secure it through a reinforced crochet loop or handle according to the hardware design. Check that the yarn cannot easily slip free from the attachment.
Gently shape the completed mini crochet purse with your fingers. Cotton projects can sometimes benefit from light blocking. If appropriate for your yarn, slightly dampen the piece, shape it carefully, and allow it to dry naturally.
Test the finished keychain by gently pulling the attachment and handles. Check for loose yarn tails, weak stitches, or decorations that need additional securing. Small handmade accessories are handled frequently, so careful finishing makes an important difference.
Your Crochet Mini Purse Keychain – Tutorial is now complete. Once you are comfortable with the construction, make additional versions in different colors and styles. Small changes to the handle, edging, decorative details, and body dimensions can create surprisingly different miniature purses.
FAQ About the Crochet Mini Purse Keychain
Is the Crochet Mini Purse Keychain suitable for beginners?
Yes. The project uses several fundamental crochet techniques and is small enough to practice without requiring a large amount of yarn. Beginners should be comfortable with chains and single crochet before starting.
What yarn is best for a Crochet Mini Purse Keychain?
Cotton yarn is particularly useful because it provides good stitch definition and structure. Acrylic can also work if you prefer a softer miniature purse.
What crochet stitches are used in this tutorial?
The main techniques include chain stitch (ch), single crochet (sc), and slip stitch (sl st). Depending on your chosen variation, you may also use simple increases.
How big should a mini purse keychain be?
There is no mandatory size, but it should remain small enough to function comfortably as a keychain accessory. You can adjust both the starting chain and number of rounds to control the dimensions.
Can I use leftover yarn?
Absolutely. This crochet keychain pattern is ideal for using small amounts of leftover yarn from other projects.
Can I make the purse in two colors?
Yes. Try crocheting the body in one color and using another for the handles and border. You can also create stripes by changing yarn colors between rounds.
How do I make the mini purse larger?
Begin with a longer foundation chain and crochet additional rounds for height. Remember that increasing the dimensions will also require a larger handle to maintain balanced proportions.
How can I make the purse hold its shape better?
Use a firm yarn such as cotton, select an appropriate smaller hook, and maintain consistent tension. Dense single crochet stitches naturally create more structure.
Can I add a button to the front?
Yes, a decorative button can be added securely. If the item may be accessible to very young children, avoid loose or detachable small embellishments that could present a choking hazard.
Can I add a tiny closure?
You can create a small chain loop and coordinate it with a securely attached button, or crochet a miniature flap. Make sure the closure remains proportional to the purse.
How can I make the keychain attachment stronger?
Reinforce the crochet loop or handle where the hardware connects. Attaching through several strong stitches distributes pressure more effectively than relying on a single yarn loop.
What else can I do with miniature crochet purses?
Besides keychains, they can be used as bag charms, decorative zipper accessories, handmade gift embellishments, or miniature decorations. Several versions can also make a fun coordinated collection.
Conclusion
The Crochet Mini Purse Keychain – Tutorial shows how a small amount of yarn and a few fundamental crochet techniques can become an adorable handmade accessory. By creating an oval foundation, building the purse body in rounds, adding handles, and finishing the project with a secure keychain attachment, you can make a miniature purse that is both decorative and practical.
Throughout this tutorial, you learned how to use chain stitches, single crochet, slip stitches, simple increases, rounds, reinforced handles, edging, and careful finishing techniques. You also discovered several ways to personalize the basic crochet mini purse pattern using contrasting colors, flowers, embroidery, tassels, and different handle styles. These variations allow the same fundamental construction method to produce many unique designs.

