
Cat’s Cradle Quilt Block Pattern is a captivating patchwork design that uses carefully arranged geometric pieces to create movement, contrast, and an attractive secondary pattern. The block is known for the way its triangles and contrasting sections interact, giving the finished design a dynamic appearance even though it is constructed from manageable quilting units. Depending on your fabric choices, the Cat’s Cradle Quilt Block can look traditional and cozy, bright and playful, or clean and contemporary. It can be repeated throughout an entire quilt or used individually for smaller projects such as pillows, table runners, wall hangings, and decorative mini quilts.
One of the most enjoyable features of the Cat’s Cradle Quilt Block Pattern is its ability to showcase color relationships. Strong contrast makes the geometry easy to recognize, while coordinated fabrics can create a softer effect in which shapes seem to blend into one another. You might combine a dark print with a light neutral background, use several shades from the same color family, or turn favorite fabric scraps into a lively scrappy block. When multiple blocks are placed beside one another, new shapes can appear where their edges meet, making the final quilt visually interesting from both close up and across the room.
Creating a Cat’s Cradle Quilt is also a useful way to strengthen fundamental quilting skills. Accurate cutting, consistent quarter-inch seam allowances, careful triangle construction, pressing, trimming, matching points, and planning the final layout all contribute to a polished block. Although the intersecting shapes can initially make the design appear complicated, breaking the construction into smaller units makes the process much easier to follow. In this tutorial, you will learn how to select and prepare fabrics, build the essential patchwork units, assemble the block accurately, arrange multiple blocks, and finish your project with quilting and binding.
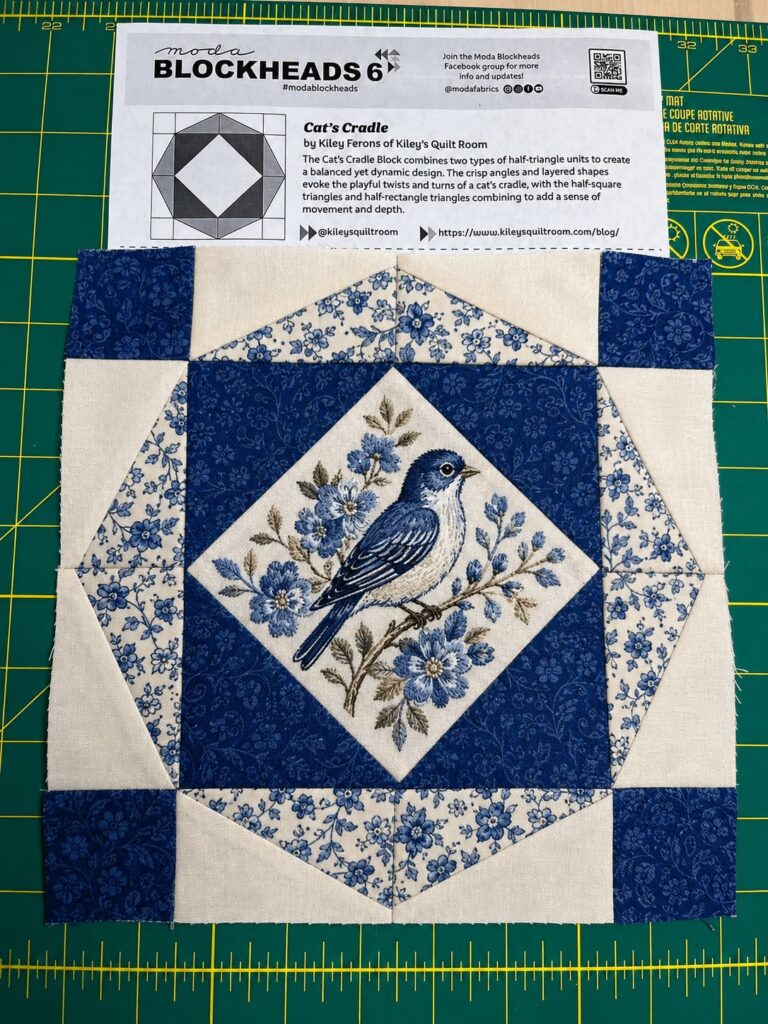
Choosing Fabrics and Preparing the Cat’s Cradle Quilt Block
Begin the Cat’s Cradle Quilt Block Pattern by selecting quilting cotton with enough contrast to make the individual shapes visible. Quilting cotton is particularly useful because its stable weave makes accurate cutting and piecing easier, especially when working with triangles.
A simple two-color combination is an excellent place to start. Pair a darker blue, red, green, purple, or other saturated fabric with cream or white. The contrast will help you understand how the different components interact before experimenting with more complicated fabric combinations.
For a colorful scrap quilt, organize your fabrics according to value rather than relying only on color. Combining several medium and dark scraps against a consistent light background can preserve the Cat’s Cradle geometry while allowing every block to have a slightly different personality.
Prepare a rotary cutter, self-healing cutting mat, acrylic quilting rulers, sewing machine, coordinating thread, pins or clips, and an iron. A square ruler is particularly useful for checking smaller units and squaring the finished block before assembly.
The block can be created in different sizes, so determine your desired finished dimensions before cutting. Depending on the construction method you are following, prepare the required squares, rectangles, and triangle-based pieces. Whenever you resize a block, create one test version before cutting fabric for the complete quilt.
Once all pieces are prepared, arrange them on a flat surface according to the Cat’s Cradle block layout. Do not skip this step. Several geometric pieces may look similar before assembly, and placing everything in position first helps prevent accidental rotation or incorrect color placement.
Sewing the Cat’s Cradle Quilt Block Pattern Step by Step
Start by constructing the smaller triangle-based components. Many versions of the Cat’s Cradle Quilt Block rely on combinations of triangles and squares to create the characteristic angled movement, so precision during these early stages is especially important.
If your construction uses half-square triangles, place two appropriate fabric squares right sides together and mark a diagonal guideline. Sew according to your preferred HST method, cut the unit where required, open it, and press carefully.
Trim each completed triangle unit to the correct unfinished dimensions. Align the ruler with the diagonal seam before trimming so the two fabric triangles remain balanced. Correctly sized units make the final block significantly easier to assemble.
Next, combine the triangle units with the squares or rectangles specified by your layout. Place the pieces right sides together and sew with a consistent quarter-inch seam allowance. Avoid stretching angled or bias edges while guiding the fabric through the sewing machine.
Build the design as several manageable sections instead of attempting to assemble the entire block immediately. After completing each section, return it to your layout surface. This helps you verify its orientation and ensures the colors continue forming the intended pattern.
When all major sections are complete, arrange them once more to form the full Cat’s Cradle Quilt Block Pattern. Check every triangle direction and color placement before joining the sections into rows. A quick visual check at this stage can prevent unnecessary seam ripping later.
Assembling Accurate Blocks and Planning the Quilt Layout
Sew neighboring sections together carefully, matching important intersections. Pin or clip near the points if necessary so the layers do not shift while sewing. Maintaining accuracy here helps create the crisp geometry associated with a successful Cat’s Cradle Quilt Block.
Press each seam after sewing. When possible, press seams in opposite directions on neighboring sections so they nest together during final assembly. This technique can make intersections easier to match and may reduce unwanted shifting.
Join the completed rows or larger sections to finish the block. Before pressing the final seams, check that important triangle points remain visible and that the block has maintained its intended shape. Then press the entire unit gently until it lies flat.
Place the finished block beneath a square quilting ruler and check its dimensions. If trimming is necessary, remove only small amounts from the outer edges while preserving the required seam allowances. Excessive trimming can cut off important points when blocks are later joined.
For a full Cat’s Cradle Quilt, make the required number of blocks and place them on a design wall, large table, or clean floor. Try rotating some blocks before deciding on the final arrangement. Different orientations can create completely new secondary patterns.
Once you are satisfied with the layout, organize the blocks into rows. Sew the blocks together using your consistent quarter-inch seam, press the row seams, and then join the rows. Optional quilt sashing can also be placed between blocks if you want each design to remain visually separated.
Quilting, Finishing, and Creative Cat’s Cradle Variations
After completing the quilt top, prepare the backing and batting slightly larger than the top on every side. Place the backing wrong side up, add the batting, and center the Cat’s Cradle Quilt top with its right side facing upward.
Smooth the three layers carefully, working from the center toward the edges. Baste them using your preferred method so the layers remain stable. Good basting helps reduce wrinkles and shifting during the quilting process.
Straight-line quilting is an excellent choice for this geometric block. Diagonal lines can follow the direction of the triangle units, while a simple grid can provide a clean contrast to the more detailed patchwork.
You can also use echo quilting around prominent geometric shapes. Repeating the outlines at regular intervals adds texture while emphasizing the Cat’s Cradle pattern. If your fabrics contain many prints, simpler quilting may allow the piecing to remain the main attraction.
After quilting, trim the excess backing and batting. Prepare binding strips and join them into one continuous length. Attach the quilt binding around the perimeter, forming neat corners and completing the final join securely.
Experiment with the pattern beyond a traditional bed quilt. A single block can become a pillow front or mini quilt, while three or four blocks can create a beautiful table runner. Different fabrics and block orientations can make the same Cat’s Cradle Quilt Block Pattern feel completely new.
FAQ About the Cat’s Cradle Quilt Block Pattern
What is a Cat’s Cradle Quilt Block?
A Cat’s Cradle Quilt Block is a geometric patchwork design that typically combines contrasting triangle-based and square or rectangular units. Their arrangement creates directional movement and interesting secondary shapes when multiple blocks are repeated.
Is the Cat’s Cradle Quilt Block Pattern suitable for beginners?
Yes, particularly for confident beginners who already understand basic straight seams. The pattern provides useful practice with triangle units, accurate cutting, seam matching, and block trimming.
What fabric is best for this quilt block?
Quality quilting cotton is an excellent choice because it is stable, easy to cut, and responds well to pressing.
How many colors should I use?
Two contrasting fabrics can create a beautiful traditional block. You can also use several coordinated fabrics or scraps once you understand how color placement affects the design.
Can I make a scrappy Cat’s Cradle Quilt?
Absolutely. Scraps work especially well when organized by light, medium, and dark values. Maintaining contrast helps preserve the recognizable geometric pattern.
What is a half-square triangle?
A half-square triangle, commonly called an HST, is a square patchwork unit composed of two triangles sewn along a diagonal seam. HSTs are frequently used to create angled designs in quilting.
Why are my triangle points disappearing?
Points can be lost when seam allowances are inaccurate or when units are trimmed too aggressively. Check that enough fabric remains beyond each point before joining sections.
Why is my finished block smaller than expected?
Slightly oversized seam allowances, inaccurate cutting, or over-trimming can reduce the final dimensions. Check measurements throughout construction rather than waiting until the block is finished.
How do I keep triangle pieces from stretching?
Handle bias edges gently and avoid pulling the fabric during sewing or pressing. Press with an up-and-down motion rather than aggressively sliding the iron.
Should seams be pressed open or to one side?
Either approach can work. Pressing neighboring seams in opposite directions can help them nest, while pressing open may reduce bulk in areas containing several layers.
Can I rotate the blocks in the final layout?
Yes. Rotation is one of the most interesting ways to experiment with this pattern because different orientations can produce unexpected secondary geometric designs.
Can I add sashing between Cat’s Cradle blocks?
Yes. Quilt sashing provides visual separation and can help individual blocks stand out, particularly when using colorful or highly patterned fabrics.
What quilting design works well with Cat’s Cradle blocks?
Straight-line, diagonal, grid, and echo quilting can all complement the geometric piecing. Choose a quilting design that supports rather than hides the patchwork.
What can I make with a single Cat’s Cradle block?
One block can become a mini quilt, cushion front, bag panel, wall hanging, or other decorative sewing project. It is also a useful way to test fabric combinations before beginning a full quilt.
Conclusion
The Cat’s Cradle Quilt Block Pattern is an engaging example of how carefully arranged geometric fabric pieces can create a design filled with movement and visual depth. What initially appears complicated becomes much more approachable when the block is divided into smaller components and assembled systematically.
Throughout this tutorial, you learned how to choose contrasting quilting fabrics, organize the pieces, construct triangle-based units, work with half-square triangles, maintain an accurate quarter-inch seam allowance, preserve points, match intersections, square completed blocks, arrange a quilt top, prepare the quilt sandwich, quilt the layers, and finish everything with binding.

