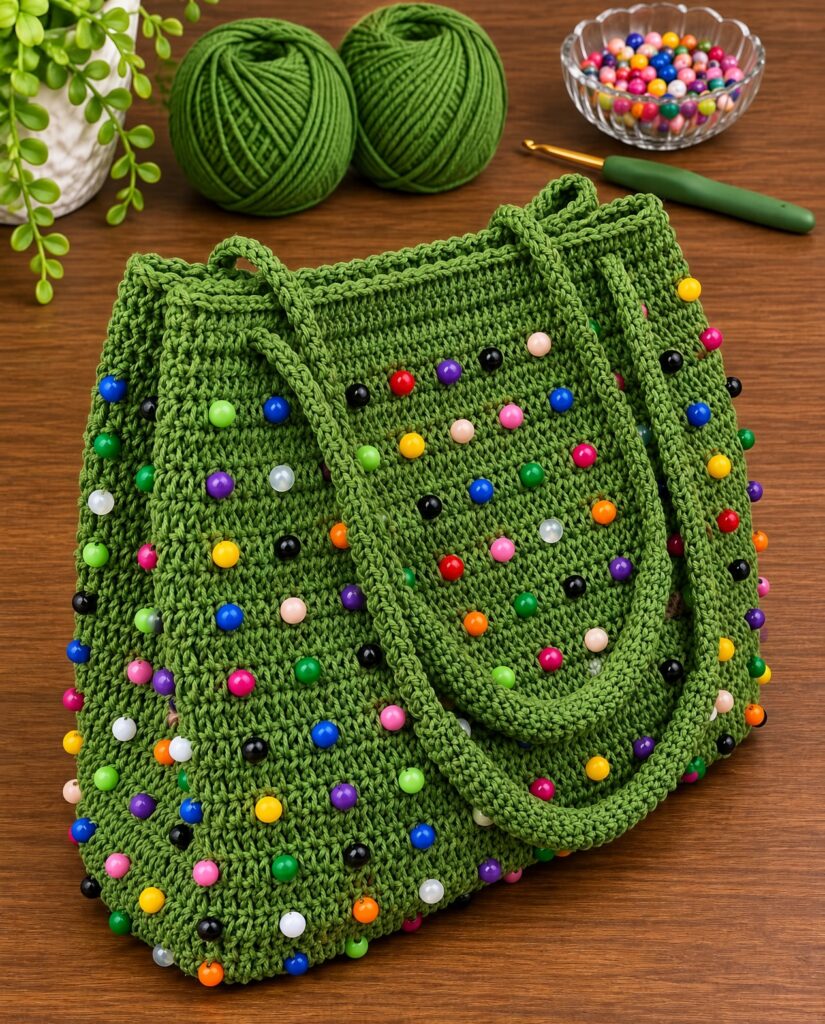
An Amazing Crochet Bag Pattern is a wonderful way to create a stylish, practical, and personalized accessory using yarn, a crochet hook, and a little creativity. Handmade crochet bags are popular because they combine beauty and functionality, allowing you to make something that reflects your personal style while enjoying the relaxing process of crocheting. Whether you prefer a casual everyday tote, a small shoulder bag, or a charming accessory for special occasions, this project can be adapted to different sizes, colors, and finishes.
One of the best things about making an Amazing Crochet Bag is the freedom to experiment with textures and stitches. Simple stitches can produce a clean and modern appearance, while textured patterns add depth and character. You can choose neutral colors for a timeless accessory or bright shades for a cheerful design. Small details, such as decorative borders, handmade straps, buttons, and lining, can also make the finished bag look more polished and unique.
This Crochet Bag Pattern is suitable for crocheters who want to practice basic techniques while creating a useful item. Beginners can follow a straightforward construction, while experienced crocheters can customize the shape, stitch combinations, and finishing details. The instructions below describe an adaptable bag design with a rectangular base, structured sides, and comfortable handles. You can adjust the measurements to create a compact purse or a larger everyday tote.
Materials and Preparation for Your Amazing Crochet Bag Pattern
Before starting your Amazing Crochet Bag Pattern, gather all the materials you will need. Medium-weight cotton yarn is a practical choice because it is durable and generally holds its shape well. You can also use another suitable yarn, but remember that softer yarns may create a more flexible bag. Choose a color that matches the style you want, or combine two or more shades for a creative effect.
For this project, prepare approximately 250 to 400 grams of yarn, depending on the desired size and thickness. You will also need a crochet hook appropriate for your yarn, a yarn needle, scissors, stitch markers, and a measuring tape. A smaller hook than the yarn label recommends may help create firmer stitches, but avoid making them so tight that the fabric becomes uncomfortable to work.
The main stitches used in this suggested design are chain stitch, single crochet, slip stitch, and increases. In US crochet terminology, single crochet is abbreviated as sc, chain as ch, and slip stitch as sl st. If you already know these basic techniques, you will find the construction manageable. If you are a beginner, practice a small sample before making the bag.
Start by deciding the approximate dimensions of your finished accessory. A medium everyday tote could measure around 12 inches wide and 11 inches tall, excluding the handles. These measurements are suggestions rather than fixed requirements. You can make the base wider for a spacious shopping bag or smaller for a compact purse. Write down your measurements so both sides remain consistent.
Make a small gauge swatch using the stitch you plan to use for the body. Crochet a square, measure it, and check whether the fabric feels firm enough to support everyday items. If the stitches are too loose, try a smaller hook. If the fabric feels stiff and difficult to work, use a slightly larger hook. A balanced fabric will help your bag maintain its shape.
Finally, choose the construction style you prefer. This tutorial uses a rectangular base worked in rows, followed by the body worked in continuous rounds. This creates a simple shape with a flat bottom and practical sides. Place stitch markers at the beginning of each round to make counting easier and prevent mistakes as the bag grows.
Step-by-Step Instructions to Crochet the Bag
Begin by making the rectangular base. Chain a length that corresponds to the desired width of your bag. For a medium tote, you might start with approximately 30 chains, adjusting the number according to your yarn and gauge. Work single crochet stitches across the chain, placing one stitch in each chain. At the end of the row, chain one and turn.
Continue working single crochet rows until the base reaches your chosen length. Keep your edges straight by counting the stitches at the end of every row. If you accidentally add or skip stitches, the base may become uneven, making the bag harder to assemble. A rectangular base provides a stable foundation and helps distribute the weight of the items placed inside.
Once the base is complete, begin crocheting around its perimeter to create the sides. Work single crochet stitches along the long edge, placing stitches evenly along the row ends. At each corner, work multiple stitches into the same area to help the fabric turn smoothly. Continue around the entire rectangle and join the round with a slip stitch if you are working joined rounds.
For the next rounds, work single crochet stitches around without increasing at the corners. This allows the fabric to rise and form the walls of the bag. If the corners look uneven, adjust the number of stitches around them in the first round rather than adding increases throughout the body. Keep the stitch count consistent as you work upward.
Continue crocheting until the bag reaches your preferred height. A medium tote may have sides approximately 10 to 12 inches tall, but you can make the body shorter for a handbag or taller for a spacious carryall. Try the bag against your body or compare it with an existing accessory to check the proportions before finishing the last round.
To create a neat upper edge, work one or two additional rounds of single crochet. You can also use slip stitches for a firmer finishing border, provided they do not make the opening too tight. Fasten off, leaving a yarn tail long enough to weave in securely. Use a yarn needle to hide the loose ends inside the stitches, keeping the exterior clean.
Handles, Finishing Details, and Customization Ideas
The handles are an important part of your Amazing Crochet Bag Pattern because they affect both comfort and durability. One simple option is to crochet two separate straps. Chain a length that gives you the handle drop you prefer, then work several rows of single crochet until the strap reaches your desired width. A strap around 1 to 1.5 inches wide can be comfortable for many everyday bags.
Make the second handle the same length and width as the first. Before attaching them, place the bag on a flat surface and measure the distance from each side. Mark the handle positions with stitch markers so both straps are symmetrical. Sew each end securely to the inside of the bag using a yarn needle and matching yarn. Reinforce the attachment points with several passes through the fabric.
Another option is to create handles directly from the top edge. Mark two equal sections on the front and back, then chain across the spaces where the handles will be. Continue crocheting around the opening and over the chains to strengthen the handle edges. This method creates an integrated design, although separate straps may be easier to reinforce for a heavier bag.
If you want a more structured accessory, consider adding a fabric lining. Measure the inside of the finished bag, allowing extra fabric for seams. Cut two fabric panels and a base piece, sew them together, and place the lining inside the crochet bag. Attach it carefully by hand along the upper edge. A lining can help prevent small objects from slipping through the stitches and reduce stretching during use.
You can also personalize the bag with decorative elements. A simple flower, a small crochet bow, a contrasting border, or a handmade tassel can give the accessory a distinctive appearance. Buttons and magnetic closures are useful options, but attach them securely and make sure they are suitable for the intended use. Keep decorations balanced so they complement the shape rather than overwhelm it.
Before using your finished bag, inspect the handles, seams, and upper edge. Check that all yarn ends are secure and that the straps are firmly attached. If you plan to carry heavier items, test the bag gradually with light objects first. Handmade crochet fabric can stretch under weight, so avoid overloading it. With careful finishing, your bag can become a beautiful accessory for shopping, casual outings, or everyday use.
Conclusion
This Amazing Crochet Bag Pattern offers a practical way to create a beautiful handmade accessory while practicing essential crochet techniques. From the rectangular base to the body, handles, and finishing details, each stage contributes to a bag that can be customized to match different styles and needs. By choosing durable yarn, maintaining consistent stitches, and reinforcing the handles, you can create a useful project with a polished appearance.