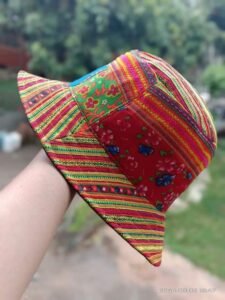
The fabric bucket hat, also known as a fisherman’s hat, is a versatile and practical accessory that has been gaining popularity.
With its simple and functional design, it is an excellent choice for protecting the face and head from the sun, rain, and wind, while adding a touch of style to any outfit.
Whether you’re skilled with sewing or looking for a fun project to kickstart your handmade fashion adventures, this comprehensive guide with a free pattern is all you need to create your own fabric bucket hat.

History and Evolution of the Bucket Hat
Before delving into sewing instructions, it’s interesting to understand a bit of the history behind this iconic accessory.
The bucket hat has its roots in hats worn by fishermen and outdoor workers, primarily in Europe and Asia, during the 20th century.
Its simple shape and wide brim offered effective protection against the elements, making it a popular choice among those spending long periods exposed to the weather.
The modern design of the bucket hat, as we know it today, emerged in the 1960s, driven by the growing popularity of street culture and casual style. It quickly became a symbol of counterculture and the hippie movement before being adopted by a wide variety of subcultures and communities around the world.
Since then, the bucket hat has remained a staple of urban fashion, continuing to evolve and adapt to contemporary trends.
Selecting the Perfect Fabric
One of the most exciting aspects of making your own bucket hat is the freedom to choose the fabric that best suits your style and needs. When selecting fabric for your project, consider both aesthetics and functionality.
Lightweight and breathable fabrics such as cotton, linen, or twill are ideal for warmer months, while heavier fabrics like denim or wool offer extra protection against cold and wind.
Join our VIP list and receive exclusive free patterns. You’ll have daily access to the best designs, delivered straight to your device. Don’t miss this chance to get inspired and improve your projects with new and amazing patterns!
Additionally, don’t be afraid to explore interesting prints and textures to add a unique touch to your hat.
From floral and geometric patterns to fabrics printed with fun themes, the options are endless. Remember to consider the pattern size when choosing fabric, especially when working with large prints or directional patterns.
Building Your Own Bucket Hat: Free Pattern and Sewing Instructions
Now that you’ve selected the perfect fabric for your bucket hat, it’s time to start sewing! Follow this free pattern and step-by-step instructions to create a unique accessory that will complement your wardrobe.
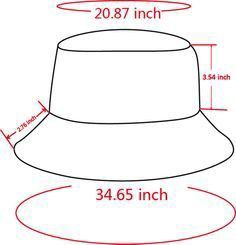
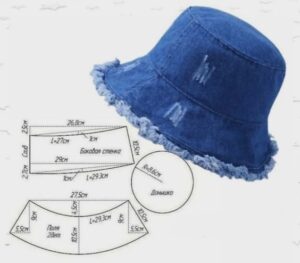
Free Pattern:

Sewing Instructions:
- Pattern Preparation: Start by printing the pattern and cutting out the pieces according to the provided instructions. Make sure to follow the size guidelines to ensure a proper fit.
- Fabric Cutting: Place the pattern on the chosen fabric and pin it in place to prevent slipping. Carefully cut around the pattern to create the hat pieces, including the top and bottom parts, the brim, and the finishing strip.
- Assembly of Pieces: Align the hat pieces carefully, pinning them together along the edges. Begin by attaching the brim to the top part of the hat, making sure the right sides of the fabric are facing each other.
- Sewing: Stitch the pieces together along the edges, leaving a seam allowance of about 1 cm. Reinforce the seams in high-stress areas, such as the junction between the brim and the top of the hat.
- Finishing: Join the finishing strip into a circle and attach it around the inner edge of the hat, aligning the raw edges. Fold the bottom edge of the strip inward, covering the raw edges of the fabric, and baste or pin it in place.
- Final Touch: Topstitch around the bottom edge of the hat to secure the finishing strip in place and give it a polished final touch. If desired, add decorative details such as a bow or a button to further personalize your hat.
-

Tips and Tricks for Customization
When creating your fabric bucket hat, don’t be afraid to let your creativity shine! Here are some tips and tricks for customizing your accessory and making it truly unique:
- Add a lining to the hat for added comfort and durability.
- Experiment with different types of decorative stitching, such as decorative stitch or hand embroidery, to add interesting details.
- Enhance your hat with accessories such as a leather pendant or a woven label with your name or logo.
- Explore contrasting fabrics for different parts of the hat, such as a fun print for the brim and a solid fabric for the top, for a visually dynamic look.
-

Making your own fabric bucket hat is a rewarding way to add a personal touch to your wardrobe and showcase your creative skills.
With the free pattern and sewing instructions provided in this guide, you’re ready to embark on a journey of creating unique and stylish fashion. So, grab your sewing machine, choose your fabric, and let your creativity soar as you bring your fabric bucket hat to life.


