If you’re searching for an adorable, quick, and rewarding crochet project, the Amigurumi crochet bee keychain is the perfect choice. This tiny buzzing bee is not only charming but also an ideal introduction to the world of Amigurumi. Whether you’re just starting out or want to use up some scrap yarn, this fun and functional keychain will leave you smiling.
The best part of creating a crochet bee keychain is how versatile and beginner-friendly it is. You only need basic crochet stitches, a small amount of yarn, and a little time to bring this cute character to life. Plus, it’s a great handmade gift for friends, kids, or anyone who loves bees and nature-inspired accessories.
In this post, you’ll learn how to make a buzz-worthy Amigurumi crochet bee keychain step-by-step. We’ll cover all materials, measurements, detailed instructions, and customization options. Whether you’re making one or a whole swarm, your new bee friend is sure to brighten someone’s day!
Materials, Measurements & Basic Instructions
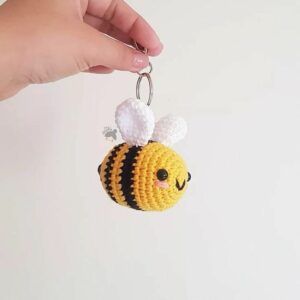
To begin your Amigurumi crochet bee keychain, gather your materials and review the basic structure. The bee consists of a simple round body, tiny wings, and embroidery for the eyes and smile. A metal keyring is added last to turn your creation into a functional accessory.
1. Yarn Choices
Use cotton or acrylic worsted weight yarn in the following colors:
-
Yellow for the bee’s body
-
Black for the stripes
-
White for the wings
These yarn types provide enough structure for a solid, durable Amigurumi keychain.
2. Crochet Hook Size
A 2.5 mm or 3.0 mm crochet hook is ideal for keeping the stitches tight, which helps maintain shape and keeps the stuffing from showing through.
3. Additional Materials
You’ll need polyester stuffing (fiberfill), a yarn needle, scissors, a metal keyring or lobster clasp, and optional black embroidery thread for facial features. Safety eyes (6 mm) can also be used if desired.
4. Finished Size
The finished crochet bee keychain should measure about 2.5 inches (6.5 cm) long and around 1.5 inches (4 cm) wide. This size is perfect for hanging on a bag, backpack, or set of keys.
5. Cutting Fabric or Felt (Optional)
For extra decoration or backing, you may cut two small heart-shaped wings from white felt (approx. 1 inch wide). This provides a flat finish and makes it easier to attach wings to the body if you don’t want to crochet them.
6. General Tips
Work in continuous rounds using a stitch marker to track the beginning of each round. Be sure to stuff your bee firmly but not so much that stitches stretch. This keeps the shape plump and neat.
Step-by-Step: Crochet the Bee Body
The bee’s body is created using basic Amigurumi stitches like single crochet (sc), increase (inc), and decrease (dec). You’ll alternate colors for stripes and shape the oval body with simple increases and decreases.
1. Starting with Yellow (Body Base)
-
R1: Start with a magic ring, 6 sc into ring (6)
-
R2: inc in each st (12)
-
R3: (sc, inc) x6 (18)
-
R4: (2 sc, inc) x6 (24)
This forms the rounded base of the bee’s body.
2. Forming the Middle Stripes
-
R5–6: sc around in yellow (24)
-
R7–8: switch to black yarn, sc around (24)
-
R9–10: switch back to yellow, sc around (24)
Continue alternating to create the classic bee stripes.
3. Begin Shaping the Top
-
R11: (2 sc, dec) x6 (18)
-
R12: (sc, dec) x6 (12)
-
R13: dec x6 (6)
Stuff the body firmly before closing with a slip stitch and weaving in the tail.
4. Optional: Add Facial Features
Use black embroidery thread or yarn to stitch a smile between R5 and R6. Add safety eyes between R6 and R7, spaced about 4–5 stitches apart.
5. Attaching Keyring
Use a jump ring or small chain to loop through the top of the bee’s body (centered) and attach it to your keyring or lobster clasp.
6. Embroidery or Felt Decorations
Add tiny embroidered blush cheeks with pink thread or use pink felt circles for a kawaii-style finish. You can also sew on tiny antennae with black thread.
Crochet Wings & Assemble the Bee
No Amigurumi crochet bee keychain is complete without its fluttery wings! These can be crocheted quickly and sewn on with a few stitches. The wings add personality and enhance the bee’s silhouette.
1. Crochet Wings (Make 2 – White Yarn)
-
R1: Magic ring, 6 sc into ring
-
R2: (sc, inc) x3 (9)
-
R3: sc around (9)
-
Fasten off, leaving a long tail
Flatten the wings and set aside.
2. Sewing the Wings
Position the wings slightly angled on each side of the bee’s back, about 2–3 rows from the top. Stitch securely using the yarn tails and a yarn needle.
3. Alternative: Felt Wings
Cut two white heart-shaped felt pieces (1″ each). Sew or glue them to the same position for a minimalist and flat look.
4. Placement Tips
Make sure the wings are symmetrical and don’t cover the bee’s face or keyring loop. Lightly pin them in place before stitching if needed.
5. Add Texture or Sparkle
Use a thin metallic thread to embroider wing veins or outline the edge for extra detail and shine. This is optional but adds visual interest.
6. Final Checks
Check all attachments for security. Tug gently to ensure nothing is loose, especially if this will be handled regularly on a bag or keyring.
Customizing Your Amigurumi Bee Keychain
Personalizing your Amigurumi crochet bee keychain can turn a simple pattern into a unique piece of art. Here are some easy ideas to make each bee different and special.
1. Color Variations
Try pastel versions like pink and white, or even rainbow-striped bees. Neon or glow-in-the-dark yarn makes fun keychains for kids or parties.
2. Add Accessories
Stitch a tiny bow, flower crown, or glasses onto your bee. Add initials with embroidery for a custom name tag.
3. Facial Expressions
Experiment with sleepy eyes, surprised eyebrows, or an open-mouth smile. Use black thread to embroider tiny expressions.
4. Seasonal Themes
Make a Christmas bee with red and green stripes, or a Valentine’s bee in red and pink. Add a heart-shaped felt patch on the back for charm.
5. Make a Bee Family
Create bees in various sizes—baby bees, big bees, or a queen bee with a crocheted crown. Display them together in a jar or on a string.
6. Gifting & Packaging
Place your finished bee in a mini gift box with crinkle paper or tuck it into a crocheted pouch. Add a handwritten note like, “Thanks for BEE-ing awesome!”
Conclusion – Sweeten Your Day with a Handmade Bee
The Amigurumi crochet bee keychain is a delightful project that buzzes with personality. Whether you’re new to crochet or just want a quick, satisfying project, this tiny bee brings instant joy. It’s small enough to make in one sitting but cute enough to melt hearts wherever it goes.
With just a few materials and a dash of creativity, you can bring this adorable bee to life. Follow the step-by-step pattern, personalize with colors and accessories, and you’ll have a perfect little gift or keepsake in no time.
So grab your hook, choose your yarn, and let this cheerful little bee fly off your hook and into your heart. This project proves that even the tiniest creations can make the biggest impact. Happy crocheting!


