If you’re looking for a relaxing yet rewarding Amigurumi project, this crochet amigurumi octopus pattern is the perfect choice. Whether you’re a beginner wanting to practice basic shapes or a seasoned crocheter looking for a cute gift idea, this small sea creature is both fun and functional. Plus, it makes for a perfect baby toy, desk companion, or even keychain!
One of the most appealing aspects of this amigurumi pattern is how forgiving and customizable it is. You can play around with different yarn colors, tentacle lengths, and facial expressions to make each octopus uniquely yours. And because the octopus is made from a simple sphere with eight identical tentacles, it’s easy to get into a rhythm once you get started.
In this blog post, we’ll walk through the entire crochet amigurumi octopus tutorial — from materials and yarn selection to sewing and finishing touches. All content is optimized for readability and ease of use, while also following Google AdSense policies to ensure family-friendly, informative, and engaging content.
Materials and Tools You’ll Need
To start crafting your amigurumi octopus, gather the following materials. Most of these supplies are standard for Amigurumi projects and can be found at your local craft store or online. Choosing the right materials ensures your finished octopus will be both soft and durable.
First, you’ll need worsted weight yarn or DK yarn in your choice of color for the body and contrasting yarn for the underside of the tentacles. Pastel colors work great for baby gifts, while bright shades give a fun and playful feel.
You’ll also need a crochet hook appropriate to your yarn. A 2.5mm or 3.0mm hook is typically ideal for Amigurumi, as it keeps stitches tight so the stuffing doesn’t show through. Use a stitch marker to keep track of your rounds and a yarn needle for sewing the tentacles to the body.
Additional essentials include polyester fiberfill for stuffing, black embroidery thread or safety eyes for the face, and scissors. If you’re making this for a small child or infant, be sure to embroider the eyes instead of using plastic safety eyes for safety reasons.
Here are the estimated fabric and yarn measurements for a medium-sized octopus:
-
Main color: 30–40 grams
-
Contrasting color: 10 grams
-
Stuffing: enough to lightly fill a 3–4 inch diameter sphere
Now that we have our supplies, let’s dive into the actual crafting steps of this cute amigurumi pattern.
How to Crochet the Octopus Body
The body of the octopus is formed as a round sphere using simple increases and decreases. This part is straightforward and excellent practice for mastering the basics of Amigurumi shaping.
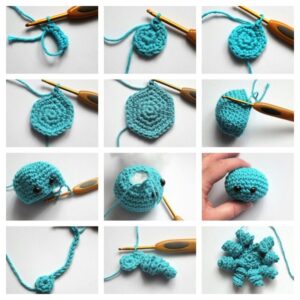
Start by making a magic ring and working in continuous rounds. This prevents visible seams and creates a polished final product. You’ll work single crochet stitches throughout, increasing gradually to form a rounded dome shape.
-
Round 1: Magic ring with 6 single crochets (sc)
-
Round 2: Increase in each stitch around (12 sc)
-
Round 3: (1 sc, inc) repeat around (18 sc)
-
Round 4: (2 sc, inc) repeat around (24 sc)
-
Round 5–9: Continue increasing by adding 1 extra sc between increases until you reach 48 sc
Once you’ve reached the desired width, you’ll start working even rounds with no increases to give the octopus some height. For a medium-sized plush, 5 to 6 rounds of 48 sc will work perfectly.
To begin shaping the top, reverse your work with decreases:
-
(6 sc, dec) repeat around
-
(5 sc, dec) repeat
-
Continue decreasing until you’re left with a small hole
Before closing the hole completely, stuff the octopus with fiberfill. You’ll want it to be firm but still soft and squishy to the touch. Then, sew the final stitches closed tightly using your yarn needle.
The result is a soft, rounded shape that becomes the head and body of your crochet amigurumi octopus.
Creating and Attaching the Tentacles
The tentacles give your octopus its charm! For this amigurumi pattern, each tentacle is made separately and then sewn onto the body. You’ll be making eight tentacles, each with a cute little spiral.
Here’s how to make one tentacle:
-
Chain 30 (for longer tentacles, chain 35 or 40)
-
Turn, and make 2 single crochets into each chain
-
This creates a naturally curling spiral shape
-
Repeat this process 8 times to make 8 tentacles
-
For added flair, use a contrasting yarn color
-
Fasten off, leaving a long tail for sewing
Once all eight tentacles are complete, it’s time to attach them to the bottom of the body. Use pins to lay them out evenly before sewing to avoid bunching or uneven spacing.
Using your yarn needle and the long tails left from each tentacle, sew them securely to the bottom of the octopus in a circle. If you’re using contrasting yarn, try to align the colors to create a flower-like base.
Make sure each tentacle is well-secured, especially if this octopus will be played with by young children. Double-stitching adds durability and helps maintain the toy’s shape over time.
Adding the Face and Final Touches
Once your body and tentacles are securely assembled, it’s time to bring your crochet amigurumi octopus to life with facial details. This is where your creativity can really shine!
If using safety eyes, attach them before you stuff and close the body. If embroidering the eyes, wait until the end. Position the eyes evenly on the front, about 4 stitches apart. Use black thread or dark yarn to make small circles or smiling eyes.
-
For a friendly face, embroider a “U” shaped smile.
-
For a sleepy octopus, make two curved eyes using short dashes.
-
Add blush using pink yarn or fabric paint (optional).
-
Tiny felt hearts or stickers also make cute decorations.
-
Add a bow, tiny hat, or even glasses for extra charm.
-
Optional: Insert a small bell or rattle inside if gifting to a baby.
You can also personalize your octopus with initials or themed embellishments (like stars or shells). These make it perfect for gifting or selling at craft fairs or Etsy shops.
Your amigurumi pattern is complete! But let’s explore ways to use, gift, and customize your octopus even more.
Creative Uses and Variations
Now that you’ve finished your crochet amigurumi octopus, there are countless ways to use or personalize it. These plushies are popular for sensory toys, decor, and even therapy tools for babies and children.
-
Baby Gifts: Soft tentacles mimic the feel of an umbilical cord and can comfort newborns.
-
Keychains: Make a mini version using thinner yarn and smaller hooks.
-
Bags & Backpacks: Sew one onto a schoolbag for a playful companion.
-
Ocean-Themed Sets: Combine with other sea creatures for a full set.
-
Stress Toys: Squishy and adorable, they make excellent desk fidget toys.
-
Charity Projects: Donate finished octopuses to neonatal units (check local guidelines).
Want to make your octopus even more unique? Here are some fun variations:
-
Use variegated yarn for a rainbow effect.
-
Crochet tiny accessories, like a sailor’s hat or bowtie.
-
Add glow-in-the-dark yarn accents for fun nighttime charm.
-
Embroider a name tag or heart patch.
-
Mix textures: try using velvet or plush yarn.
This project grows with your creativity. Whether you make one or a dozen, your collection will never look the same twice.
Final Thoughts
The crochet amigurumi octopus is a perfect balance of ease and excitement, offering crafters of all levels the chance to enjoy a satisfying, soft, and huggable creation. This amigurumi pattern allows for personalization, creativity, and plenty of learning along the way.
By following the steps outlined in this tutorial, you’ve:
-
Created a seamless body with increases and decreases
-
Made eight adorable spiral tentacles
-
Assembled and finished your Amigurumi with personality
-
Explored variations and gift ideas for your final piece
Whether you’re making these for loved ones, local hospitals, or your own collection, the joy of crafting something cute and meaningful never gets old. ]
Happy crocheting — and may your octopuses be many, squishy, and full of smiles! 🐙🧶


