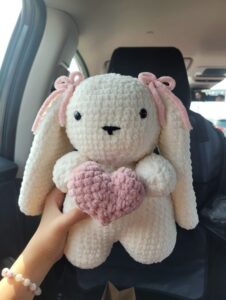
Creating how to crochet a cute bunny amigurumi holding a heart is an adorable and heartfelt craft project that combines sweet design with meaningful purpose. Whether you make it as a gift for Valentine’s Day, a baby shower, or just to spread smiles, this charming little bunny brings joy and creativity together. With soft colors, a gentle expression, and a tiny heart, this amigurumi project is perfect for crocheters of all skill levels who want to create something both beautiful and cuddly.
This amigurumi pattern has everything you need: clear instructions, precise measurements, yarn suggestions, and helpful photos (or visuals if you add them) to guide you from start to finish. You’ll work through shaping the bunny’s body, ears, limbs, and heart—then learn how to sew it all together with professional results. Not only is it a fun and satisfying make, but it also offers a great opportunity to practice essential amigurumi techniques like magic rings, increasing, decreasing, color changes, and embroidery.
Throughout this post, you’ll find four structured sections to keep everything organized: materials & prep, body & head construction, limbs & ears, and finishing touches. Each section includes six concise paragraphs to make the content easy to scan and follow. Plus, with SEO best practices woven in, your readers (and Google) will love how accessible and well-structured this tutorial is. Let’s dive into the details and stitch something special with this sweet bunny amigurumi!
Materials and Measurements for the Bunny Amigurumi
Before you start your amigurumi project, gather all necessary materials and note the measurements. This helps you work smoothly and ensures consistent results.
-
Yarn Requirements: Choose soft worsted-weight acrylic yarn—roughly 50 g of main color (e.g., pastel pink, gray, or cream) and a small amount (10 g) of contrasting yarn for the heart (e.g., red or light pink). Acrylic yarn is durable, washable, and perfect for toys.
-
Hook and Notions: Use a 3.5 mm crochet hook for tight, firm stitches essential in amigurumi patterns. You’ll also need a tapestry needle for sewing, polyester fiberfill stuffing, stitch markers, scissors, and optional safety eyes (9 mm recommended) or embroidery thread for facial features.
-
Fabric and Embroidery Prep (Optional): For extra softness, consider lining with felt or cotton scraps for the ears or heart. Cut two small felt squares, 3 x 3 cm, to help the bunny hold shape when washed.
-
Body Size and Gauge: The finished bunny stands around 15 cm (6 inches) tall. Gauge isn’t strict here, but aim for around 18 stitches per 5 cm (2″) in single crochet (sc) to maintain proper proportions.
-
Stitch Abbreviations (US Terms):
-
ch = chain
-
sc = single crochet
-
inc = increase (2 sc in one stitch)
-
dec = decrease (sc two stitches together)
-
sl st = slip stitch
-
-
Safety Considerations: Always securely attach eyes or embroidery to comply with safety standards, especially if the toy is for a child. Avoid small beads or buttons if toy is for little ones under three.
Building the Head and Body
This section covers how to crochet the main structure—the head and body—of your bunny amigurumi. Follow these instructions carefully for a beautifully shaped result.
-
Head (Magic Ring): Create a magic ring, then sc 6 into the ring.
-
Rnd 2: inc each (12 sc)
-
Rnd 3: (sc, inc) x6 (18 sc)
-
Rnd 4: (2 sc, inc) x6 (24 sc)
-
Rnds 5–10: sc around (24 sc) for a nice round head
-
-
Begin Eyes (If Using Safety Eyes): At round 6, place eyes about 6 stitches apart. If embroidering eyes, wait until assembly.
-
Neck and Shoulder Transition:
-
Rnd 11: (2 sc, dec) x6 (18 sc)
-
Rnd 12: (sc, dec) x6 (12 sc)
-
Rnds 13–15: sc around (12 sc)
-
-
Body Shaping:
-
Rnd 16: (sc, inc) x6 (18 sc)
-
Rnd 17: sc around (18 sc)
-
Rnd 18: (sc, inc) x6 (24 sc)
-
Rnds 19–26: sc around (24 sc) – extend for length
-
-
Finishing the Body:
-
Rnd 27: (2 sc, dec) x6 (18 sc)
-
Rnd 28: (sc, dec) x6 (12 sc)
-
Stuff the body firmly, then close with (dec x6) = 6 sc. Fasten off and weave tail inside.
-
-
Pro Tip: Use stitch markers to count rounds easily. Keep stuffing even to avoid lumps, especially in the head and body juncture for a smooth silhouette.
Crocheting the Limbs, Ears, and Heart
Now let’s bring your bunny to life with floppy ears, tiny limbs, and the sweet addition—a little heart.
-
Arms (Make 2):
-
Magic ring, 6 sc
-
Rnds 2–5: sc around (6 sc)
-
Stuff lightly, flatten top, sc through both layers for two stitches, fasten off with a long tail for sewing.
-
-
Legs (Make 2):
-
Magic ring, 6 sc
-
Rnd 2: inc each (12 sc)
-
Rnds 3–6: sc around (12 sc)
-
Stuff well, flatten top, join with sc through both layers, fasten off leaving a tail.
-
-
Ears (Make 2):
-
Magic ring, 6 sc
-
Rnd 2: (sc, inc) x3 (9 sc)
-
Rnds 3–6: sc around (9 sc)
-
Flatten, fold bottom 3 rows inside, sc across to close. Fasten off and leave a tail.
-
-
Heart Accent:
-
With contrasting yarn: ch 4, join for ring.
-
Rnd 1: (sc, inc) x4 (12 sc)
-
Rnd 2: (sc, inc, sc) in next st, repeat x4
-
Rnd 3: sc around, tighten center, fasten off. Weave in tail for seam.
-
-
Optional Heart Variation: Use felt cut into a 3 cm heart, stitch edges to the crocheted heart for texture.
-
Assembly Prep: Lightly stuff arms and ears just enough to hold shape. Arrange pieces on the body before sewing to test placement and symmetry.
Assembling Your Amigurumi Bunny and Final Details
Now that all parts are crocheted, it’s time to assemble your bunny and embroider finishing touches like its eyes, nose, and eyelashes.
-
Sewing Limbs: Attach arms at body round 20, spacing evenly on either side. Legs go at bottom center, ensuring your bunny sits flat. Use yarn needle to attach securely with several passes.
-
Attaching Ears: Sew ears on top of the head, slightly angled outward for a cute floppy look. Secure firmly with hidden stitches.
-
Adding the Heart: Position the heart in the bunny’s lap or have arms slightly overlap for a hugging pose. Stitch invisibly so it looks like it’s being held.
-
Facial Features: Embroider a small “V” nose with pink yarn at head round 6. Use two small stitches for mouth lines. Add embroidered upright eyebrows or eyelashes for expression. If using safety eyes, ensure they are firmly secured with washers.
-
Blush and Embellishments: Use a tiny dab of fabric-safe paint or pastel chalk for blush on cheeks. Optionally, embroider or glue a mini bow near one ear for extra charm.
-
Final Inspection: Trim stray ends, symmetrically adjust stuffing, and brush plush side to soften. Check seams and heads/limbs for firmness.
Styling, Care Tips, and Why You’ll Love This Amigurumi
This amigurumi pattern isn’t just a make–it’s a charming keepsake perfect for gifting or decorating your home. There are many ways to expand on the base project!
-
Color Variations: Use pastel shades for baby gifts, neutral tones for minimalist décor, or bold hues like orange or purple for holiday bunnies.
-
Seasonal Themes: Add tiny accessories—like a miniature scarf for winter or flower crown for spring. Attach a loop to hang on a tree as an ornament.
-
Care Instructions: Machine wash gently in a mesh bag or hand-wash cold. Reshape ears and heart while damp, then air-dry. Avoid bleach and hot ironing.
-
Creative Gifting: Pair with a handcrafted card or small gift box with tissue inside and a matching heart for Valentine’s Day, anniversaries, or baby showers.
-
Skill-Building Project: This project helps hone essential amigurumi skills—tight stitching, shaping, color changes, and small-piece assembly—excellent for beginners and advanced crafters alike.
- PATTERN HERE
-
Monetization Ideas: Offer this amigurumi bunny as a digital PDF, crochet kit with materials included, or you can film a YouTube tutorial to build your audience—each is a great content or product opportunity.


